background image

178

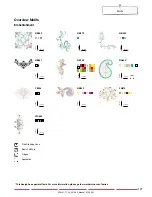
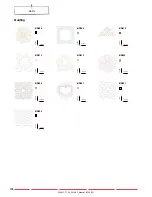
Motifs

Quilting

63.5mm

109.9mm

62.9mm

109.9mm

BD514

BD554

63.5mm

63.4mm

BD513

113.8mm

121.1mm

BD553

97.0mm

96.8mm

BD394

89.4mm

53.2mm

BD412

107.9mm

108.2mm

BD567

120.6mm

120.6mm

BD569

63.5mm

61.1mm

BD501

61.5mm

60.7mm

BD502

034247.71.04_2014-02_Manual_B750_EN

Summary of Contents for 750 QE

Page 1: ...BERNINA 750 QE...

Page 2: ...ands on technique and the ease of use but also considered the design of the product After all we sell our products to creative people like you who do not only appreciate high quality but also form and...

Page 3: ...r operate this sewing embroidery computer if it has a damaged cord or plug it is not working properly it has been dropped or damaged it has fallen into water Return the sewing embroidery computer to y...

Page 4: ...duct Servicing a double insulated product requires extreme care and knowledge of the system and should be done only by qualified service personnel Replacement parts for a double insulated product must...

Page 5: ...eset settings 27 Feed Dog lowered ready to sew 28 Feed Dog and Fabric Feed 28 Functions 30 Overview Function buttons sewing 30 Start Stop button 30 Presser foot position button 30 Automatic thread cut...

Page 6: ...joining seam 78 Height compensation of uneven layers 79 Sewing corners 79 Buttonholes 80 Overview Buttonholes 80 Important information 81 Marking the length of manual buttonholes 81 Marking the lengt...

Page 7: ...BSR Sewing Function by using the Start Stop button 106 BSR Function deactivation 106 BERNINA Dual Feed 107 Presser Feet Selection 107 Switching On BERNINA Dual Feed 107 Switching Off BERNINA Dual Fee...

Page 8: ...7 Notes Notes 034247 71 04_2014 02_Manual_B750_EN...

Page 9: ...ry Glossary BERNINA USB stick Mobile storage medium Balance Correcting abnormalities in stitch formation due to the fabric Fabric fold Folded edge of material BSR BERNINA Stitch Regulator Quilting wit...

Page 10: ...3 spool discs 8 4 bobbins one of them in the bobbin case 9 Height compensation tool 10 Selection of needles 11 Seam guide right 12 Seam ripper 13 Screwdriver Torx gray 14 Screwdriver red 15 Angular To...

Page 11: ...tern foot 3 No 3A Automatic buttonhole foot with slide 4 No 4D Zipper foot 5 No 5 Blindstitch foot 6 No 20C Open embroidery foot 7 No 37D Patchwork foot 8 No 42 BSR foot Visit www bernina com for more...

Page 12: ...ly buttonhole foot with slide no 3A can be stored in the left compartment 4 store the needle package in the special compartment 3 2 1 5 7 6 4 3 Bobbin ATTENTION Treat the bobbins with care Keep the wh...

Page 13: ...12 Overview sewing computer Overview sewing computer Front view Detail view 20 25 21 1 2 3 5 4 16 12 22 6 9 8 7 15 10 23 45 13 14 11 17 19 24 18 42 4 6 40 43 41 44 034247 71 04_2014 02_Manual_B750_EN...

Page 14: ...n 29 Vertical spool pin 30 Eyelet thread guide 31 Handwheel 32 Power switch On I Off 0 33 Power plug socket 34 Magnetic holder for touchscreen pen optional accessory 35 USB connection 36 PC connection...

Page 15: ...cularly colorfast polyester threads are more flexible and are recommended where a strong and elastic seam is required Rayon threads rayon threads are made of natural fibers and have a brilliant sheen...

Page 16: ...ead or too fine needle The thread rubs on the edges of the long groove and can get jammed This can cause thread breakage 130 705 H S 70 1 130 Shank length 2 705 Flat shank 3 H Needle scarf 4 S Needle...

Page 17: ...e 130 705 HO 100 120 Wide needle wing Hemstitching Jeans 130 705 H J 80 110 Very fine sharp point Heavy weight fabrics such as jeans canvas overalls Double wing needle 130 705 H ZWI HO 100 For special...

Page 18: ...17 Notes Notes 034247 71 04_2014 02_Manual_B750_EN...

Page 19: ...slide on table increases sewing surface Attaching the slide on table turn the handwheel see page 13 needle is raised press Presser foot up down button presser foot is lifted slide table to the right...

Page 20: ...ed the feed dog is lowered simultaneously The thread tension is released the feed dog is raised as soon as the first stitch is sewn The vertical spool pin is on the side behind the handwheel It is an...

Page 21: ...6 place thread on the vertical spool pin following the direction of the arrow take the thread through the thread guide 7 and place foam pad on the spool pin place thread on the spool pin attach appro...

Page 22: ...read cutter 5 to cut it close the cover Inserting the bobbin case hold the bobbin case with the thread guide 3 pointing upwards put the thread guide into the notch 4 of the hook race cover insert the...

Page 23: ...needle to the back insert the needle as far as it will go tighten needle clamp 1 using the gray screwdriver Changing the needle Appropriate spool disc Diameter of thread spool determines disc size The...

Page 24: ...ion disc 1 on the left side guide the thread to the needle as usual and thread the left needle manually Threads 5 must not be twisted together Two thread spools and one full bobbin are needed insert t...

Page 25: ...lease lever 1 and thread needle is threaded pull the thread to the back and put the thread under the foot and pull it from back to front over the thread cutter on left side of the head frame 4 cut Thr...

Page 26: ...orrespond to the distance between the needle and the line measurements are marked to the right and to the left of center needle position Removing the stitch plate press Feed dog button 5 the feed dog...

Page 27: ...lled to the back of the fabric Altering the upper thread tension touch i icon touch Upper thread tension icon the optimal stitch formation stitch formation in the fabric is visible the white bar withi...

Page 28: ...yellow framed icon the basic setting remains visible white When sewing thick material e g quilting turn stitch width or stitch length knob to the left the presser foot pressure decreases to minus The...

Page 29: ...ngth selected With an extremely short stitch length the steps are also very short The fabric moves away from the foot quite slowly even at full sewing speed e g buttonholes satin stitch and decorative...

Page 30: ...29 Notes Notes 034247 71 04_2014 02_Manual_B750_EN...

Page 31: ...ing in Quilters securing program No 1324 Automatic thread cutter button upper and lower threads are automatically cut 2 6 securing stitches can be programmed in the setup program These are sewn before...

Page 32: ...the right keep button pressed quick change total of 11 needle positions 5 left 5 right 1 center 0 Needle stop position up and Quick Reverse button If the Quick Reverse button is pressed while sewing o...

Page 33: ...ram 3 Tutorial 4 Creative consultant 5 Help 6 ECO 7 Clear settings Display Overview Main Display Menu Selection 8 Practical stitches 9 Decorative stitches 10 Alphabets 11 Buttonholes 12 Personal progr...

Page 34: ...8 Selection 14 Single and combi mode 15 Scroll up down Stitch Pattern selection 16 Stitch pattern selections Stitch Pattern Display 17 Display of the stitch pattern selected 18 Information 034247 71 0...

Page 35: ...ons Display Overview Sewing functions touch i icon Function display appears Information touch icon another Display is opened Back touch icon goes back to the previous Display all changes are saved Con...

Page 36: ...le position 0 Mirror image Left Right The sewing computer sews the stitch pattern mirrored left right referring to the sewing direction Personal memory permanent select a stitch pattern and alter e g...

Page 37: ...h the icon again Buttonhole length direct entry Enter the buttonhole length via the stitch width or stitch length knob Size in mm Manual buttonhole sew a manual buttonhole in 5 or 7 steps depending on...

Page 38: ...kage numbers in the needle icons indicate the needle distance in mm touch the Standard needle icon the standard needle is activated again stitch width limitation is deactivated Overview Stitch plates...

Page 39: ...a stitch combination after the number of repeats selected Altering pattern length move the round knob in the Display using the finger pattern length Standard 100 is infinitely variable extend shorten...

Page 40: ...vement of the needle the needle position is displayed in the yellow framed icon touch yellow framed icon moves the needle to the middle Position 0 Mirror image Left Right The sewing computer sews the...

Page 41: ...he left or to the right touching the arrow icons left right or using the finger keep arrow icon pressed quick movement of the needle the yellow framed icon shows the needle position touch yellow frame...

Page 42: ...con stitch width is limited automatically this prevents the inserted special needle from hitting the presser foot and the stitch plate no needle breakage numbers in the needle icons indicate the needl...

Page 43: ...ubdivided into several parts only those parts where the cursor is located will be sewn to sew another part the cursor must be placed into this part Combination subdivider 2 each combination can be int...

Page 44: ...ion Mirror image Left Right The sewing computer sews the whole combination mirrored left right referring to the sewing direction Combination repeat touch icon 1x number 1 appears the sewing computer s...

Page 45: ...are saved even when the sewing computer is switched off Exceptions from this rule are outlined within the description of the function concerned in each case touch Setup Program button Setup Program d...

Page 46: ...he brightness 3 of the sewing light changes alterations are visible in the yellow framed icon a white line indicates the basic setting Welcome text create or change Welcome Text 4 The space button is...

Page 47: ...move the round knob in the Display to the left right using the finger or turn the stitch length knob alters the basic setting of the upper thread tension 2 at plus or minus two basic values 0 0 basic...

Page 48: ...he upper and lower thread are automatically cut after sewing Raising the presser foot if function 6 is activated the presser foot is raised after securing if function is not activated the presser foot...

Page 49: ...be taken up either manually handwheel or by back heel kicking the foot control The threads must be held when starting to embroider touch icon 4 to calibrate the hoop Calibrating the hoop The hoop cal...

Page 50: ...alibration is saved touch Display calibration icon Altering the acoustic signals By touching 1 the signals are activated or deactivated Selecting Stitch Pattern Function BSR Stitch patterns and functi...

Page 51: ...ing speed icon It is recommended to save the data and the settings of the sewing computer before the update is carried out touch icon 1 the data of the sewing computer is saved on the USB Stick touch...

Page 52: ...ing computer touch Calibration icon clean the thread catcher according to the instructions touch Cleaning icon 1 Calibrating Buttonhole foot No 3A 2 Cleaning the thread catcher 3 Packing position touc...

Page 53: ...icon selection menu appears Exceptions Thread tension brilliance brightness display color and speed need to be reset to basic state knowingly according to the corresponding function Delete user data...

Page 54: ...tches and the number of stitches sewn since the last servicing by the dealer are displayed touch icon touch icon 7 8 Choose from following options 6 Sewing Personal program 7 Embroidery My Designs 8 E...

Page 55: ...to the BERNINA dealer insert memory stick to sewing embroidery computer touch LOG icon data is saved on the memory stick remove memory stick Dealer details touch respective icon Following details of...

Page 56: ...sser foot touch Tutorial button Tutorial display appears 1 Threading 2 Needles 3 Presser foot 4 BSR 5 Sewing techniques 6 Quilting 7 Buttonholes 8 Embroidery 9 Free Hand System FHS 10 Miscellaneous 11...

Page 57: ...topic is shown scroll through the topics using the knobs or the finger touch Next the next page appears touch Back the previous page appears touch the Tutorial display closes the previous Display appe...

Page 58: ...7 Heavy weight knit 8 Fur 9 Toweling 10 Fabric with a pile 11 Leather and Vinyl 12 Tulle and Laces touch icon of the desired material e g light weight woven The optional sewing techniques are display...

Page 59: ...pattern name suitable materials recommendation Help program The Help program provides information about individual stitch patterns and function icons in the Display Functions The Display shows the fol...

Page 60: ...e so that the stitch formation can be adjusted where necessary to suit the material Corrections The stitch sewn on the fabric e g the Honeycomb stitch opens up and it does not look correct adjust the...

Page 61: ...cts as a child safety feature The Display is inactive and the sewing embroidery computer cannot be started Deactivating eco touch eco button the sewing embroidery computer is ready for use eco descrip...

Page 62: ...61 Notes Notes 034247 71 04_2014 02_Manual_B750_EN...

Page 63: ...Blind hems shell edging effect on soft jerseys and fine material decorative seams Double overlock For any knit materials overlock seam sewing and finishing in one step Super stretch stitch For highly...

Page 64: ...ve stitch patterns in a combination Reinforced darning program Automatic darning of firm materials Universal stitch For firm fabrics such as felt and leather flat joining seams visible seams attaching...

Page 65: ...g stitch pattern select the desired main category 1 5 By stitch number touch 0 9 button numbers for entering are visible in the Display portion 10 enter stitch number the entered stitch number appears...

Page 66: ...altered zig zag again your alterations are still active Return to basic settings Individual stitch patterns can be reverted to basic settings manually touch stitch width stitch length icon and in the...

Page 67: ...memX icon touch Back icon the basic setting is reset Personal memory permanent The basic settings programmed by BERNINA can be altered and saved and remain active even when the sewing computer is swit...

Page 68: ...al 5 left 5 right 1 center 0 turn the knobs or touch stitch width or stitch length Display touch the arrow icons in the respective Display or move the round knob in the Display using the finger Can be...

Page 69: ...tch length approximately 3 4mm with denim a shorter length with fine fabirc approx 2 2 5mm Adjust the stitch length to suit the thread E g use a longer stitch length thread when using cordonnet thread...

Page 70: ...erse pattern foot No 1C 1D Triple zig zag No 7 In firm materials particularly for denim deckchair covers awnings Seams on often washed items Finish raw edges first Use Jeans needle for very firm mater...

Page 71: ...the presser foot turn sewing project again sew the second side from bottom to top Variation Sew both sides of zipper from bottom to top Suitable for all fabrics with nap or grain e g velvet prepare z...

Page 72: ...on bottom Avoid points as this can cause holes and thread breakage sew different length The thread is better spread over the fabric Poor stitch formation if the thread is lying on top slow down the f...

Page 73: ...t No 1C Start sewing top left sew first row stop sewing computer press Quick reverse button the length is programmed finish sewing the darning program the sewing computer stops automatically press the...

Page 74: ...ole worn or damaged area Reposition the work under the foot to continue covering the worn or damaged area Begin sewing the program will repeat as often as desired the length is saved Per Direct entry...

Page 75: ...d seam Double overlock seam in loose knits and cross seams in knits and jerseys Double overlock Knits and jersey use a new Jersey needle to prevent damaging the loops if necessary loosen presser foot...

Page 76: ...sen the screw on the back of the presser foot insert the seam guide into the hole of the presser foot adjust width as desired tighten the screw guide the folded edge along the seam guide To sew parall...

Page 77: ...For visible elastic hems in jersey cotton synthetic and mixed fibers Preparation iron the hem baste if necessary reduce the presser foot pressure if necessary Sewing sew the hem at preferred depth on...

Page 78: ...ches forward the sewing computer stops automatically at the end of the securing program Securing program Reverse pattern foot No 1C 1D Basting stitch No 21 straight stitch sews out every fourth stitch...

Page 79: ...al for fluffy or thick materials such as terry cloth felt and leather etc Sewing overlap fabric edges sew along the fabric edge the needle should sew over the edge of the top layer on the right side v...

Page 80: ...ce one or more plates under the foot close to the needle Sew until the foot is level again and remove the plates Height compensation of uneven layers Sewing corners Needle stop down Needle stop down W...

Page 81: ...sure wear Straight stitch buttonhole Program for staystitching buttonholes for pocket openings reinforcing buttonholes especially for buttonholes in leather and imitation leather Heirloom buttonhole F...

Page 82: ...o be used for the project select the buttonhole type you intend to use sew the buttonhole in the same direction on the fabric horizontal or vertical with or against the grain cut the buttonhole open p...

Page 83: ...durability and stability to the buttonhole choose the interfacing according to the material being used when using thick or fluffy materials an embroidery stabilizer can be used therefore the fabric fe...

Page 84: ...edle at the beginning of the buttonhole hook cord over the pin in the middle of the buttonhole foot at the front pull both cord ends under the buttonhole foot sole to the back and place both ends of t...

Page 85: ...ring the bead the keyhole or eye are automatically altered accordingly A B Balance for manual keyhole or round buttonhole Any balance alteration affects both beads differently Left bead too dense C tu...

Page 86: ...puter sews automatically 2 the straight stitches in reverse 3 the first bartack 4 the second bead forwards 5 the second bartack and securing stitches the sewing computer stops and returns automaticall...

Page 87: ...ectly from the diameter of the button 2mm are automatically entered for the button thickness hold the button on the bright field in the lower right corner of the Display adjust the bright field to the...

Page 88: ...tonhole all subsequent buttonholes will be sewn to exactly the same length no need to press the Quick reverse button the programmed buttonholes can be saved in the long term memory see page 90 press c...

Page 89: ...atically 2 straight stitches in reverse 3 the upper bartack 4 the second bead forward 5 the lower bartack and the securing stitches the sewing computer stops and returns automatically to buttonhole be...

Page 90: ...no need to press the Quick reverse button the programmed buttonholes can be saved in the long term memory see page 90 press clr button the programmed settings are cleared touch i icon touch REC icon B...

Page 91: ...1 the Save display appears touch Save icon the buttonhole is now saved in long term memory Selecting a saved buttonhole touch folder 2 select buttonhole touch Memory button touch Memory button Button...

Page 92: ...the length of the saved buttonhole touch Back icon twice reprogram the buttonhole as described Deleting a saved buttonhole touch Delete icon 1 the saved buttonholes appear select desired buttonhole co...

Page 93: ...length marking select step 3 sewing computer sews straight stitches in reverse stop sewing computer at the height of the first stitch buttonhole begin select step 4 the sewing computer sews top bartac...

Page 94: ...ton sew on program check distances between holes with the handwheel adjust stitch width if necessary hold the threads when starting to sew sew the first securing stitches into the left hole sew progra...

Page 95: ...oot and sew eyelet program sewing computer stops automatically and is at the beginning of the eyelet program again Punching eyelets use an awl punch pliers or a hole punch to open the eyelet touch But...

Page 96: ...tabilizer on the right side of pile or longfiber materials e g wool velvet etc which can be easily removed after sewing Depending on the type of material simple or more complex decorative stitches sho...

Page 97: ...g in general Sewing Cross stitches of Category 300 can be stitched and combined like any other decorative stitches Sewing Trims select cross stitch stitch a row using the seam guide or slide on table...

Page 98: ...e grooves of the selected pintuck foot the cord must be colorfast and shrinkproof Pintucks Inserting the cord remove the stitch plate of the sewing computer see page 25 open the bobbin door pull the c...

Page 99: ...ur project at uniform speed evenly under the needle follow the lines of the design Remove the stabilizer after you finish sewing Sew a sample first to check what the result looks like on the wrong sid...

Page 100: ...et stitch dual Quilt stitch Handlook quilt stitch variations 1346 1348 1350 Satin stitch Double blanket stitch dual Quilt stitches Overview Quilt stitches Various stitch patterns are available which a...

Page 101: ...thread tension one stitch is visible bobbin thread one stitch invisible monofilament hand look effect Upper thread tension Depending on the fabric increase the tension 6 9 Balance Adjust stitch with...

Page 102: ...terial if there are knots on the wrong side of the fabric move the material more quickly Monofilament breaks Reduce the motor speed and or loosen the upper thread tension Thread breaks Guide the fabri...

Page 103: ...ns continuously at a reduced motor speed as soon as the foot control or the Start Stop button is pressed the speed of the sewing computer is regulated by the movement of the fabric through continuous...

Page 104: ...periodically with soft slightly damp cloth Preparation lower the feed dog presser foot pressure may be reduced depending on the material type and thickness attach slide on table use the Free Hand Sys...

Page 105: ...ted sew 5 6 securing stitches touch Start Stop button the BSR mode is stopped cut threads touch Start Stop button BSR mode is activated continue the stitching process Securing function only Mode 2 pre...

Page 106: ...und for the beeper is inactive The loudspeaker is gray when the sound for the Beeper is active Selecting sound for BSR in the BSR display touch the icon with the loudspeaker the loudspeaker is highlig...

Page 107: ...sser foot press foot control while sewing the speed of the sewing computer is regulated by the movement of the fabric release the foot control the BSR mode is stopped 2 Option BSR Function via the Sta...

Page 108: ...own until it engages More D presser feet are listed in the enclosed accessories catalogue With the BERNINA Dual Feed the top and bottom layer of fabric are fed simultaneously the even feeding enables...

Page 109: ...cky Fabrics imitation leather coated fabrics Dual Feed presser foot with sliding sole Application Sewing all sewing techniques on difficult fabrics e g hems zippers Patchwork accurate stripes and bloc...

Page 110: ...ght fabrics more simple lettering types programmed with straight stitches are suitable such as double block letters Block Double Block Script and Quilt Text alphabet and Cyrillic can be sewn in two di...

Page 111: ...ursor up by using the arrow icons Activating desired place select or scroll to required letter in the Stitch altering area select new letter letter is inserted above cursor Deleting Letters A letter i...

Page 112: ...ivated touch the Upper Lower case icon again the upper case A is highlighted in black and jumps to the upper left corner of the icon upper case is activated again Change size touch i icon touch Letter...

Page 113: ...ouch Personal program button 1 touch Save icon 2 Preparing stitch patterns The following alterations can be saved Stitch width Stitch length Needle position Thread tension Mirror image Pattern extend...

Page 114: ...the same way Stitch pattern selection in the Personal program touch Personal program button touch Open icon 4 touch Save icon 3 the altered zig zag is saved the Display closes Personal display the pro...

Page 115: ...tch pattern touch Personal program button 1 select zig zag make alterations stitch width and stitch length are altered yellow numbers touch Personal program button touch Save icon select zig zag 2 con...

Page 116: ...Selecting stitch pattern touch Personal program button touch Delete icon 1 select the stitch pattern to be deleted confirm with stitch pattern is deleted the remaining stitch patterns are moved by on...

Page 117: ...oidery designs in the memory The memory is long term i e contents are kept until they are deleted A power cut or switching off the sewing embroidery computer does not have any effect on the stored con...

Page 118: ...re combination touch i icon touch Edit the complete combination icon touch the Delete icon confirm with the stitch altering area is empty touch Back icon a new pattern combination can be programmed to...

Page 119: ...be positioned above the first stitch pattern Altering stitch patterns select the desired stitch pattern in the combination touch i icon select desired function e g Mirror image left right the stitch...

Page 120: ...l sections with the Subdivider 1 function only the section where the cursor is positioned is sewn to sew the next section the cursor must be placed in the respective section Interrupting a combination...

Page 121: ...y button touch Save icon select the drawer to be overwritten e g 3 confirm with Touch to cancel the overwriting procedure Deleting touch Memory button touch the Delete icon select the Drawer to be del...

Page 122: ...broidery mode 134 Embroidery Alphabet 135 BERNINA motif 136 My Design 136 Embroidery motif from USB Stick optional accessory 137 Edit display 138 Overview Edit display 138 General Functions 138 Overvi...

Page 123: ...ot control 162 Completing the color 162 Changing color 162 Embroidery display 162 Thread breakage when embroidering 163 Upper or lower thread breaks 163 Embroidery sequence control when thread breaks...

Page 124: ...y hoop medium 100x130 mm 4 Embroidery template for medium embroidery hoop 5 Embroidery hoop small 72x50mm 6 Embroidery template for embroidery hoop small blue 7 USB connecting cable 8 Embroidery needl...

Page 125: ...ry arm 2 Sewing computer guide rails 3 Bracket for attaching embroidery hoop 4 Connection to the sewing computer 5 Connection for embroidery module Embroidery module Detail view 3 1 2 4 5 2 034247 71...

Page 126: ...n embroidery Reduce the speed and upper thread tension when embroidering with metallic threads Embroidery needle correct size thread must correspond with correct size needle replace the needle regular...

Page 127: ...stitch the embroidery motif on the same type material Use the same stabilizer as will be used on the finished project Changes colors stabilizer type or needle if needed to suite the motif fabric combi...

Page 128: ...for narrow and small shapes Satin stitching is however not suitable for larger areas since wide stitches are too loose and do not cover the fabric properly In addition there is the danger that with to...

Page 129: ...wo units must be placed on a stable surface or the motor speed reduced when embroidering Make sure that there is enough space around the sewing computer and embroidery module to allow the unimpeded mo...

Page 130: ...tion area The small needle hole supports the fabric This optimizes the stitching results remove the standard stitch plate see page 25 replace it with the straight CutWork stitch plate Threading upper...

Page 131: ...rea is marked in 1cm squares the center and end point are marked with holes for transferring marks to the material attach the embroidery template holder place the template in the inner hoop so the BER...

Page 132: ...rials Avoid using spray adhesive next to your embroidery system at a distance 1 of 25 30cm use adhesive spray carefully spray the stabilizer and adhere to the wrong side of the material carefully smoo...

Page 133: ...removed For lace embroidery place one or two layers of water soluble stabilizer in hoop as the motif is not embroidered on any material only the thread embroidered motif is left Embroidery motifs mus...

Page 134: ...ered on the fabric when start sewing press button again presser foot is lifted Automatic thread cutter button press button the upper and the lower thread are cut automatically Stitch width and stitch...

Page 135: ...lect embroidery motifs which are saved on the USB stick Alphabets To select built in alphabets Embroidery motifs To select built in embroidery motifs My Designs To select saved embroidery motifs press...

Page 136: ...lay Embroidery Alphabet touch Alphabet icon select desired alphabet 1 Swiss Block 2 Anniversary 3 Guinevere 4 Drifter Return to selection menu Back to the Selection display 1 2 3 4 034247 71 04_2014 0...

Page 137: ...d embroidery motif folder 1 Embellishment 2 Quilting 3 Borders and Lace 4 Children 5 Seasons 6 Sports and Hobbies 7 Animals 8 Flowers touch the desired motif touch Embroidery motif icon touch My Desig...

Page 138: ...137 Overview Display Embroidery motif from USB Stick optional accessory insert USB Stick touch USB Stick icon touch the desired motif 034247 71 04_2014 02_Manual_B750_EN...

Page 139: ...oving the view of the motif within the hoop The embroidery motif can be moved within the hoop to any direction using the finger directly in the Display Zoom plus touch icon 1 5x the displayed embroide...

Page 140: ...The motif is mirrored horizontally left right Altering the motif proportionally Displayed alteration in turn stitch width knob to the right the motif is enlarged turn stitch width knob to the left th...

Page 141: ...y motif when the function Virtual positioning is activated Move hoop to back the hoop moves vertically to the far back Better access for changing the bobbin Virtual Positioning Icon is inactive if the...

Page 142: ...141 Notes Notes 034247 71 04_2014 02_Manual_B750_EN...

Page 143: ...le and or Stitch plate icon if the Security icon is yellow framed the correct stitch plate is not attached or selected Presser foot indicator Embroidery foot No 26 is displayed by default touch the bu...

Page 144: ...y the motif is shown in the normal size In the right Display the motif is enlarged Edit In this Display the motif can be edited Cut jump stitches By default the function is active yellow frame Jump st...

Page 145: ...n is switched off Moving the hoop If the fabric has to be re hooped when stitching a large embroidery motif e g lettering borders etc the hoop has to be moved to the last stitch of the already embroid...

Page 146: ...if 3 Deleting motif New Motif the overview of the previous Display is opened Alphabet Motifs My Designs select the desired motif Saving Motif the Save display is opened Deleting Motif the Delete displ...

Page 147: ...146 Overview Display Changing the thread brand the Display showing different thread brands is opened press Color number button Overview Color Display 034247 71 04_2014 02_Manual_B750_EN...

Page 148: ...oes not help decrease the lettering size or reduce the number of letters Alphabets Entering Correcting lettering the Display showing the keyboard is opened the ABC icon upper case is active automatica...

Page 149: ...ew select the desired motif touching the icon or via 0 9 icon My Designs All BERNINA embroidery motifs can either be embroidered as is or changed using the various functions offered by the embroidery...

Page 150: ...f icon turn stitch width knob to the right the motif is enlarged turn stitch width knob to the left the motif is reduced the alteration is displayed in the icon in percent touch yellow framed icon the...

Page 151: ...vertically touch i icon Mirroring motifs center of motif 1 is shown in the the Display the hoop is moved until the needle is exactly in the center of the motif touch Motif center icon again the first...

Page 152: ...attach the respective hoop The Motif center icon must be deactivated in order to utilize Absolute check check the motif within the hoop by using a blunt pen select any point in the motif by using a bl...

Page 153: ...1 5x Zoom touch Zoom icon 1 5x the enlarged view of the motif is scaled down by one step Icon inactive the position of the motif can be moved to any position within the hoop directly in the Display b...

Page 154: ...new thread details appear touch Back icon the altered thread details are displayed Motif colors touch Thread color icon scroll with the arrow icons until the desired color appears select the desired c...

Page 155: ...touch the Select hoop icon touch Basting icon The embroidery motif is outlined with a straight basting stitch This serves as an additional anchoring of the project so that the fabric and stabilizer ar...

Page 156: ...e regarded as new motifs when they are recalled That is why all percentages say 100 and the former alteration can no longer be seen Embroidery computer memory select desired motif alter if desired The...

Page 157: ...capacity free capacity is shown in percentage in the green bar select the motif to be saved the motif is saved on the stick Empty USB sticks are available as optional accessory at the BERNINA dealer...

Page 158: ...select desired motif insert BERNINA USB Stick press Selection button touch Save icon The motif to be saved is displayed in a yellow frame touch Embroidery computer icon or USB Stick icon select the m...

Page 159: ...USB stick icon or touch Embroidery computer icon or touch My Design icon touch Delete icon 1 select the motif to be deleted confirm with the motif is deleted Cancelling deleting touch the deleting is...

Page 160: ...ng deleting touch the deleting is cancelled the previous screen appears When embroidering there are two options to choose from 1 My Designs 2 USB stick the stick must be inserted touch the button of w...

Page 161: ...sition the center points of the hoop small attachment clamps over the bracket of the embroidery arm press down until it clicks in position release the attaching mechanism of the hoop Removing the hoop...

Page 162: ...embroidering Interrupting the process press Start Stop button on the headframe the embroidery computer stops Completing the color press Start Stop button on the headframe the embroidery computer embr...

Page 163: ...h the foot control release the foot control the sewing computer stops Completing the color press the foot control the embroidery computer embroiders all the sections in the color activated the embroid...

Page 164: ...the right portion enlarged This makes it easier to check the embroidery sequence the message to operate the stitch width and stitch length knobs appears turn the knobs to the left or to the right the...

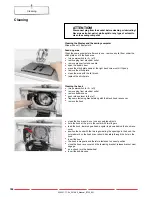
Page 165: ...clean the sewing computer clean the hook race do not use any pointed objects hold the hook at the pin in the center with two fingers lead the hook lower edge ahead angular top down behind the hook ra...

Page 166: ...ng with the black hook race cover remove the hook fill as much BERNINA oil into both oil depots so that the felts are damp insert the hook close hook race cover and fastening bracket release bracket m...

Page 167: ...ake up lever Upper thread breaks If the upper thread breaks and the thread is trapped in the area of the take up lever proceed as follows turn power switch to 0 off remove the screw 1 on the headframe...

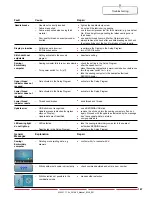
Page 168: ...f ECO function Stitch width not adjustable Setting activated in the security program deactivate setting Lower thread indicator reacts Thread used broken wind thread and thread Sewing Embroidery comput...

Page 169: ...t from the hook area bobbin case remove the hook and check the magnetic back of the hook for broken off needle parts attach embroidery hoop connect the embroidery module to the sewing computer check t...

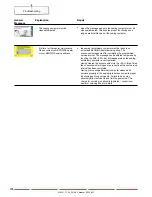
Page 170: ...on the USB stick During the update process personal data was not saved on the USB stick delete data from USB stick check that the USB stick is inserted correctly and re start the sewing computer the...

Page 171: ...ice interval The message can be deleted temporarily by touching the field ESC but will reappear when the sewing embroidery computer is next restarted Having cleared the announcement via the ESC three...

Page 172: ...171 Stitch patterns Overview Stitch patterns Practical stitches Buttonholes Decorative stitches Florals 034247 71 04_2014 02_Manual_B750_EN...

Page 173: ...172 Stitch patterns Cross stitches Satin stitches Ornamental stitches 034247 71 04_2014 02_Manual_B750_EN...

Page 174: ...173 Stitch patterns Heirloom stitches Novelty Stitches Quilt stitches 034247 71 04_2014 02_Manual_B750_EN...

Page 175: ...174 Stitch patterns Alphabets Block Double Block 034247 71 04_2014 02_Manual_B750_EN...

Page 176: ...175 Stitch patterns Script Quilting Text 034247 71 04_2014 02_Manual_B750_EN...

Page 177: ...176 Stitch patterns Hiragana Cyrillic 034247 71 04_2014 02_Manual_B750_EN...

Page 178: ...ina com 7series 78 1mm 78 3mm NB403 122 1mm 105 1mm FQ870 121 4mm 176 8mm NB373 55 6mm 58 4mm NB442 123 4mm 67 6mm NB481 126 5mm 262 8mm NB749 75 6mm 103 7mm NA959 128 1mm 92 6mm FB106 59 3mm 35 1mm N...

Page 179: ...mm 62 9mm 109 9mm BD514 BD554 63 5mm 63 4mm BD513 113 8mm 121 1mm BD553 97 0mm 96 8mm BD394 89 4mm 53 2mm BD412 107 9mm 108 2mm BD567 120 6mm 120 6mm BD569 63 5mm 61 1mm BD501 61 5mm 60 7mm BD502 0342...

Page 180: ...m HG341 97 9mm 88 1mm NX957 121 7mm 121 6mm FB461 26 3mm 175 9mm NB520 50 0mm 158 6mm HG177 31 8mm 209 6mm CM473 132 8mm 29 2mm FB436 This design has special effects For more information please go to...

Page 181: ...ase go to www bernina com 7series 113 3mm 96 2mm NB193 120 6mm 113 0mm CM362 106 7mm 127 4mm CM193 71 5mm 71 8mm CM220 84 4mm 81 6mm CK970 89 1mm 85 7mm CK738 100 3mm 97 5mm CM376 119 0mm 167 1mm CM34...

Page 182: ...s Seasons 77 6mm 94 8mm FQ749 89 1mm 69 2mm HE919 122 1mm 121 8mm HG053 88 6mm 151 5mm HG319 87 4mm 86 9mm NB317 91 8mm 98 1mm HG460 45 8mm 96 0mm CM426 90 4mm 117 2mm CM287 034247 71 04_2014 02_Manua...

Page 183: ...rts and Hobbies 97 5mm 57 0mm LT870 88 4mm 53 4mm RC244 101 6mm 82 5mm SP989 87 5mm 96 9mm SR067 63 3mm 63 5mm SP980 95 2mm 66 5mm SR589 101 1mm 89 5mm FB148 120 3mm 38 0mm SR551 034247 71 04_2014 02_...

Page 184: ...Animals 118 0mm 198 3mm FQ617 127 3mm 111 1mm WS610 56 5mm 66 7mm CM142 64 5mm 144 2mm FQ624 100 4mm 111 0mm WP224 98 9mm 81 0mm WP192 93 2mm 98 0mm LJ599 77 9mm 94 0mm WP325 034247 71 04_2014 02_Manu...

Page 185: ...s Flowers 86 8mm 293 2mm FB492 46 0mm 112 5mm FQ801 90 0mm 89 9mm NB209 80 0mm 90 6mm FQ722 66 5mm 66 5mm FQ733 88 0mm 84 4mm FP814 65 6mm 61 8mm FP246 90 3mm 156 3mm FQ562 034247 71 04_2014 02_Manual...

Page 186: ...185 Alphabets Alphabets Anniversary Drifter Swiss Block Guinevere 034247 71 04_2014 02_Manual_B750_EN...

Page 187: ...ing stitch length 67 Altering stitch width 67 Altering winding speed 44 50 Attaching BSR presser foot sole 103 Embroidery hoop 124 160 Embroidery module 128 Presser foot 24 Presser foot lifter 19 Slid...

Page 188: ...se 21 Needle 22 Presser foot 24 Stitch plate 25 Cleaning Display and Sewing Computer 164 Feed dog area 164 Hook 164 Lubricating 165 Combi mode 116 120 Correcting stitch pattern combination 118 Creatin...

Page 189: ...image left right 139 Mirror image up down 139 Moving embroidery motif 139 Moving the view of the motif within the embroidery hoop 138 Overview 138 Rotating embroidery motif 139 Selection 138 Zoom minu...

Page 190: ...c feed 28 Lowering 28 129 Position 28 Ready to sew 28 Symbol 13 28 129 Finishing edges 73 Foam pad 9 Foot control Cable unwind wind 18 Connection 13 18 Plugging in 18 Raising and lowering the needle 1...

Page 191: ...d tension 35 G Glossary 8 Guidelines Material Thread Needle size 15 H Handwheel 13 Height compensation of uneven layers 79 Height compensation tool 9 79 81 Heirloom buttonhole 80 89 Help 58 Help progr...

Page 192: ...77 184 Embroidery menu 142 143 Embroidery mode 134 Function buttons 30 31 133 Functions alphabets 38 39 Functions buttonholes 36 37 Functions combi mode 40 43 Functions embroidery 138 140 Functions Se...

Page 193: ...quilt stitch 99 Overview 99 Patchwork stitch Straight stitch 99 Quilt stitch Straight stitch 99 Quilters securing program 99 Quiltstich Hand look stitch variations 99 Satin stitch 99 Stippling stitch...

Page 194: ...6 Automatic thread cutter 46 Automatic thread cutter and securing stitches 47 Presser foot in hover position 47 Presser foot position when needle stop position down 47 Sewing speed control 46 Sewing s...

Page 195: ...26 Embroidery motif 143 Upper thread 22 26 34 35 Thread needle and material 14 Threader 13 24 Threading Double Triple needle 23 Lower thread 21 129 Needle 13 24 Upper thread 22 129 Threading the doub...

Page 196: ...195 Notes Notes 034247 71 04_2014 02_Manual_B750_EN...

Page 197: ...tolz Susanne Ribi Graphics www sculpt ch Pictures Patrice Heilmann CH Winterthur Typesetting Layout Susanne Ribi Copyright 2012 BERNINA International AG CH Steckborn 2014 02 en 034247 51 04 034247 71...

Page 198: ...In partnership with...

Reviews: