background image

2

Choosing a 

BERNINA Sewing & Embroidery à la Carte

is a decision which

will have a positive impact on your sewing for 

years to come.

Customer satisfaction has been the driving force of our family company for over 

100 years and I intend to continue that tradition of delivering superb Swiss 

quality, future-orientated sewing technology and unrivaled customer service.

The new 

BERNINA family of creative sewing machines

gives you the unique

opportunity to select what you need to satisfy your sewing needs and

requirements.

As the name suggests, the “

artista

” range of computer sewing is pure artistry.

These machines provide unlimited scope for total sewing pleasure. They inspire

creativity and allow you to translate your ideas into practical sewing of the finest

quality. 

In addition, a wide range of sewing accessories, together with sewing publications

full of practical and creative ideas, add to the 

joy of sewing the BERNINA

way.

It gives me great pleasure to welcome you into the 

BERNINA

family.

Fritz Gegauf Ltd · BERNINA Sewing Machines · CH-8266 Steckborn/Switzerland

“Welcome to

the BERNINA

family!”

H.P. Ueltschi

BERNINA Sewing Machine

Company

®

I

bed_artista_180_engl_V3  7.10.2002  16:29 Uhr  Seite 2

Summary of Contents for Artista 180

Page 1: ...titching It may deflect the needle causing it to break 9 Turn power switch to 0 when making any adjust ments in the needle area such as threading or changing the needle threading the bobbin or changin...

Page 2: ...needs and requirements As the name suggests the artista range of computer sewing is pure artistry These machines provide unlimited scope for total sewing pleasure They inspire creativity and allow you...

Page 3: ...tional sewing Sideways motion stitches Outline Designs Balance Help TTC Thread tension Tutorial Creative Consultant smart function Setup program eco ecological function Special accessories Needles Thr...

Page 4: ...machine 4 Details of the machine Front view Back view 1 2 3 4 5 6 7 8 11 12 14 15 16 18 19 20 22 21 24 26 27 28 29 30 23 25 17 31 35 32 9 10 13 33 34 37 38 39 36 bed_artista_180_engl_V3 7 10 2002 16...

Page 5: ...button Needle stop up down Help button TTC Thread Tension Tutorial Creative Consultant button Stitch width knob Stitch length knob Needle position smart button setup button eco Ecology button FHS con...

Page 6: ...work in free arm mode Note make sure the bobbin door on the free arm is closed before removing the box To attach push the box to the right until it engages Standard accessories four bobbins selection...

Page 7: ...s switched on 0 the machine is switched off The sewing light is switched on and off within the Setup program Refer to the safety instructions FHS Free Hand System presser foot lifter Attaching the pre...

Page 8: ...clockwise into the slot Pull the thread to the left under the spring until it lies in the T shaped slit at the end of the spring Winding the bobbin Winding the bobbin turn power switch on place empty...

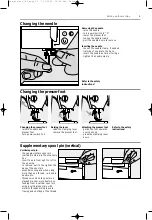
Page 9: ...le as far as it will go tighten the needle clamp Changing the needle Changing the presser foot Refer to the safety instructions Vertical spool pin the supplementary spool pin vertical is stored in the...

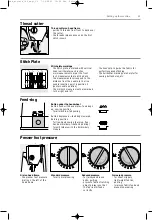
Page 10: ...ke the thread in front of the needle C pass the thread from the bottom to the top of the needle until it catches in the hook Let go of lever and thread let go of lever B and thread pull the thread loo...

Page 11: ...sewing position for all machine fed sewing Button depressed feed dogs lowered darning position for free hand sewing darning free hand embroidery freehand quilting for embroidery with the Embroidery M...

Page 12: ...12 Stitch Summary Practical stitches Buttonholes 9 mm 40 mm decorative stitches bed_artista_180_engl_V3 7 10 2002 16 29 Uhr Seite 12...

Page 13: ...13 Stitch Summary 16 directional sewing 4 directional sewing Alphabets Quilt stitches bed_artista_180_engl_V3 7 10 2002 16 29 Uhr Seite 13...

Page 14: ...14 Stitch Summary bed_artista_180_engl_V3 7 10 2002 16 29 Uhr Seite 14...

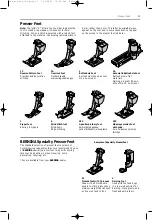
Page 15: ...r does not always appear on the foot and in some cases does not appear on the screen in the presser foot indicator 1C Reverse Pattern Foot Practical and decorative stitches 3 Buttonhole Foot Buttonhol...

Page 16: ...s of knit Sews and finishes the edges in one operation 11 Super stretch Open seam in all super stretch fabrics such as Lycra 12 Gathering stitch Most types of fabric Gathering with shirring elastic Bu...

Page 17: ...ium to heavy weight fabrics of all types Clothing jackets coats rainwear 55 Round buttonhole with horizontal bartack For medium to heavy weight fabrics of all types Clothes jackets coats rain wear 56...

Page 18: ...titch screen appears immediately after the welcome screen shows A presser foot indicator B needle stop position C assigned F function button D selected stitch and number E stitch width basic setting a...

Page 19: ...width bar automatically shows 0 5 when using non coded feet Altering the stitch width turn the upper knob altered length is shown on the stitch length bar the basic setting will still be visible show...

Page 20: ...dle stop reverts to up arrow points up Stitch selection Direct selection by scrolling up down touch the arrow down scroll the screen to view all stitches the top row disappears the next two rows move...

Page 21: ...screen Practical Stitches Buttonholes Decorative Stitches Quilt Directional Stitches Alphabets Embroidery Practical stitch button the practical stitch menu appears the straight stitch at the top left...

Page 22: ...n be saved quilt stitches 16 directions 4 directions saved customized menu Personal program can be opened at any time customized settings can be can celled at any time External function buttons clr Cl...

Page 23: ...end sews in reverse as long as button is depressed used to program buttonhole length used to program darning length used to switch to straight stitch securing program Stitch no 5 used to start stop s...

Page 24: ...which can be used in the selected program will appear on the screen in the bottom row If there are more than eight or four memory functions the remaining ones will be hidden and can be accessed by us...

Page 25: ...individual stitch quick selection for stitch combina tion in memory Scroll touch one or more times to view more functions Applications view all available functions combine functions with stitches for...

Page 26: ...lete functions Insert functions touch symbol insert functions The functions below are found in the Setup program of the artista sewing machine They are accessed by pressing the external Setup button o...

Page 27: ...ion touch symbol to access tension screen tension changes affect the selected stitch only visual change of setting on tension screen default setting shown by a fine line touch reset to return to basic...

Page 28: ...ddle field is activated 2 20 mm touch symbol again the right field is activated 3 15 mm Buttonhole program functions Buttonhole length direct length entry touch symbol to open number screen enter butt...

Page 29: ...ssages that pertain to the embroidery module and the appropriate responses MESSAGE RESPONSE Please check the lower thread Check to see if the bobbin thread has run out Wind and insert a new bobbin if...

Page 30: ...e sewn and programmed in a variety of ways 3A Programming the buttonhole press and release the quick reverse button auto appears in buttonhole symbol length is programmed machine sews straight stitch...

Page 31: ...y machine sews straight stitches forwards up to circle or eye machine sews 2nd bead backwards automatically machines sews bar tack auto matically machines sews securing stitches automatically machine...

Page 32: ...ed on the screen 3A Automatic buttonhole all types Direct entry length On screen display auto below the buttonhole symbol indicates that the buttonhole is programmed Enter the length numbers 1 0 appea...

Page 33: ...example refer to the artista 180 Sewing Manual page 27 Bartack 2nd bead the machine sews the end of the buttonhole and automatically switches to stitching the reverse bead Continue stitching the reve...

Page 34: ...e beads balance will influence the bead and the eye density balance affects both beads and the eye Buttonhole too wide to reduce the width of the buttonhole reduce the stitch width The following adjus...

Page 35: ...he length and touch OK to confirm touch store programming a new length over rides the existing stored one Manual 4 and 6 step buttonholes Open buttonhole screen select buttonhole touch the man functio...

Page 36: ...ewing the buttonhole touch 2 machine sews straight stitch backwards stop machine at the first stitch touch 3 machine sews the top bartack and stops automatically touch 4 machine sews the second bead i...

Page 37: ...tter and block place the fabric on a piece of wood position the cutter in the center of the buttonhole press the handle of the cutter to punch the buttonhole Seam ripper use the seam ripper to cut the...

Page 38: ...ymbol again the larger size is now active Screen Letter selection the presser foot indicator and needle stop symbol are in the usual positions scroll up and down to select letters and numbers Alphabet...

Page 39: ...mbers can be programmed saved and corrected in memory The memory has a capacity of 1023 stitches that can be divided into 255 memory segments or banks The memory banks are as large as requir ed depend...

Page 40: ...ng at the beginning of the combination use Pattern end to stop auto matically Toolbar function Pattern end will stop after the selected number of combinations have been stitched External button Single...

Page 41: ...ng the appropriate number and proceed as above Back to stitch screen touch esc the screen reverts to the stitch screen which includes the selected stitch the selected stitch is activated highlighted E...

Page 42: ...into position with the arrows for editing applications after viewing touch esc the window closes and the memory bar appears the cursor is in exactly the same place as it was in the view window View me...

Page 43: ...al mem button touch mem 1 on the functions toolbar Note if the machine has been turned off since the last time the memory feature was used mem 1 will show on the screen when the memory is activated If...

Page 44: ...sewing the complete grouping Note if the contents of the memory have been changed using the edit function page 42 the Pattern begin function must be selected to start the stitching at the beginning of...

Page 45: ...length can be shortened but not lengthened Sewing select direction and sew select new direction and continue to sew continue in this manner as desired Zig zag the stitch length is programmed to satin...

Page 46: ...ication The combination of straight stitch and the long stitch function is particularly useful for joining large motifs or letters see page 45 of the Sewing Manual The connecting stitches can be remov...

Page 47: ...hes are programmed in one size and cannot be altered Note Different types of fabric interfacings and tabilizers can affect the stitching of the motifs Adjustment can be made using the Balance function...

Page 48: ...the stitch beginning is marked with a circle the stitch ending is marked with a cross the presser foot direction is shown with fine lines the presser foot must be placed on the fabric in the given di...

Page 49: ...changes and return to the stitch screen touching reset will return the stitch to the same condition as when the balance function was opened before selecting a new stitch press the external clr button...

Page 50: ...fficient to correct the stitch horizontally max 20 steps sew a test and make additional corrections if needed Returning to stitch screen after all corrections are made touch OK to confirm the changes...

Page 51: ...further through to the top of the fabric the tension alteration affects only the selected stitch and does not remain saved when the machine is off Save and close touch OK to confirm the change and ret...

Page 52: ...the screen shows that the computer is searching for the desired information information about the subject of your choice appears on the screen touch esc to close the screen and return to the menu Sub...

Page 53: ...type of fabric and technique you have chosen Presser foot number s Needle size and type Feed dog position Thread tension Presser foot pressure Stabilizer needed Special suggestion the tension is set...

Page 54: ...the machine is turned off Application you have created and stored something in memory you have tested or completed some of the work you plan to finish at a later time Saving the screen with the Smart...

Page 55: ...Start screen Return to basic settings Sewing light Service Screen Contrast personal settings remain saved even when the machine is turned off the machine can be reset to its original settings or repro...

Page 56: ...type of sewing such as heirloom or garment or just your favorite decorative stitches this screen will make it easy and quick to sew any project When inserting stitches into the Per sonal program varia...

Page 57: ...the machine above the needle see page 59 60 Personal program function to open your personal program the Personal Program function must be inserted in the function toolbar see pages 59 60 Save and clos...

Page 58: ...he screen closes Setup menu appears Personal screen personal screen appears select stitch to be deleted will be highlighted Delete the stitch press the external clr button Setup menu press the externa...

Page 59: ...r functions in the same way Insert function a removed function can be reinstated at any time select Motor Speed in the upper rows touch the down arrow the function is moved to the first position in th...

Page 60: ...enu appears select stitch length stitch width needle position Setup Program Beeper Setup menu press the external Setup button menu appears touch Beeper beeper menu appears Save changes and close touch...

Page 61: ...d Deleting a signal select desired item from the menu touch off the audio signal is turned off for this feature Save and close touch OK changes are saved screen closes Setup screen appears Audio signa...

Page 62: ...creen closes the tension alteration affects all stitches and remains saved when the machine is turned off Setup menu press the external Setup button menu appears select Thread Tension thread tension s...

Page 63: ...is turned on followed automatically by the practical stitch menu Setup menu press the external Setup button menu appears touch Start Screen a message will appear switch off and on your machine the fac...

Page 64: ...m gives information about the version of software in the artista and lets you make calibration adjustments to the screen and hoop of the embroidery module special accessory Setup menu press the extern...

Page 65: ...al Setup button menu appears touch Service Calibrating the screen is important for making on screen selections by touch If the screen is not calibrated you may touch one selection and the machine will...

Page 66: ...eedle should be positioned exactly over the center point of the template if it is not adjust with the arrows it is only necessary to adjust the hoop once the same setting changes will apply to all the...

Page 67: ...the machine is locked and the foot control is inactive The machine will only sew after turning off the eco function pressing the button once returning it to the last active screen eco Function Leave...

Page 68: ...your sewing machine to suit your preferences and sewing requirements And you can do it as often as you want Ask your BERNINA dealer for further details Embroidery module optional accessory This comput...

Page 69: ...motifs in full color The module attaches to the free arm and is connected to the right side of the machine in the connecting socket provided it comes preprogrammed with 18 assorted motifs When selecte...

Page 70: ...st stitch on your screen to the finished motif on fabric Each design is uniquely yours You design your machine does the work The finished creations are transferred directly via a connecting cable 9 pi...

Page 71: ...e finer the needle the lower the number The table shows you which needle is suitable for which threads The needle size select must correspond to the thread size Needle and fabric Condition of needle T...

Page 72: ...point fibers 130 705H S Medium Special needle for delicate of ball point difficult stretch fabrics stretch Jeans needles 130 705H J Very fine point Overalls heavy linen denim can vas Pierces dense fab...

Page 73: ...ewing corners only a small section of the fabric is actually on the feed dog so that it cannot grip the fabric well The gap between the two rows of teeth is relatively large due to the width of the st...

Page 74: ...ver use oil alcohol or solvents of any kind on any part of the machine Lubricating squeeze 2 3 drops of oil into the hook race run the machine for a short time without thread to prevent oil soiling yo...

Page 75: ...the needle This must be polished by an authorized BERNINA service technician the needle is blunt or bent Skipped stitches wrong needles used use only 130 705H system the needle is blunt bent or incorr...

Page 76: ...hes stitches with outer contours which are not filled in pattern motif stitch PC Personal Computer PC Embroidery Software User friendly program designed especially for our customers PC program for use...

Page 77: ...7 28 balance 28 letter size 28 long stitch 27 mirror image 27 28 monogram size 28 motor speed 27 pattern extend 28 securing end of stitch 27 sub division 27 tension 27 Embroidery cards 69 70 Embroider...

Page 78: ...9 60 Functions programming 59 60 Functions in Setup 55 Motor speed 61 Needle position 60 Personal program 56 58 Return to basic settings 63 Leave Setup 67 Screen Calibration 65 Screen Contrast 67 Serv...

Page 79: ...Sewing Manual artista 180 naeh_artista_180_engl 7 10 2002 16 31 Uhr Seite 1...

Page 80: ...naeh_artista_180_engl 7 10 2002 16 31 Uhr Seite 2...

Page 81: ...ts Mending darning Decorative stitches Cross stitches Quilt stitches Decorative stitches combined with functions Practical and decorative stitches in memory 16 direction stitching 4 direction stitchin...

Page 82: ...reverse button and the machine sews in reverse release the button and the machine sews forward TIPS Adjust the stitch length to suit the fabric e g use a longer stitch length approximately 3mm 4mm wit...

Page 83: ...eam machine secures the seam automatically 4 stitches forward 4 stitches reverse machine continues straight stitching Ending the seam when coming to the end of the seam press and release the quick rev...

Page 84: ...de align the edge of the presser foot with the finished or folded edge of the fabric Stitch plate as a guide guide the folded edge along the markings on the stitch plate for stitching 1cm 3cm from the...

Page 85: ...ooth gentle rotation for a smooth transition of the stitch length Satin stitch short stitch length setting indicated by parallel lines filled in stitch used for applique cutwork embroidery and other d...

Page 86: ...o 4 altered settings remain active sew a line of the altered running stitch Return to basic settings Method 1 press the external clr button Method 2 alter the stitch width and length manually Method 3...

Page 87: ...s where the edges are overlapped and then sewn stitching is on the seam allowances Suggested stitch stretch overlock Application particularly good for terry cloth also good for beachwear leisure wear...

Page 88: ...bulky TIPS Knits and jersey use a new needle to prevent damaging the fabric fibers Sewing stretch fabrics if necessary use a stretch ball point needle 130 705H S needle point slides between the fibers...

Page 89: ...2A Closed seam stretchy seam in fine soft knits such as silk jersey and interlock Sewing guide the raw edge along the pin on the overlock foot the stitch will form over the pin and over the edge of t...

Page 90: ...y flat durable seam ideal for fluffy thick materials such as terry cloth felt and leather Sewing sew stretch overlock along the fabric edge the stitch should go over the edge of the top layer of fabri...

Page 91: ...rong visible seam for firm densely woven fabrics particularly good for denim and canvas TIPS Knits and jersey use a new needle to prevent damaging the loops of the knit fabric Sewing stretch fabrics i...

Page 92: ...am lies flat the machine must still feed the fabric properly Sewing knits TIPS Needle stop down needle stays in fabric when pivoting around curves neck edges and armholes Presser foot pressure reduce...

Page 93: ...No 2A Ribbing with overlock seam for all fine cotton synthetic and mixed fiber knits Preparation fold ribbing in half pin and baste to opening front edge to outside Sewing sew Vari overlock over the...

Page 94: ...r teeth position the foot so the needle stitches along the edge of the zipper teeth Zippers TIPS To sew around the zipper pull close the zipper and sew up to about 5 cm 2 away from the pull stop with...

Page 95: ...tion TIPS Decorative top stitching use cordonnet topstitching thread and a 100 110 needle with the straight stitch Basting long stitch can also be used to baste fine fabrics This function works with t...

Page 96: ...m up sewing position Reverse pattern foot No 1C Basting stitch for all work where a very long stitch is desired quick and easy basting of seams hems etc easy to remove Stitch Needle Thread Stitch leng...

Page 97: ...em and baste or pin in place fold the garment back over the right side of the fabric to expose the finished lower edge place the work under the presser foot see drawing with the guide positioned again...

Page 98: ...ng and end sew a few stitches with the feed dog lowered Presser foot pressure increase the foot pressure if necessary for better feeding of the fabric and cord Gathering stitch No 12 size and type to...

Page 99: ...r polyester up sewing position Reverse pattern foot No 1C Wide elastic for edges on sportswear and lingerie Preparation cut elastic to length required divide fabric edge and elastic into 4 equal secti...

Page 100: ...alls use for attaching ribbons to a quilt for tying Buttonhole bartack for reinforcing buttonhole bartacks Sewing the machine starts top left with the bartack program the machine stops automatically a...

Page 101: ...ng interfacing and stabilizers select the same buttonhole type sew the buttonhole in the same direction on the fabric with or against the grain Corrections To adjust the bead width alter the stitch wi...

Page 102: ...No 3C insert the needle at the beginning of the buttonhole raise the presser foot hook the cord over the center toe of the foot place both ends of the cord in the grooves on the sole of the foot and p...

Page 103: ...ner do not hold the cord the buttonhole will form over the cord covering it Securing the cord pull the cord through the buttonhole until the loop disappears into the end of it pull the ends of the cor...

Page 104: ...les Buttonhole foot no 3C will register the number of stitches in the buttonhole Sewing the stitch counter buttonhole program sew the first bead stop stitching at the desired length press and release...

Page 105: ...s will be sewn automatically to the same length without pressing the quick reverse button Important if you make a mistake press the Pattern Begin function the machine reverts to the beginning of the b...

Page 106: ...uttonhole machine stops in position to begin the next buttonhole reposition the fabric and sew all subsequent buttonholes will be sewn automatically to the same length without pressing the quick rever...

Page 107: ...ections reprogram the buttonhole if any alterations to the stitch width length or balance have been made Programmed buttonhole on a different fabric different fabrics and interfacings can affect the l...

Page 108: ...first selected Sewing a 4 or 6 step buttonhole touch 1 on the screen and sew the first bead stop the machine at the desired length touch 2 sew continue in this manner until the buttonhole is complete...

Page 109: ...sew sew machine stops automatically when program is completed machine is automatically ready for the next button Beginning and ending threads the threads are secured and can be trimmed For secure resu...

Page 110: ...finished machine is automatically ready for the next eyelet Punching eyelets use an awl or punch to cut open the eyelet Stitch Needle Thread Feed dog Presser foot Straight Stitch Eyelets Straight Sti...

Page 111: ...position Reverse pattern foot No 1C Elastic edges use on knit garments to re form out of shape edges Sewing guide double length of shirring elastic along the edge of the fabric stretching the elastic...

Page 112: ...inforcing edges good for work clothes table linen towels etc use a cord to match the color of the fabric Suitable cords perle yarn fine crochet yarn strong hand sewing thread gimp Sewing oversew edges...

Page 113: ...tomatically Corrections if the darning becomes distorted correct with the Balance function see page 50 51 Reinforced Darning Program No 23 replaces threads along the lengthwise and crosswise grains in...

Page 114: ...Complete darning loosely and in same direction as 2nd rows Method for tubular items first step in a horizontal direction second and third steps in lengthways direction When you have mastered the tech...

Page 115: ...idth turn the external stitch width knob to the right to widen the stitch turn the external stitch width knob to the left to narrow the stitch both the basic settings and the altered settings will be...

Page 116: ...tomatically in the center the machine stops with the needle down in the fabric even if the needle stop indicates up a curved arrow appears on the screen next to the needle stop indicator the arrow is...

Page 117: ...pattern foot No 1C or Walking foot No 50 optional accessory Hand look quilt stitch for all fabrics and all types of work where the look of a hand sewn running stitch is desired Sewing test the bobbin...

Page 118: ...wing position Reverse pattern foot No 1C Straight stitch No 326 a short straight stitch 2mm particularly suitable for piecing patchwork Quilt stitches suitable for all fabrics and quilting especially...

Page 119: ...ament down darning position Darning foot No 9 or Quilting foot No 29C Freehand quilting for all freehand quilt work Preparation pin and baste top layer batting and lining together attach the slide on...

Page 120: ...can achieve some exciting effects by combining basic settings with various functions Horizontal mirror image Vertical mirror image Pattern end 1 9 Half pattern Balance Long stitch function Double nee...

Page 121: ...ination of stitches has been programmed to save touch store Example of programmed stitch combination select a memory bank following the directions above touch stitch 407 one time touch stitch 102 one...

Page 122: ...n the previous page touch stitch 109 one time touch stitch 414 one time activate horizontal mirror image touch stitch 414 one time activate horizontal mirror image touch stitch 109 one time on the too...

Page 123: ...INA on the toolbar activate Pattern end 1 begin stitching the letters will continuously stitch automatically stopping after the A to save touch store for double length letters select Pattern the Exten...

Page 124: ...ag appear a compass is in the center of the screen a presser foot is in the center of the compass the points indicate the 16 directions one touch to right or left one step in the chosen direction cont...

Page 125: ...g Stitch length the length of the connecting stitches with the Long stitch function is 9 mm in all directions it cannot be altered Sewing select Straight Stitch select the desired direction on the com...

Page 126: ...xternal direction button touch the 4 direction symbol select the desired stitch align the edge of the presser foot with one edge of the patch and sew one side change direction with the right or left a...

Page 127: ...to the chosen fabric for additional information see pages 50 51 Sideways motion stitches and functions sideways motion stitches can be combined with all the functions which appear on the screen e g m...

Page 128: ...useful when sewing these stitches Sideways motion stitches on a single layer of fabric always use a stabilizer remove stabilizer after sewing External button press the external Decorative stitch butto...

Page 129: ...he selected letters e g F and G the sewing directions must correspond place the presser foot symbol of the 16 direction template on the end point of the first letter the sewing directions must corresp...

Page 130: ...foot stitches such as Honeycomb may therefore not close correctly this can be corrected with the balance function Balance for practical stitches the stitch as it should look e g Honeycomb is in the ce...

Page 131: ...ber of steps required depend heavily on the type of fabric test sew if more than 10 balance steps are necessary the stitch will automatically be made smaller Correcting horizontally horizontal balance...

Page 132: ...buttonholes 28 Manual darning 34 Memory letters and numbers 43 Memory practical and decorative stitches 41 43 Memory sideways motion stitches 49 N Numbers and letters in memory 43 O Outline designs 47...

Reviews: