background image

Summary of Contents for Bernette 20

Page 1: ......

Page 2: ...ropped into water Return the appliance to the nearest authorized dealer or service center for examination repair electrical or mechanical adjustment 6 Never operate the appliance with any air openings...

Page 3: ...acturing Do not dispose of electrical appliances as unsorted municipal waste use separate collection facilities Contact your local government for information regarding the collection systems available...

Page 4: ...ommercial use are not covered automatically even if they occur within the warranty period The decision on how to deal with any such cases rests with the local authorised servicing staff For technical...

Page 5: ...Information on the LED Display 25 Function Buttons 28 General Operating Principles 30 Needle Fabric Thread Selection Guide 21 Buttons Explanation model 25 Basic Sewing Procedures 35 Special Functions...

Page 6: ...e and accessory box 14 Top cover 15 Hole for second spool pin 16 Bobbin winder 17 Bobbin stopper 18 Bobbin winder pre tension 19 Pattern group selection button 20 Stitch length button 21 Stitch width...

Page 7: ...3 Cording foot M 24 Gathering foot 25 1 4 Quilting foot 26 Twin needle 27 Walking foot Edge quilting guide pool net Standard Optional to be purchased individually Machine Overview 6 5 E A 502020 73 08...

Page 8: ...Cording foot M 24 Gathering foot 25 1 4 Quilting foot 26 Twin needle 27 Walking foot pool net Accessories model 25 1 2 3 4 6 T I E A Standard 7 5 F 9 8 11 10 12 13 14 15 16 Optional to be purchased i...

Page 9: ...tion Always make sure that the machine is unplugged from power source and the main switch is on O when the machine is not in use and before inserting or removing parts Attention Consult a qualified el...

Page 10: ...e snap in sewing table horizontal and pull it in the direction of the arrow The inside of the snap in sewing table is used as an accessory box To open tilt the cover towards you Sewing Table Machine S...

Page 11: ...Press with your finger on the symbol and the top cover jumps up Touch with your finger at the outer rim of the stitch selector wheel and scroll forward backward Fold up the top cover To close the top...

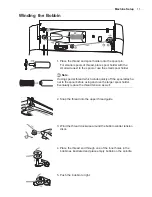
Page 12: ...thread clockwise around the bobbin winder tension discs 4 Place the thread end through one of the inner holes in the bobbin as illustrated and place empty bobbin on the spindle 5 Push the bobbin to ri...

Page 13: ...nd then remove the bobbin Note When the bobbin winder is placed on the right bobbin winding position the machine will not sew and the handwheel will not turn To start sewing push the bobbin winder spi...

Page 14: ...tly onto the bobbin while pulling As a check you must feel a resistance in the thread feed Pull the thread at the arrow markings into the stitch plate thread guide from B to C To cut off excess thread...

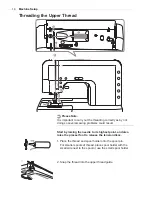
Page 15: ...sewing problems could result Start by raising the needle to its highest point and also raise the presser foot to release the tension discs Threading the Upper Thread Machine Setup 1 Place the thread a...

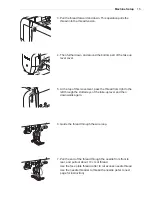
Page 16: ...ards again 3 Pull the thread forward and down This operation pulls the thread into the thread tension 7 Pull the end of the thread through the needle from front to rear and pull out about 10 cm of thr...

Page 17: ...lease the lever slowly The hook will turn and pass the thread through the needle eye forming a loop Pull the thread through the needle eye Raise the needle to its highest position and lower the presse...

Page 18: ...read Cutter Change the needle regularly especially if it is showing signs of wear and causing problems Insert the needle following the illustrated instructions A Loosen the needle clamp screw and tigh...

Page 19: ...umber Normal thread tension for zig zag and decorative sewing Normal thread tension for straight stitch sewing Reverse side Surface Upper thread Bobbin thread Thread Tension The presser foot pressure...

Page 20: ...Lower the presser foot holder b and the presser foot f will engage automatically Raise the presser foot Press the black lever e and the foot will disengages Attach the guide g in the slot as illustrat...

Page 21: ...he drop feed lever can be located on the back of the free arm To Raise or Drop the Feed Dogs Sliding the lever to the b will lower the feed dog for example during button sewing or freehand embroidery...

Page 22: ...x 1 130 705H 130PCL 705H LR LL Standard sharp needles Sizes range thin to large 9 65 to 18 110 Leather needles 12 80 to 18 110 Full ball point needle 9 65 to 18 110 Semi ball point needle scarfed 9 6...

Page 23: ...zippers Buttonhole sewing Overcasting Satin stitch sewing Darning Embroidery foot Darning Free embroidery Monogramming Button sewing Satin stitch foot A NEEDLE NEEDLE Button sewing foot Hemmer foot K...

Page 24: ...ION Inserting zippers Buttonhole sewing Overcasting Satin stitch sewing Darning Embroidery foot Darning Free embroidery Monogramming Button sewing Satin stitch foot A NEEDLE NEEDLE Button sewing foot...

Page 25: ...ection 8 Function 10 Reverse button Needle up down button Auto lock button Start stop button Slide speed button Stitch length button Stitch width button button model 25 button Memory button model 25 S...

Page 26: ...mal mode display model 25 1 2 4 5 6 7 8 9 10 11 12 Auto lock Reverse 3 Stitch number Stitch length Stitch width Auto stop on pattern end Pattern Mirrored function Twin needle function Alphabets group...

Page 27: ...structions Memory mode display model 25 1 Stitch number 3 Stitch length 4 Stitch width 5 Memory position display 6 Memory position 7 Memory insert function 8 Memory delete delete ALL function 2 Memory...

Page 28: ...titch length Stitch width mode Stitch width Needle stop down Machine running Pattern group 1 2 3 4 5 6 7 8 9 10 11 Note To display stitch length or stitch width press the corresponding button The symb...

Page 29: ...on once again or select another pattern Reverse button The machine will display the symbol indicates reverse sewing the pattern 01 05 and 24 can be The machine Reverse is pressed to sew in reverse Onl...

Page 30: ...it will stop in the opposite position either at the highest or the lowest position At the same time the needle stop position after sewing is permanently set When the needle stops down the needle down...

Page 31: ...well For special functions Alphabet switch from Memory Enter Mode to Memory Review Edit Mode Delete ALL there are special keystroke combinations Error Beep 3 short beeps Select stitch and sew There ar...

Page 32: ...habets 1 Double click the pattern group selection button to enter Alphabet selection 2 Press pattern group selection button once again to start the stitch number flashing 3 Use selector wheel to selec...

Page 33: ...0 4 5 1 0 3 0 1 0 3 0 1 0 3 0 1 0 3 0 1 5 3 0 1 0 3 0 1 0 3 0 0 3 1 0 0 3 1 0 1 0 3 0 0 3 1 0 0 3 1 0 0 3 1 0 T T T T T E F E T D T E A T T F T T T T E T A T A A A A A A Please Note The portion marke...

Page 34: ...5 5 3 0 7 0 2 5 5 5 2 5 5 5 5 5 7 0 5 5 7 0 3 0 7 0 5 0 6 0 7 0 0 5 0 5 0 5 0 5 0 5 0 5 1 0 2 5 1 0 1 0 2 0 2 5 2 0 3 0 0 5 0 5 2 5 2 0 2 0 2 0 2 0 0 5 0 5 0 5 0 5 0 5 0 5 0 5 1 5 0 3 1 0 0 3 1 0 0 3...

Page 35: ...7mm The user must line up the letters if a sequence of letters is sewn If a sequence of letters is stored in memory the machine will sew capital letters with a reduced height of 5 5mm This way all let...

Page 36: ...nning and at the end of a seam Press the reverse button and sew 4 5 stitches The machine will sew forward when the button is released Free arm Free arm sewing is convenient for sewing tubular areas su...

Page 37: ...g the presser foot This ensures even feeding at the beginning of a seam and helps when sewing multiple layers of fabric such as sewing over seams when hemming jeans When you reach the point of an incr...

Page 38: ...0 mm Adjusting the stitch length The density of zigzag stitches increase as the setting of stitch length approaches 0 3 Neat zigzag stitches are usually achieved at 1 0 2 5 Closed up zigzag stitches c...

Page 39: ...rics It is good for joining durable fabric such as denims These stitches can also be used as a decorative top stitch Triple zigzag stretch stitch is suitable for firm fabrics like denim poplin duck et...

Page 40: ...presser foot to the overcasting foot E Sew the fabric with the fabric edge against the guide of the overcasting foot The overcasting foot should be used to sew with patterns and 21 only and do not se...

Page 41: ...does not adjust the stitch width accordingly Adjust the guide b by turning the knob a so that the guide just rests against the fold Sew slowly guiding the fabric carefully along the edge of the guide...

Page 42: ...goes cleanly into the left and right holes of the button Before sewing press the Auto lock button to sew reinforcement stitches automatically at the beginning and at the end of the stitch If a shank...

Page 43: ...ct practice on a scrap piece of the same type of fabrics Select the buttonhole stitch Adjust the stitch width and the stitch length to the desired width and density 2 5 7 0 0 3 1 0 3 0 7 0 0 3 1 0 2 5...

Page 44: ...e buttonhole lever While lightly holding the end of upper thread and start sewing Please Note Gently feed the fabric by hand Before stopping the machine will automatically sew a reinforcement stitch a...

Page 45: ...vy thread or cord under the button hole foot Attach the buttonhole foot and hook the gimp thread onto the back of the presser foot Bring the two gimp thread ends to the front of the foot and insert th...

Page 46: ...e needle into the fabric at the beginning of the stitching and then lower the presser foot lever Once sewing is completed the machine automatically sews reinforcement stitches then stops Make a hole a...

Page 47: ...ther Select the needle position Lower the presser foot over the center of the tear 3 5 7 0 1 0 2 0 Darning Stitch The size of one darn cycle is variable However the maximum stitch length is 2 6cm 1 in...

Page 48: ...the upper thread down through the hole in the presser foot Pull down the buttonhole lever The buttonhole lever is positioned behind the bracket on the buttonhole foot Gently hold the end of the upper...

Page 49: ...left side of the presser foot pin to the presser foot holder when sewing the right side of the zipper Stitch left side of the zipper from top to bottom Stitch across the lower end and right side of zi...

Page 50: ...when sewing the left side of the zipper Attach the left side of the presser foot pin to the presser foot holder when sewing the right side of the zipper Stitch the left side of zipper from bottom to t...

Page 51: ...er coil stitch zipper until the foot hits the slider Remove the garment from the machine To attach the other half of the zipper place the fabric edge on the 5 8 inch marking line on the needle plate a...

Page 52: ...and raise the presser foot Insert the fabric fold into the spiral opening of hemmer foot Move fabric back and forth until the fold forms a scroll shape Lower the presser foot and start sewing slowly g...

Page 53: ...so that the stitches are just covering the cords Lower the foot and sew slowly guiding the cords Cording Single cording Mark the design on the fabric Insert the cord in the center groove of the cordin...

Page 54: ...feeding of the fabric To tailor the satin or decorative stitch pattern you may adjust the length and width of the pattern by pressing the stitch length and width adjustment buttons Experiment with fa...

Page 55: ...of the needle for accurate pivoting of corners Note Only the straight stitch in the center position can be used Using the edge quilting guide edge quilting Insert the in the presser foot holder as il...

Page 56: ...need to be determined by the thickness of your batting Patchwork stitching Place the two pieces of fabric with the right side together and sew with the straight stitch Open the seam allowance and pre...

Page 57: ...g the stitches Be careful not to cut the stitches A Scallop Stitch Separate the folded edges of the fabric pieces with a gap of 4mm 1 8 inch and baste them onto a piece of thin paper or water soluble...

Page 58: ...10 increments of the fabric trims or elastic This makes it easier to determine the adjustments and how much change is needed for your project Always test on your project fabric and on the same grainli...

Page 59: ...art across the area to be smocked Knot the threads along one edge Pull the bobbin threads and distribute the gathers evenly Secure the threads at the other end Reduce the tension if necessary and sew...

Page 60: ...work by 1 4 90 and sew over the first stitching moving the work slower over the hole to separate the threads and not form big gaps between the threads Darning 3 5 5 0 Free Motion Darning Embroidery a...

Page 61: ...moving the hoop faster and shorter stitches by moving the hoop more slowly Secure with a reinforcement stitches at the end by pressing the Auto lock button Select the zigzag stitch pattern and adjust...

Page 62: ...presser foot lifter to raise the presser foot bar Remove the presser foot holder by unscrewing counterclockwise the presser bar attaching screw Attach the Walking Foot to the machine as follows The ar...

Page 63: ...an be mirrored are shown in the picture on the left Use selector wheel to scroll to the mirror function Please Note When starting to scroll only the selected function will flash A Normal pattern sewin...

Page 64: ...hole on the top of the machine Thread through making certain to omit the thread guide above the needle and pass thread through the right needle the same path Thread each needle separately Make sure t...

Page 65: ...ion will flash The machine automatically reduces the maximum width for twin needle sewing Start to sew and two lines of stitching are sewn parallel to each other Please Note When sewing with twin need...

Page 66: ...be stored While the machine is sewing the memory patterns the reverse button can not be operated Please Note Memory model 25 Special Functions Memory Mode Mem Enter Mode Mem Review Edit Mode Note If...

Page 67: ...ge a stored stitch or its parameters Insert an additional stitch Delete a stored stitch Delete ALL See page 69 See page 72 See page 73 See page 75 See page 77 Switch to Mem Enter Mode Overview Memory...

Page 68: ...isp button The parameters of the selected stitch such as stitch length and stitch width mirroring and twin needle may be adjusted by pressing the corresponding button The stitch can be test sewn by pr...

Page 69: ...the memory Patterns and Alphabets can be stored in combination Double click pattern group selection button to open the Alphabet selection and repeat above mentioned steps Please Note 2ed memory posit...

Page 70: ...ode is active double click set disp button to enter the Memory Enter Mode Press the memory button to enter the Memory Review Edit Mode the screen shows the stitch of the 1st memory position Double cli...

Page 71: ...le sewing 1st memory position Special Functions Press the memory button to enter the Memory Mode the display shows the stitch of the 1st memory position Sew memorized pattern Switch from Memory Mode t...

Page 72: ...2nd memory position 1st memory position by mem position Please Note Press set disp button to change to mem position display During Memory Review Edit Mode the display can always be switched between me...

Page 73: ...osition Use selector wheel to select new value E g stitch 47 2nd memory position Before pressing set disp button The parameters of the selected stitch such as stitch length and stitch width mirroring...

Page 74: ...tions 1st memory position 73 Use selector wheel to select the stitch that you want to insert a new stitch before it Press the function button to open the function program Initially all the function sy...

Page 75: ...selected stitch such as stitch length and stitch width mirroring and twin needle may be adjusted by pressing the corresponding button Please note Example Stitches in Memory before inserting another on...

Page 76: ...emory position 2nd memory position 2nd memory position 2nd memory position Use selector wheel to select the stitch that you want to delete Press the function button to open the function program Initia...

Page 77: ...Edit Mode Example Stitches in Memory before deleting a stitch 25 26 35 27 01 30 48 01 02 03 04 05 06 07 Chose stitch no 26 which is on 2nd memory position Stitches in Memory after deleting stitch no 2...

Page 78: ...2 seconds until the machine beeps The memory is deleted and the machine switches into the Memory Enter Mode If any other button was pressed or if set disp button was pressed too short the machine retu...

Page 79: ...section right side of the machines are switched off while all 5 LED s on the head of the machine start flashing for 2 seconds Please look through the Trouble shooting guide on page 80 81 to blocked o...

Page 80: ...them with a soft dry cloth Replace the bobbin holder into the hook race so that the tip a fits to the stopper b Replace the stitch plate and the two screws Insert the bobbin Close the bobbin cover pla...

Page 81: ...rong 4 Thread tension is wrong 1 The needle is too thick for the fabric 2 The stitch length is adjusted wrong 3 The thread tension is too tight 1 Select a finer needle 2 Readjust the stitch length 3 L...

Page 82: ...nd remove the thread remnants The machine is noisy 1 Fluff have collected on the hook or needle bar 2 The needle is damaged 1 Clean the hook and feed dog as described 2 Replace the needle Uneven stitc...

Page 83: ...Appendix 82 Flowchart Normal Mode Standard Display after Startup Pattern or Parameter Selection Alphabet Selection mem Sew double click click Stitch Selection...

Page 84: ...ode mem completed sew mem from pos 01 Memory Review Edit Mode Test Sew Change Parameter Store pattern and show mem pos for 2 seconds Yes No Yes Review stitch by stitch Review by mem Pos Scroll to Pos...

Page 85: ......

Reviews: