background image

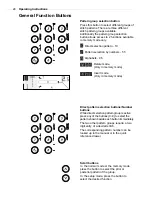
Direct pattern selection buttons/ Number
buttons

While direct selection pattern group is active
press any of the buttons (0~9) to select the
pattern shown beside each button immediately.
The two other pattern groups require a two
digit entry of a desired stitch.
The corresponding pattern number can be
looked up in the manual or in the quick
reference drawer.

Pattern group

Press this button to select different groups of
stitch patterns. There are three different
stitch pattern groups available.
Additionally the pattern group selection
button allows access to 2 functions available
in memory mode only.

Direct selection pattern - 10

Pattern selection by numbers - 55

Alphabets - 95

selection button

Delete mode.
(Only in memory mode)

Insert mode.
(Only in memory mode)

Scroll buttons

In the normal mode or the memory mode,
press the button to select the prior or
posterior pattern of the group.
In the setup mode, press the button to
select the desired function.

General Function Buttons

24

Operating Instructions

Summary of Contents for Bernette Rome 8

Page 1: ......

Page 2: ...r dropped into water Return the appliance to the nearest authorized dealer or service center for examination repair electrical or mechanical adjustment 6 Never operate the appliance with any air openi...

Page 3: ...acturing Do not dispose of electrical appliances as unsorted municipal waste use separate collection facilities Contact your local government for information regarding the collection systems available...

Page 4: ...cation Chart 21 Information on the LCD Screen 22 Buttons Explanation 23 General Function Buttons 24 Extra Function Buttons 26 Needle Fabric Thread Selection Guide 20 Basic Sewing Procedures 31 Special...

Page 5: ...Thread tension dial 14 Speed limiting slider 15 LCD screen 16 Stitch width adjustment and memory scroll buttons 17 Stitch length adjustment buttons 18 Enter parameter button 19 Memory button 20 Direct...

Page 6: ...pool holder Small 12 Bobbin 3x 13 Spool pin felt 14 Second spool pin 15 Pack of needles 5x 16 17 Brush Seam ripper 18 L screwdriver 19 Hemmer foot K 20 Cording foot M 21 Invisible Zipper foot 22 Gathe...

Page 7: ...stop the sewing machine Caution Always make sure that the machine is unplugged from power source and the main switch is on O when the machine is not in use and before inserting or removing parts Atten...

Page 8: ...ference shows you the recommended settings for the stitches including the appropriate presser foot to be used Further some basic operations are shown In addition there is a compartment for presser fee...

Page 9: ...next to the spool or use the small spool holder 2 Snap the thread into the upper thread guide 3 Wind the thread clockwise around the bobbin winder tension discs 4 Place the thread end through one of t...

Page 10: ...to start winding the bobbin 9 After the bobbin has wound a few turns stop the machine and cut the thread near the hole of the bobbin Continue filling the bobbin until it is full The motor stops automa...

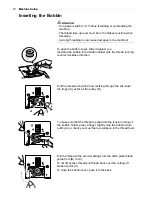
Page 11: ...ss a finger slightly onto the bobbin while pulling As a check you must feel a resistance in the thread feed Pull the thread at the arrow markings into the stitch plate thread guide from B to C To cut...

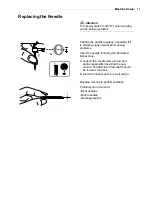
Page 12: ...the needle clamp screw and tighten again after inserting the new needle The flat side of the shaft should be towards the back B Insert the needle as far up as it will go Needles must be in perfect co...

Page 13: ...tart by raising the needle to its highest point and also raise the presser foot to release the tension discs 1 Lift up the spool pin until it is snaped in in the middle position Place the spool of thr...

Page 14: ...ards again 3 Pull the thread forward and down This operation pulls the thread into the thread tension 7 Pull the end of the thread through the needle from front to rear and pull out about 10 cm of thr...

Page 15: ...the lever slowly The hook will turn and pass the thread through the needle eye forming a loop Pull the thread through the needle eye Raise the needle to its highest position and lower the presser foo...

Page 16: ...to the back under the presser foot The face plate thread cutter serves two purposes 1 Cut the thread after threading the needle 2 Cut the thread after finishing a seam To cut the thread after complet...

Page 17: ...umber Normal thread tension for zig zag and decorative sewing Normal thread tension for straight stitch sewing Reverse side Surface Upper thread Bobbin thread Thread Tension Machine Setup The presser...

Page 18: ...Lower the presser foot holder b and the presser foot f will engage automatically Raise the presser foot Press the black lever e and the foot will disengages Attach the guide g in the slot as illustrat...

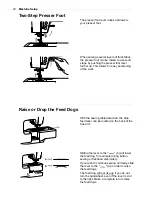
Page 19: ...d the drop feed lever can be located on the back of the free arm Raise or Drop the Feed Dogs Sliding the lever to the b will lower the feed dog for example during button sewing or freehand embroidery...

Page 20: ...The dial should usually be in a middle position Adjusting distorted stretch stitch patterns If the pattern are too open turn the dial clockwise If the pattern are too close turn the dial counterclock...

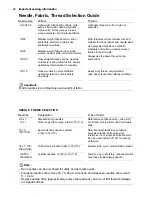
Page 21: ...ead carpet thread Use heavy foot pressurelarge numbers Match needle size to thread size and weight of fabric Important NEEDLE FABRIC SELECTION Needles Explanation Type of fabric 15 x 1 130 705H SUK HA...

Page 22: ...embroidery Monogramming Button sewing Satin stitch foot A NEEDLE NEEDLE Button sewing foot Hemmer foot K Narrow hemming Gathering Quilting and pacthwork sewing Cording foot M Presser Foot Application...

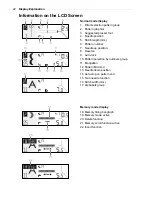
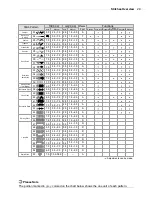
Page 23: ...ern end 15 Twin needle function 17 Alphabets group 3 Suggested presser foot Pattern number Needle up position Reverse Auto lock Pattern selection by numbers group Elongation Pattern Mirrored 13 Needle...

Page 24: ...button Auto lock button and single pattern Needle up down position button Start stop button Setup button Scroll buttons Stitch length adjustment buttons Memory button Direct pattern selection buttons...

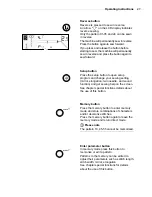
Page 25: ...different groups of stitch patterns There are three different stitch pattern groups available Additionally the pattern group selection button allows access to 2 functions available in memory mode onl...

Page 26: ...CD screen Pressing the button will move the needle to the left and pressing the button will move the needle to the right There are a total of 15 needle positions 7 left 7right and 1 center With patter...

Page 27: ...on so the arrow on the LCD points upward the needle moves to the highest position and will stop there after sewing Press the button so the arrow on the LCD points downwards the needle moves to the low...

Page 28: ...on twin needle and sound function and get sewing help on the screen See chapter special functions details about the use of this button Memory button Please note Press the memory button to enter memory...

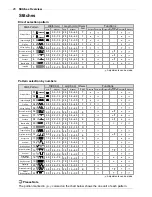
Page 29: ...1 0 3 0 1 5 3 0 T T T T T E F E T D T E A T T F T T T T E T Stitches Overview Stitches Functions Presser Foot Stitch Pattern Auto Manual Auto Manual Auto lock Elongation Mirror Presser foot Twin needl...

Page 30: ...0 1 0 3 0 0 3 1 0 0 3 1 0 1 0 3 0 0 3 1 0 0 3 1 0 0 3 1 0 0 3 1 0 0 3 1 0 0 3 1 0 0 3 1 0 0 3 1 0 0 3 1 0 1 0 3 0 1 5 4 5 1 0 3 0 1 0 3 0 1 0 3 0 1 5 3 0 2 0 3 0 2 5 4 5 1 0 2 0 1 0 2 0 0 3 1 0 0 3 1...

Page 31: ...m The user must line up the letters if a sequence of letters is sewn If a sequence of letters is stored in memory the machine will sew capital letters with a reduced height of 5 5mm This way all lette...

Page 32: ...nning and at the end of a seam Press the reverse button and sew 4 5 stitches The machine will sew forward when the button is released Free arm Free arm sewing is convenient for sewing tubular areas su...

Page 33: ...g the presser foot This ensures even feeding at the beginning of a seam and helps when sewing multiple layers of fabric such as sewing over seams when hemming jeans When you reach the point of an incr...

Page 34: ...of stitch length approaches 0 3 Neat zigzag stitches are usually achieved at 1 0 2 5 Closed up zigzag stitches close together are referred to as a satin stitch 4 5 3 0 2 0 1 0 0 5 7 0 5 0 3 0 1 0 0 0...

Page 35: ...rics It is good for joining durable fabric such as denims These stitches can also be used as a decorative top stitch Triple zigzag stretch stitch is suitable for firm fabrics like denim poplin duck et...

Page 36: ...presser foot to the overcasting foot E Sew the fabric with the fabric edge against the guide of the overcasting foot The overcasting foot should be used to sew with patterns and 21 only and do not se...

Page 37: ...does not adjust the stitch width accordingly Adjust the guide b by turning the knob a so that the guide just rests against the fold Sew slowly guiding the fabric carefully along the edge of the guide...

Page 38: ...oes cleanly into the left and right holes of the button Before sewing press the Auto lock button to sew reinforcement stitches automatically at the beginning and at the end of the stitch If a shank is...

Page 39: ...ct practice on a scrap piece of the same type of fabrics Starting point Select the buttonhole stitch Adjust the stitch width and the stitch length to the desired width and density 2 5 7 0 0 3 1 0 3 0...

Page 40: ...D screen will be demonstrated the figure it is to remind you to lower the buttonhole lever While lightly holding the end of upper thread and start sewing Please Note Gently feed the fabric by hand Bef...

Page 41: ...vy thread or cord under the button hole foot Attach the buttonhole foot and hook the gimp thread onto the back of the presser foot Bring the two gimp thread ends to the front of the foot and insert th...

Page 42: ...e needle into the fabric at the beginning of the stitching and then lower the presser foot lever Once sewing is completed the machine automatically sews reinforcement stitches then stops Make a hole a...

Page 43: ...ther Select the needle position Lower the presser foot over the center of the tear Start a b Stop Stop a Start b 3 5 7 0 1 0 2 0 Darning Stitch The size of one darn cycle is variable However the maxim...

Page 44: ...ttonhole lever The buttonhole lever is positioned behind the bracket on the buttonhole foot Gently hold the end of the upper thread in your left hand and then start sewing When you select any buttonho...

Page 45: ...e left side of the presser foot pin to the presser foot holder when sewing the right side of the zipper Stitch left side of the zipper from top to bottom Stitch across the lower end and right side of...

Page 46: ...when sewing the left side of the zipper Attach the left side of the presser foot pin to the presser foot holder when sewing the right side of the zipper Stitch the left side of zipper from bottom to t...

Page 47: ...over coil stitch zipper until the foot hits the slider Remove the garment from the machine To attach the other half of the zipper place the fabric edge on the 5 8 inch marking line on the needle plate...

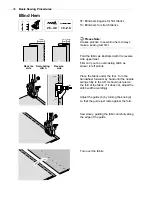
Page 48: ...s and raise the presser foot Insert the fabric fold into the spiral opening of hemmer foot Move fabric back and forth until the fold forms a scroll shape Lower the presser foot and start sewing slowly...

Page 49: ...so that the stitches are just covering the cords Lower the foot and sew slowly guiding the cords Cording Single cording Mark the design on the fabric Insert the cord in the center groove of the cordin...

Page 50: ...feeding of the fabric To tailor the satin or decorative stitch pattern you may adjust the length and width of the pattern by pressing the stitch length and width adjustment buttons Experiment with fa...

Page 51: ...oth behind the needle and in front of the needle for accurate pivoting of corners Note Only the straight stitch in the center position can be used 1 4 Using the edge quilting guide edge quilting Inser...

Page 52: ...ll need to be determined by the thickness of your batting Patchwork stitching Place the two pieces of fabric with the right side together and sew with the straight stitch Open the seam allowance and p...

Page 53: ...g the stitches Be careful not to cut the stitches A Scallop Stitch Separate the folded edges of the fabric pieces with a gap of 4mm 1 8 inch and baste them onto a piece of thin paper or water soluble...

Page 54: ...h 10 increments of the fabric trims or elastic This makes it easier to determine the adjustments and how much change is needed for your project Always test on your project fabric and on the same grain...

Page 55: ...art across the area to be smocked Knot the threads along one edge Pull the bobbin threads and distribute the gathers evenly Secure the threads at the other end Reduce the tension if necessary and sew...

Page 56: ...d continuous movement Turn the work by 1 4 90 and sew over the first stitching moving the work slower over the hole to separate the threads and not form big gaps between the threads Darning 3 5 5 0 Fr...

Page 57: ...moving the hoop faster and shorter stitches by moving the hoop more slowly Secure with a reinforcement stitches at the end by pressing the Auto lock button Select the zigzag stitch pattern and adjust...

Page 58: ...of plaids stripes and patterns It also helps to prevent uneven feeding of very difficult fabrics Lift the presser foot lifter to raise the presser foot bar Remove the presser foot holder by unscrewing...

Page 59: ...o mirror the pattern The LCD screen icon for mirror imaging of the pattern appears A Normal pattern sewing B Mirror pattern sewing Press the setup button again to leave setup program Please Note Mirro...

Page 60: ...on imaging of the pattern appears When the width or length or stitch is changed a greater variety of patterns are available Please Note Pattern 25 26 and 28 32 can be elongated and mirrored simultaneo...

Page 61: ...le Set the spool pin included with the accessories into the hole on the top of the machine Thread through remaining points making certain to omit the thread guide above the needle and pass thread thro...

Page 62: ...atically reduces the maximum width for twin needle sewing Press the setup button again to leave setup program Start to sew and two lines of stitching are sewn parallel to each other Please Note When s...

Page 63: ...ected topic It will automatically play the instruction recurring in 2 seconds he stitch length button To display the next screen by pressing the stitch length button or to return to the previous scree...

Page 64: ...s that the thread is twisted or jammed and the hand wheel axle cannot move Please look through the Trouble shooting guide on page 72 73 to find the solution After the problem has been solved the machi...

Page 65: ...ft If you press any button on the machine when the bobbin is full or the bobbin winder is in the right position then the machine will beep 3 times as a warning Return the bobbin winder spindle to the...

Page 66: ...roup among or on the LCD screen Press the desired pattern number or press scroll buttons to select stitch e g 14 t Before pressing the enter parameter button Please Note The parameters of the selected...

Page 67: ...e screen stays in a specific location the machine will start sewing from that pattern Please Note Press the memory button to leave the memory mode and return to the last selected pattern group Special...

Page 68: ...ion to be edited Twin needle sewing in memory mode Only regular sewing pattern can be sewn with twin needle function If any alphabet letter was stored the twin needle function will be disabled With th...

Page 69: ...t the insert function Press the to insert an empty space at this location All upper patterns will be moved one memory position forward i e If 2nd memory location is selected the original memorized pat...

Page 70: ...moved one memory position backward enter parameter button If you want to delete all patterns press the enter parameter button for 3 seconds The LCD screen will show Del ALL Use the stitch width adjust...

Page 71: ...abets and patterns mixture after pressing the DEL ALL to delete all the locations the display will be afresh in the utility group enter parameter button Press any key except for and memory button to q...

Page 72: ...them with a soft dry cloth Replace the bobbin holder into the hook race so that the tip a fits to the stopper b Replace the stitch plate and the two screws Insert the bobbin Close the bobbin cover pla...

Page 73: ...ong 4 Thread tension is wrong 1 The needle is too thick for the fabric 2 The stitch length is adjusted wrong 3 The thread tension is too tight 1 Select a finer needle 2 Readjust the stitch length 3 Lo...

Page 74: ...d remove the thread remnants The machine is noisy 1 Fluff have collected on the hook or needle bar 2 The needle is damaged 1 Clean the hook and feed dog as described 2 Replace the needle Uneven stitch...

Page 75: ...EN 0 2013 502020 84 27 021D1E0104 BERNINA International AG Steckborn CH www bernina com...

Reviews: