My
BERNINA
25
B E R N I N A O V E R L O C K E R W O R K B O O K
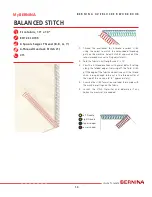
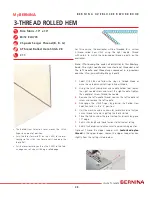
For this exercise, the overlocker will be threaded for a wide
3-thread flatlock stitch using the left needle and thread
colors to match the color-coded threading path on the
overlocker.
Note: If following the order of exercises in this
Mastery book, the right needle was removed in the
previous exercise so you will skip Step 2.
1.
Select Stitch #5 and follow the steps in Guided Mode
or make the noted manual settings in Expert Mode.
2.
Using the small screwdriver and needle holder tool,
insert the left needle and remove the right needle.
Tighten the needle set screw after inserting or
removing needles.
3.
Fold the fabric in half, wrong sides together, to 5” x 10”.
4.
Place the fold under the presser foot. Guide the fabric
halfway between the left needle and the right edge of
the stitch finger. This method allows the fabric to lay
totally flat under the stitches.
Optionally, you may choose to trim the folded edge
which will allow one fabric to lay on top of the other.
This is the preferred method if using the flatlock stitch
as a seam.
5.
Slowly sew the fabric. The looper threads will extend
beyond the fabric on the right side of fold.
6.
Gently pull the fabric flat.
3-THREAD FLATLOCK - WIDE
Decorative Thread Tip:
A heavy thread such as YLI Jeans
Stitch or Pearl Crown Rayon can be used in the looper for a
more decorative look. When working with heavy decorative
threads, loosen the upper looper tension and lengthen the
stitch length as needed for the desired look.
Firm fabric, 10" x 10"
80/12 ELX705
3 Spools Serger Thread (Y, B, R)
3-Thread Flatlock Stitch (wide-Stitch #5)
C 11
Note:
The stitch preview of flatlock stitches show
both the stitch "as stitched" and as it will look when
pulled open. Touch the stitch preview to toggle be-
tween these views.


