13
ENGLISH
Under no circumstances must the ear th
wire pass through this switch.
• This switch may be replaced with a plug,
which must always be accessible in normal
working conditions.
After connecting the electricity, check that all
the electrical par ts of the oven are working.
This appliance must be installed by a licensed
electrician in accordance with AS/NZS 3000
wiring rules and any local wiring rules, and a
Certificate of Compliance issued upon
completion. The main supply and interconnecting
cables required for installation must be rated at a
minimum 15A.
For all ovens and after carr ying out the
electrical connection,
1
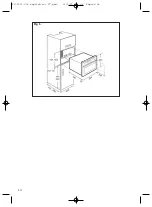
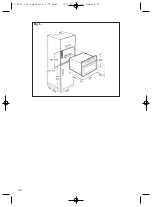
Insert the oven in the kitchen unit, making
sure the power lead is not trapped or in
contact with hot parts of the oven.
2
Fix the oven to the unit by means of the 2
screws supplied via the holes that can be
seen when the door is opened.
3
Check that the oven housing is not in contact
with the sides of the unit and that there is at
least 2 mm separating the neighbouring
units.
Installing the Oven
3172533-000 english-1st IT.qxd:- 16/3/12 08:06 Página 13
Summary of Contents for F45 CONXT
Page 2: ...3172533 000 english 1st IT qxd 16 3 12 08 06 Página 2 ...
Page 14: ...14 Fig 1 3172533 000 english 1st IT qxd 16 3 12 08 06 Página 14 ...
Page 26: ...26 Fig 1 3172533 000 english 1st IT qxd 16 3 12 08 06 Página 26 ...
Page 38: ...38 Fig 1 3172533 000 english 1st IT qxd 16 3 12 08 07 Página 38 ...
Page 50: ...50 Fig 1 3172533 000 english 1st IT qxd 16 3 12 08 07 Página 50 ...
Page 62: ...62 Fig 1 3172533 000 english 1st IT qxd 16 3 12 08 07 Página 62 ...
Page 63: ...3172533 000 english 1st IT qxd 16 3 12 08 07 Página 63 ...


