background image

4

Electrical Safety 

•  All adjustments to or repair of the appliance,

including replacement of the power lead,
must be carried out by authorised Technical
Assistance Ser vice staf f using original
spare par ts. Repairs or alterations carried
out by persons other than Technical
Assistance Ser vice staff may result in the
malfunctioning of or damage to the
appliance, representing a risk to your
personal safety. 

•  Disconnect your oven if it breaks down. 

Safety for Children

•  Do not allow children to approach the oven

while it is in use, as high temperatures can
be reached. 

• Precautions must be taken to prevent

children from playing with the appliance.

Oven Safety in Use

• The oven must not be operated with the

door open. 

• The manufacturer will not be held

responsible if this oven is used for anything
other than domestic purposes. 

•  Only use the oven when it is installed within

kitchen units. 

• Do not store oils, fats or inflammable

materials inside the oven, as it could be
dangerous if the oven is switched on.                

Important Safety
Instructions 

• Do not lean or sit on the open door of the

oven as it could damage the door and be
dangerous for you. 

• Do not cover the bottom of the oven with

aluminium foil, as it could affect cooking
and damage the interior enamelling of the
oven.     

• To use the oven, inser t the tray or rack

supplied onto the side guides inside the
oven. The trays and racks are fitted with a
system to facilitate par tial extraction and
make handling easier.

• Do not put containers or food on the floor of

the oven. Always use the trays and grids.

• Do not spill water on the floor of the oven

while it is working as this could damage the
enamel.

•  While using the oven, open the door as little

as possible to reduce electricity
consumption.

• Use protective gloves if you need to work

inside the hot oven. 

• In recipes with a high liquid content, it is

normal for condensation to form on the
oven door. 

• Use of the appliance is not intended for

persons (including children) whose physical,
sensor y or mental capabilities are reduced.
This is also applicable to those who lack
experience or knowledge, unless they are
super vised, or have received instructions on
how to use the appliance from a person in
charge of their safety. 

3172533-000 english-1st IT.qxd:-  16/3/12  08:06  Página 4

Summary of Contents for F45 CONXT

Page 1: ... Installation Manual Manual de Mantenimiento e Instalación Manuale di installazione e manutenzione Manual d Entretien et Installation Instandhaltung Buch F45 CONXT 3172533 000 english 1st IT qxd 16 3 12 08 06 Página 1 ...

Page 2: ...3172533 000 english 1st IT qxd 16 3 12 08 06 Página 2 ...

Page 3: ...ling clean the oven and the accessories During the first use fumes and odours may occur and the kitchen should therefore be well ventilated Ecological Packaging The packaging materials are completely re cyclable and can be used again Check with your local authority on the regulations for disposing of this material CAUTION The symbol on the product or on its packaging indicates that this product ma...

Page 4: ... Do not lean or sit on the open door of the oven as it could damage the door and be dangerous for you Do not cover the bottom of the oven with aluminium foil as it could affect cooking and damage the interior enamelling of the oven To use the oven insert the tray or rack supplied onto the side guides inside the oven The trays and racks are fitted with a system to facilitate partial extraction and ...

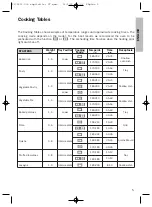
Page 5: ...w dish Shallow dish 1 0 Intermediate 170 190 190 210 180 200 45 50 160 180 30 35 15 20 170 190 10 15 40 45 160 180 35 40 STARTERS Weight Kg Tray Position Cooking Mode Temperat ºC Time min Receptacle Baked rice Shallow oven dish Lower 1 0 180 200 25 30 170 190 20 25 Vegetable Pie Intermediate 1 0 190 210 55 60 170 190 45 50 Tray Stuffed tomatoes Tray 0 8 Intermediate 170 190 10 12 160 180 10 12 Las...

Page 6: ...ptacle Sole Tray 170 190 15 20 1 0 Intermediate 160 180 10 15 Hake Tray 190 210 25 30 1 1 Intermediate 180 200 20 25 Fish Pie Casserole dish 190 210 60 65 1 1 Intermediate 190 210 60 65 Salmon in greased paper Tray 180 200 20 25 1 0 Intermediate 170 190 15 20 Trout Tray 190 210 20 25 1 1 Intermediate 180 200 15 20 Fillet of Fish Grid 170 190 15 20 1 0 Higher Sardines Grid 180 200 10 15 1 0 Higher ...

Page 7: ...170 190 45 50 170 190 30 35 Roast beef Tray 190 210 30 35 0 6 Intermediate 180 200 25 30 190 210 30 35 Weight Kg Tray Position Cooking Mode Temperat ºC Time min Receptacle Salted Pork Loin Tray 170 190 35 40 0 6 Intermediate 170 190 40 45 Fillet Steak Pastry Tray 180 200 35 40 1 0 Intermediate 160 180 30 35 Brochettes Grid 180 200 10 12 0 3 Higher Sausages Grid 190 210 10 15 0 6 Higher 3172533 000...

Page 8: ...190 10 15 0 5 Intermediate 160 180 10 15 Flan Bread Mould 160 180 55 60 0 8 Intermediate 150 170 50 55 Biscuits Tray 160 180 20 25 1 0 Intermediate 150 170 20 25 Vol au vents Tray 170 190 20 25 0 3 Intermediate 160 180 15 20 Cup Cakes Tray 160 180 20 25 20 25 0 7 Intermediate 160 180 Baked Apples Tray 180 200 30 35 20 25 0 5 Intermediate 170 190 Cake Mould 170 190 55 60 0 6 Intermediate 160 180 50...

Page 9: ...rt of the oven and return the grill element to its original position Cleaning the Inside of the Oven Clean the outside of the oven and the accessories with warm soapy water or with a mild detergent Caution Never use metallic scouring pads or commercial or scouring powders that could scratch the enamel For stainless steel surfaces proceed with care and only use sponges or cloths that cannot scratch...

Page 10: ...ssembly Instructions for the interior glass 1 Open the oven door 2 Pull the glass upwards from the bottom A Cleaning the Large Interior Glass Door A 10 Caution To change the bulb first ensure that the oven is disconnected from the power supply Ease out the chrome supports releasing them from the bolt E Changing the oven bulb 3 The interior glass is now free Remove it Warning Be careful the oven do...

Page 11: ... manual or programmed mode Check the position of the function and temperature selectors The inside light of the oven does not work Change the bulb Check its assembly in accordance with the instruction manual The heating indicator light does not work Select a temperature Select a setting It should only light up while the oven is heating up to its set working temperature Smoke is given off while the...

Page 12: ...icated on the rating plate The connection diagram is shown in the following figure The electrical connection has adequate earthing in accordance with regulations in force The connection must be carried out with an omnipolar switch of an adequate size for the current drawn There must be a minimum aperture between contacts of 3 mm to enable disconnection in the case of emergency cleaning or bulb exc...

Page 13: ...ssued upon completion The main supply and interconnecting cables required for installation must be rated at a minimum 15A For all ovens and after carrying out the electrical connection 1 Insert the oven in the kitchen unit making sure the power lead is not trapped or in contact with hot parts of the oven 2 Fix the oven to the unit by means of the 2 screws supplied via the holes that can be seen wh...

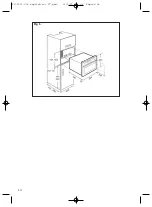
Page 14: ...14 Fig 1 3172533 000 english 1st IT qxd 16 3 12 08 06 Página 14 ...

Page 15: ...ie el horno y los accesorios Durante este primer funcionamiento se pro ducen humos y olores por lo que se debe ase gurar una buena ventilación de la cocina Embalaje Ecológico El embalaje está realizado con materiales totalmente reciclables y pueden ser aprove chados nuevamente Consulte con su admi nistración municipal sobre las normas locales para retirar estos materiales ATENCIÓN El símbolo en el...

Page 16: ... podría dañarla además de poner en peligro su seguridad No recubra el fondo del horno con hojas de papel de aluminio ya que puede afectar al cocinado y dañar el esmalte del interior del horno y el interior del mueble de su cocina Para cocinar cualquier alimento introduzca la bandeja o parrilla que se suministra en las guías laterales que el horno posee en la cavidad interior La bandeja y la parril...

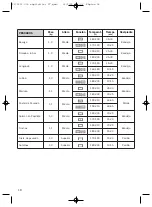
Page 17: ...ia Hojaldre de verduras Molde Molde 1 0 Media 170 190 190 210 180 200 45 50 160 180 30 35 15 20 170 190 10 15 40 45 160 180 35 40 ENTRANTES Peso Kg Altura Función Temperat ºC Tiempo min Recipiente Arroz al horno Paellera Inferior 1 0 180 200 25 30 170 190 20 25 Pastel de verduras Media 1 0 190 210 55 60 170 190 45 50 Bandeja Tomates rellenos Bandeja 0 8 Media 170 190 10 12 160 180 10 12 Lasaña Mol...

Page 18: ...guado Bandeja 170 190 15 20 1 0 Media 160 180 10 15 Merluza Bandeja 190 210 25 30 1 1 Media 180 200 20 25 Pastel de Pescado Molde 190 210 60 65 1 1 Media 190 210 60 65 Salmón en Papillote Bandeja 180 200 20 25 1 0 Media 170 190 15 20 Truchas Bandeja 190 210 20 25 1 1 Media 180 200 15 20 Filete de pescado Parrilla 170 190 15 20 1 0 Superior Sardinas Parrilla 180 200 10 15 1 0 Superior 3172533 000 e...

Page 19: ...dia 170 190 45 50 170 190 30 35 Roast beef Bandeja 190 210 30 35 0 6 Media 180 200 25 30 190 210 30 35 Peso Kg Altura Función Temperat ºC Tiempo min Recipiente Lomo a la Sal Bandeja 170 190 35 40 0 6 Media 170 190 40 45 Solomillo en Hojaldre Bandeja 180 200 35 40 1 0 Media 160 180 30 35 Brochetas Parrilla 180 200 10 12 0 3 Superior Salchichas Parrilla 190 210 10 15 0 6 Superior 3172533 000 english...

Page 20: ... 170 190 10 15 0 5 Media 160 180 10 15 Flan Molde 160 180 55 60 0 8 Media 150 170 50 55 Galletas Bandeja 160 180 20 25 1 0 Media 150 170 20 25 Hojaldre Bandeja 170 190 20 25 0 3 Media 160 180 15 20 Magdalenas Bandeja 160 180 20 25 20 25 0 7 Media 160 180 Manzanas Asadas Bandeja 180 200 30 35 20 25 0 5 Media 170 190 Molde 170 190 55 60 0 6 Media 160 180 50 55 Molde 180 200 40 45 0 8 Media 170 190 4...

Page 21: ...r la resistencia de Grill en su posi ción inicial Limpieza del Interior de Horno Limpie el exterior del horno y los accesorios con agua jabonosa y templada o con algún detergente suave Para superficies inoxidables actúe con precau ción y emplee sólo esponjas o paños que no puedan rayarlas Para la limpieza del exterior del horno no inten te extraer los mandos ya que para hacerlo debería extraer ant...

Page 22: ...erturas correspondientes en la parte frontal del horno Abra lenta y completamente la puerta del horno 22 Atención Para cambiar la lámpara asegure primero que el horno está desconectado de la red eléctrica Desmonte los soportes cromados soltándo los de la tuerca E Cambio de la Lámpara del Horno 3 El cristal interior está ya suelto Sáquelo Atención Por favor preste atención porque cuando retire el c...

Page 23: ...as el horno está calentando para alcanzar la temperatura seleccionada Generación de humos durante el funcionamiento del horno Proceso normal en el primer funcionamiento Limpie periódicamente el horno Reduzca la cantidad de grasa o aceite añadido a la bandeja No utilice temperaturas más altas de las indicadas en las tablas de cocinado No se obtienen los resultados esperados en el cocinado Revise la...

Page 24: ... recubrimiento plástico de los muebles debe soportar tem peraturas superiores a 85ºC El instalador debe verificar que La tensión y la frecuencia de la red se corresponde con lo indicado en la Placa de Características La instalación eléctrica puede soportar la potencia máxima indicada en la Placa de Características El esquema de conexión se muestra en la figura siguiente Conexión Eléctrica Requisit...

Page 25: ...uso normal Después de la conexión eléctrica verifique el correcto funcionamiento de todos los elemen tos eléctricos del horno Para todos los hornos y tras realizar la cone xión eléctrica 1 Introduzca el horno en el mueble asegurán dose que el cable de alimentación no queda atrapado ni en contacto con partes calien tes del horno 2 Sujete el horno al mueble mediante los 2 tornillos suministrados ros...

Page 26: ...26 Fig 1 3172533 000 english 1st IT qxd 16 3 12 08 06 Página 26 ...

Page 27: ... dell appa recchio Una volta raffreddato pulire il forno e gli accessori Durante la prima messa in funzione vengono prodotti fumi e odori quindi fare in modo che ci sia una buona ventilazione della cucina Imballaggio ecologico L imballaggio è realizzato con materiali totalmen te riciclati che possono essere riutilizzati Contattare le autorità locali per informarsi sulle procedure previste per il r...

Page 28: ...e danneggiarsi oltre che rappresentare un pericolo per la sicurezza Non ricoprire la base del forno con fogli di alluminio poiché potrebbe avere conse guenze sulla cottura degli alimenti oltre a danneggiare lo smalto del forno e l interno del mobile della cucina Per cucinare qualsiasi alimento inserire il vassoio o la griglia compresi nella fornitu ra nelle guide laterali di cui è dotato il forno ...

Page 29: ...re Stampo Stampo 1 0 Media 170 190 190 210 180 200 45 50 160 180 30 35 15 20 170 190 10 15 40 45 160 180 35 40 ANTIPASTI Peso Kg Altezza Funzione Temp ºC Tempo min Recipiente Riso al forno Stampo recipiente per la cottura del riso Inferiore 1 0 180 200 25 30 170 190 20 25 Tortino di verdure Media 1 0 190 210 55 60 170 190 45 50 Vassoio Pomodori ripieni Vassoio 0 8 Media 170 190 10 12 160 180 10 12...

Page 30: ...ola Vassoio 170 190 15 20 1 0 Media 160 180 10 15 Merluzzo Vassoio 190 210 25 30 1 1 Media 180 200 20 25 Tortino di pesce Stampo 190 210 60 65 1 1 Media 190 210 60 65 Salmone al cartoccio Vassoio 180 200 20 25 1 0 Media 170 190 15 20 Trota Vassoio 190 210 20 25 1 1 Media 180 200 15 20 Filetto di pesce Griglia 170 190 15 20 1 0 Superiore Sardine Griglia 180 200 10 15 1 0 Superiore 3172533 000 engli...

Page 31: ...Media 170 190 45 50 170 190 30 35 Roast beef Vassoio 190 210 30 35 0 6 Media 180 200 25 30 190 210 30 35 Peso Kg Altezza Funzione Temp ºC Tempo min Recipiente Lombata al sale Vassoio 170 190 35 40 0 6 Media 170 190 40 45 Filetto in pasta sfoglia Vassoio 180 200 35 40 1 0 Media 160 180 30 35 Spiedini Griglia 180 200 10 12 0 3 Superiore Salsicce Griglia 190 210 10 15 0 6 Superiore 3172533 000 englis...

Page 32: ... 15 0 5 Media 160 180 10 15 Latte alla portoghese Stampo 160 180 55 60 0 8 Media 150 170 50 55 Biscotti Vassoio 160 180 20 25 1 0 Media 150 170 20 25 Pasta sfoglia Vassoio 170 190 20 25 0 3 Media 160 180 15 20 Madeleine Vassoio 160 180 20 25 20 25 0 7 Media 160 180 Mele al forno Vassoio 180 200 30 35 20 25 0 5 Media 170 190 Stampo 170 190 55 60 0 6 Media 160 180 50 55 Stampo 180 200 40 45 0 8 Medi...

Page 33: ...sterna e degli accessori del forno Pulizia e manutenzione Attenzione Scollegare l apparecchio dall alimentazione elettrica per effettuare qualsiasi intervento Pulire l interno del forno per eliminare i resi dui di grasso o di alimenti che emanano fumo e odori oppure provocano la compar sa di macchie Con il forno freddo e per pulire le superfici smaltate ad esempio la base del forno utilizzare spaz...

Page 34: ... spugne o spazzole metalliche né polveri pulenti o prodotti abrasivi per pulire lo sportello del forno poiché la superficie potrebbe rigarsi e il vetro potrebbe rompersi Istruzioni di smontaggio montaggio del vetro interno 1 Aprire lo sportello del forno 2 Tirare il vetro verso l esterno dalla parte inferiore A Pulizia dello sportello con vetro interno di grandi dimensioni B C E D A 4 Sollevare lo...

Page 35: ...el selettore delle funzioni e delle temperature La lampadina interna del forno non si accende Sostituire la lampadina Verificare il corretto montaggio in base al manuale di istruzioni La spia pilota di riscaldamento non si accende Selezionare una temperatura Selezionare una funzione Questa dovrà illuminarsi solo mentre il forno si sta scaldando per raggiungere la temperatura impostata Produzione d...

Page 36: ...ili deve essere in grado di sop portare temperature superiori a 85ºC L installatore dovrà verificare quanto segue La tensione e la frequenza di rete devono corrispondere a quanto indicato nella targa delle specifiche tecniche L impianto elettrico deve essere in grado di sopportare la potenza massima indicata nella targa delle specifiche tecniche Lo schema di collegamento è indicato nella figura se...

Page 37: ...a effettuato il collegamento elettrico verificare il corretto funzionamento di tutti i componenti elettrici del forno In tutti i forni dopo aver effettuato i collega menti elettrici 1 Inserire il forno nel mobile verificando che il cavo di alimentazione non resti schiacciato né a contatto con parti calde del forno 2 Fissare il forno al mobile tramite le due viti comprese nella fornitura avvitandol...

Page 38: ...38 Fig 1 3172533 000 english 1st IT qxd 16 3 12 08 07 Página 38 ...

Page 39: ...insi que tous ses accessoires Pendant ce premier fonctionnement il y aura des fumées et des odeurs et il faudra pour autant assurer une bonne ventilation dans la cuisine Emballage Écologique L emballage a été réalisé avec des matériaux totalement recyclables qui pourront être utilisés de nouveau Consultez votre administration municipale sur les normes locales pour faire enlever ces matériaux ATTEN...

Page 40: ...ouverte du four cela pourrait l endommager et de plus mettre votre sécurité en danger Ne couvrez pas le fond du four avec des feuilles de papier d aluminium car cela pourrait affecter la cuisson et endommager l émail de la partie inférieure du four Pour cuire un aliment introduisez le plateau ou la grille fournis dans les guides latéraux que le four possède dans sa cavité intérieure Le plateau et ...

Page 41: ...izza Grille Quiche Moule 0 6 0 8 Moyenne 1 2 Moyenne Moyenne Feullete de legumes Moule Moule 1 0 Moyenne 170 190 190 210 180 200 45 50 160 180 30 35 15 20 170 190 10 15 40 45 160 180 35 40 ENTRÉES Poids Kg Position Fonction Températ ºC Temps min Récipient Riz au four Flat à paella Inférieure 1 0 180 200 25 30 170 190 20 25 Gâteau de legumes Moyenne 1 0 190 210 55 60 170 190 45 50 Plateau Tomates f...

Page 42: ...le Plateau 170 190 15 20 1 0 Moyenne 160 180 10 15 Colin Plateau 190 210 25 30 1 1 Moyenne 180 200 20 25 Gâteau de poisson Moule 190 210 60 65 1 1 Moyenne 190 210 60 65 Saumon en papillote Plateau 180 200 20 25 1 0 Moyenne 170 190 15 20 Truites Plateau 190 210 20 25 1 1 Moyenne 180 200 15 20 Filet de poisson Grille 170 190 15 20 1 0 Supérieure Sardines Grille 180 200 10 15 1 0 Supérieure 3172533 0...

Page 43: ... 2 Moyenne 170 190 45 50 170 190 30 35 Rosbif Plateau 190 210 30 35 0 6 Moyenne 180 200 25 30 190 210 30 35 Poids Kg Position Fonction Températ ºC Temps min Récipient Echine au Sel Plateau 170 190 35 40 0 6 Moyenne 170 190 40 45 Feullete d Aloyau Plateau 180 200 35 40 1 0 Moyenne 160 180 30 35 Brochettes Grille 180 200 10 12 0 3 Supérieure Saucisse Grille 190 210 10 15 0 6 Supérieure 3172533 000 e...

Page 44: ...0 10 15 0 5 Moyenne 160 180 10 15 Flan Moule 160 180 55 60 0 8 Moyenne 150 170 50 55 Petis gâteaux Plateau 160 180 20 25 1 0 Moyenne 150 170 20 25 Feullete Plateau 170 190 20 25 0 3 Moyenne 160 180 15 20 Madeleines Plateau 160 180 20 25 20 25 0 7 Moyenne 160 180 Pommes au four Plateau 180 200 30 35 20 25 0 5 Moyenne 170 190 Moule 170 190 55 60 0 6 Moyenne 160 180 50 55 Moule 180 200 40 45 0 8 Moye...

Page 45: ...du Four Nettoyage de l extérieur et des Accessoires du Four Nettoyage et Entretien Attention Avant toute operation de nettoyage ou d entretien vérifiez que la prise de l appareil est débranchée Nettoyez l intérieur du four pour éliminer les restes de graisse ou d aliments qui sont la cause de fumées et d odeurs et provoquent l apparition de taches Quand le four est froid et pour les surfaces émail...

Page 46: ...our 2 Tirez la vitre vers l extérieur par la partie inférieure A Nettoyage de la Porte avec Vitre Intérieure de Grande Taille A 46 Attention Pour changer l ampoule assurez vous d abord que le four est débranché du courant électrique Tirez sur les supports chromé en les déta chant de l écrou E Changement de l ampoule du four 3 La vitre intérieure est déjà libre Sortez la Attention Veuillez prêter a...

Page 47: ...sition du sélecteur de fonctions et de températures La lumière intérieure du four ne s allume pas Changer l ampoule Vérifiez si le montage est correct selon le Mode d Emploi Le voyant lumineux de chauffage ne s allume pas Sélectionnez une température Sélectionnez une fonction Il ne doit s allumer que quand le four est en train de chauffer pour atteindre la température sélectionnée Génération de fu...

Page 48: ...ratures supérieures à 85ºC L installateur doit vérifier que La tension et la fréquence du courant correspondent à ce qui est indiqué sur la Plaque de Caractéristiques L installation électrique doit pouvoir supporter la puissance maximale indiquée sur la plaque de caractéristiques Le schéma de raccordement est indiqué sur la figure suivante Le raccordement au réseau dispose d une prise de terre adé...

Page 49: ...accordement vérifier le fonctionnement correct de tous les éléments électriques du four Pour tous les fours et après avoir réalisé le raccordement au réseau 1 Introduisez le four dans le meuble en vous assurant que le câble d alimentation n est pas coincé ni en contact avec des parties chaudes du four 2 Fixez le four au meuble à l aide des 2 vis fournies en les vissant au meuble à travers les trou...

Page 50: ...50 Fig 1 3172533 000 english 1st IT qxd 16 3 12 08 07 Página 50 ...

Page 51: ... Abkühlen Herd und Zubehörteile Während der ersten Inbetriebnahme tritt eine Rauch und Geruchsentwicklung auf sorgen Sie daher für eine gute Lüftung der Küche Ökologische Verpackung Die Verpackung ist aus vollständig recycelbaren Materialien hergestellt die einer Wiederverwendung zugeführt werden können Setzen Sie sich bitte mit der örtlichen Verwaltung hinsichtlich der Entsorgung dieser Materiali...

Page 52: ...werden oder Ihre Sicherheit gefährden Decken Sie den Boden des Herds nicht mit Alufolie ab hierdurch können der Garvorgang beeinträchtigt und die Innenemaillierung beschädigt werden Zum Zubereiten von Speisen schieben Sie die mitgelieferte Schale oder den Rost in die Seitenführungen im Herdinnenraum ein Der Rost und die Schale sind mit einer Vorrichtung ausgestattet die ein teilweises Herausziehen...

Page 53: ...Quiche Form 0 6 0 8 1 2 Mitte Mitte Mitte Blattertelg mit Gemusefüllung Form Form 1 0 Mitte Untere 170 190 190 210 180 200 45 50 160 180 30 35 15 20 170 190 10 15 40 45 160 180 35 40 VORSPEISEN Gewicht Kg Stellung Funktion Temperat ºC Zeit min Gefäß Gebackener Reis Reispfanne 1 0 Untere 180 200 25 30 170 190 20 25 Gemüsepastete 1 0 Mitte 190 210 55 60 170 190 45 50 Schale Gefullite Tomaten Schale ...

Page 54: ...eit min Gefäß Seezunge Schale 170 190 15 20 1 0 Mitte 160 180 10 15 Seehecht Schale 190 210 25 30 1 1 Mitte 180 200 20 25 Fischpastete Form 190 210 60 65 1 1 Mitte 190 210 60 65 Lachs Im Schlafrock Schale 180 200 20 25 1 0 Mitte 170 190 15 20 Forellen Schale 190 210 20 25 1 1 Mitte 180 200 15 20 Fischfilet Rost 170 190 15 20 1 0 Obere Sardinen Rost 180 200 10 15 1 0 Obere 3172533 000 english 1st I...

Page 55: ...1 2 Mitte 170 190 45 50 170 190 30 35 Roastbeef Schale 190 210 30 35 0 6 Mitte 180 200 25 30 190 210 30 35 Gewicht Kg Stellung Funktion Temperat ºC Zeit min Gefäß Lendenstück mit Salz Schale 170 190 35 40 0 6 Mitte 170 190 40 45 Lendenstück Im Blättertelg Schale 180 200 35 40 1 0 Mitte 160 180 30 35 Medaillons Rost 180 200 10 12 0 3 Obere Würstchen Rost 190 210 10 15 0 6 Obere 3172533 000 english ...

Page 56: ...füllte Blätterteigrolle Schale 170 190 10 15 0 5 Mitte 160 180 10 15 Karamelpudding Form 160 180 55 60 0 8 Mitte 150 170 50 55 Plätzchen Schale 160 180 20 25 1 0 Mitte 150 170 20 25 Blätterteig Schale 170 190 20 25 0 3 Mitte 160 180 15 20 Bärentatzen Schale 160 180 20 25 20 25 0 7 Mitte 160 180 Backäpfel Schale 180 200 30 35 20 25 0 5 Mitte 170 190 Plumcake Form 170 190 55 60 0 6 Mitte 160 180 50 ...

Page 57: ...lierten Flächen entsprechend den Herstellerangaben einsetzen Achtung Dampf und oder Druckreinigungsgeräte dürfen nicht zum Reinigen des Backofens verwendet werden Verwenden Sie keine metallischen Scheuerschwämme Drahtbürsten oder sonstige Utensilien welche die emaillierten Flächen verkratzen können Benutzung des schwenkbaren Grills je nach Modell Zur Reinigung des Herdoberteils Warten Sie bis sich...

Page 58: ...onstige scheuernde Reinigungsmittel verwenden um die Herdtür zu säubern anderenfalls könnte die Oberfläche verkratzt und ein Bruch der Scheibe verursacht werden Anweisungen zu Aus und Einbau der Innenscheibe 1 Öffnen Sie die Herdtür 2 Ziehen Sie die Scheibe an der Unterseite A heraus Reinigung Grosse Innenscheibe der Herdtüre A 4 Heben Sie die Tür jetzt an und holen Sie die Scharniere aus den vord...

Page 59: ...Programm eingestellt ist Überprüfen Sie die Stellung des Funktionswahlschalters und des Temperaturreglers Die Innenbeleuchtung des Herds leuchtet nicht Tauschen Sie die Lampe aus Überzeugen Sie sich vom korrekten Einbau entsprechend der Bedienungsanleitung Die Kontrolleuchte Heizen leuchtet nicht Stellen Sie eine Temperatur ein Wählen Sie eine Funktion Leuchtet nur während des Heizvorgangs bis zum...

Page 60: ...n Das Installationspersonal muß prüfen Spannung und Frequenz des Netzes müssen mit den Angaben auf dem Typenschild übereinstimmen Die Elektroanlage muß für die maximale Anschlußleistung des Geräts ausgelegt sein Das Anschlußschema ist nachstehend abgebildet Der elektrische Anschluß muß mit Schutzleiter entsprechend den gesetzlichen Bestimmungen ausgeführt werden Vor Ausführung des Elektroanschluss...

Page 61: ...der elektrischen Anschlüsse alle Funktionen des Herds überprüfen Für alle Herde nach Ausführung des Elektroanschlusses 1 Setzen Sie den Herd so in das Küchenmöbel ein dass das Netzanschlusskabel nicht eingeklemmt wird oder an heißen Teilen des Herds anliegt 2 Den Herd am Küchenmöbel mit den 2 mitgelieferten Schrauben befestigen Diese sind durch die entsprechenden Bohrungen zu führen die nach Öffne...

Page 62: ...62 Fig 1 3172533 000 english 1st IT qxd 16 3 12 08 07 Página 62 ...

Page 63: ...3172533 000 english 1st IT qxd 16 3 12 08 07 Página 63 ...

Page 64: ...ente utilizamos papel reciclado Our contribution to enviromental protection we use recycled paper Notre contribution à la protection de l environnement nous utilisons du papier recyclé Unser Beitrag zum Umweltschutz wir verwenden umweltfreundliches papier Cod 3172533 000 3172533 000 english 1st IT qxd 16 3 12 08 07 Página 64 ...

Reviews: