background image


20 

EN 


Usage, tables and tips 

Use of accessories  

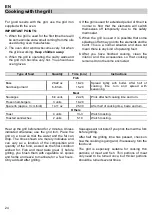
The  perforated  container  is  suitable  for  cooking 
fresh or deep-frozen vegetables, meat and poultry. 
In this case it is important that the non-perforated 
container is introduced into the first level. This way, 
dripping  liquids  are  collected  and  the  appliance 
does  not  get  dirty.  The  perforated  container  with 
the food should be inserted into the second level. 

The  non-perforated  container  is  used  to  steam 
sensitive foods, e.g. compotes and dumplings. 


The  rack  is  used  when  cooking  with  small 
containers,  as  for  example,  dessert  bowls  and  to 
regenerate plate dishes. 

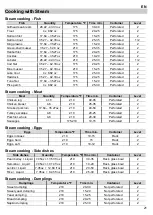
For more precise information refer to the tables. 

The  suggested  times  and  temperatures  are 
guideline values. The actual cooking time can vary 
according to the type and quality of the foods. 


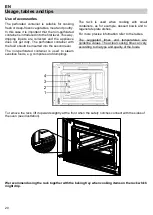
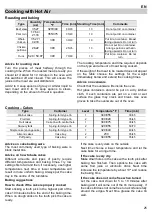
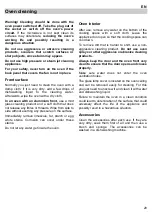
To remove the rack, lift it upwards slightly at the front when the safety notches connect with the sides of 
the oven (see illustration). 


We recommend using the rack together with the baking tray when cooking items on the rack which 
might drip.


Summary of Contents for MAST30CSEX

Page 1: ...EN Instruction Manual FR Guide de l utilisateur MAST30CSEX PROF30CSEX ...

Page 2: ...POSITION 65 WARNING Cancer and Reproductive Harm www P65Warnings ca gov ADVERTENCIA Cáncer y Daño Reproductivo www P65Warnings ca gov AVERTISSEMENT Cancer et Troubles de l appareil reproducteur www P65Warnings ca gov ...

Page 3: ...ons 73 Dear Customer Before going any further we want to thank you for preferring our BERTAZZONI product We are sure that this modern functional and practical steam oven manufactured with top quality materials will fully meet your expectations We ask you to read the instructions in this booklet very carefully as this will allow you to get the best results from using your steam oven KEEP THE DOCUME...

Page 4: ...tem or an equipment grounding conductor should be run with the circuit conductors and connected to the equipment grounding terminal or lead on the appliance Warning IMPROPER USE OF THE GROUNDING CAN RESULT IN A RISK OF ELECTRICAL SHOCK Please refer to the Installation Instructions for further information ...

Page 5: ...erred to a qualified technician 6 Storage in or on Appliance Flammable materials should not be stored in an oven 7 Do Not Use Water on Grease Fires Smother fire or flame or use dry chemical or foam type extinguisher 8 Use Only Dry Potholders Moist or damp potholders on hot surfaces may result in burns from steam Do not let potholder touch hot heating elements Do not use a towel or other bulky clot...

Page 6: ...ING The appliance and its accessible parts become hot during use Care should be taken to avoid touching heating elements Children less than 8 years of age shall be kept away unless continuously supervised During use the appliance becomes hot Care should be taken to avoid touching heating elements inside the oven WARNING Accessible parts may become hot during use Young children should be kept away ...

Page 7: ...n up the appliance s frame Possible contacts with electrical conducting parts or changes to electrical or mechanical components may represent a danger to users safety and prejudice the correct working of the appliance WARNING Repairs and maintenance especially of parts carrying electrical current must only be done by technicians authorised by the manufacturer The manufacturer and retailers do not ...

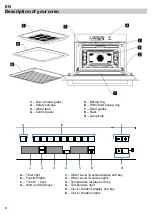
Page 8: ...e lights c and keys 3 Temperature display and key d Start and Stop keys 4 Temperature light 5 Clock Duration display and key 6 Clock Duration lights b c 1 2 3 4 5 6 d 150 600 12 00 a 1 Door window glass 5 Baking tray 2 Safety catches 6 Perforated baking tray 3 Water tank 7 Shelf guides 4 Control panel 8 Rack 9 Lamp bulb ...

Page 9: ...frosting and cooking of vegetables Convection Steam Cooking meals with hot damp circulating air Cooking potatoes rice Moist garnishing Convection Roasting and baking Broil Grilling meat and fish Grilling Potatoes deep frozen defrosting and roasting Convection Broil Grilling food Roasting and Baking Reheat Regenerating plate dishes and ready made meals Sterilising boiling down fruit ...

Page 10: ...an hide it by pressing the Clock setting key If you want to see the clock display again press the Clock setting key again Water Hardness setting The appliance features a system that automatically indicates when it is time to descale The system can be optimised for households with very soft water also through using a water softening appliance and very hard water by changing the user settings to the...

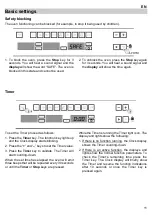
Page 11: ...lay starts blinking 2 Press the and keys to set the Timer value 3 Press the Timer key to validate The Timer will start counting down When the set time has elapsed the oven will emit three beeps that will be repeated every 30 seconds or until the Timer or Stop keys are pressed While the Timer is running the Timer light is on The display and lights show the following 1 If there is no function runnin...

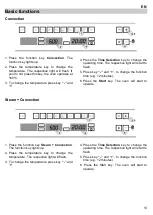
Page 12: ...time The respective light will start to flash This setting is optional Please jump to point 6 if you don t want to set duration 5 Select the operating time you want by pressing the and for example to 20 minutes 6 Press the Start key The oven will start to operate Broil 1 Press the function key Broil The function key lights up 2 Press the Time Selection key to change the operating time The correspo...

Page 13: ...t will start to flash 5 Press key and to change the function time e g 12 minutes 6 Press the Start key The oven will start to operate Steam Convection 1 Press the function key Steam Convection The function key lights up 2 Press the temperature key to change the temperature The respective light will flash 3 To change the temperature press key and 4 Press the Time Selection key to change the operati...

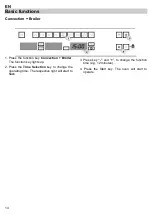
Page 14: ... key Convection Broiler The function key lights up 2 Press the Time Selection key to change the operating time The respective light will start to flash 3 Press key and to change the function time e g 12 minutes 4 Press the Start key The oven will start to operate ...

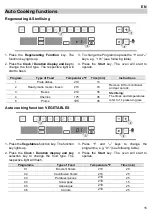
Page 15: ...ove lid from container and put on rack 3 Beans 210 35 Sterilising The times and temperatures refer to 1L preserving jars 4 Cherries 175 35 5 Plums 195 35 Auto cooking function VEGETABLES 1 Press the Vegetables function key The function key lights up 2 Press the Clock Duration display and key selection key to change the food type The respective light will flash 3 Press and keys to change the progra...

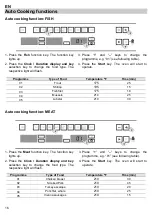
Page 16: ...ime min 01 Trout 175 25 02 Shrimp 195 15 03 Fish filet 175 18 04 Mussels 210 25 05 Lobster 210 30 Auto cooking function MEAT 1 Press the Meat function key The function key lights up 2 Press the Clock Duration display and key selection key to change the food type The respective light will flash 3 Press and keys to change the programme e g 01 see following table 4 Press the Start key The oven will s...

Page 17: ...r misplaced the Water Level display shows the message RES To clear the message correctly insert the water tank Emptying the water tank When the appliance is switched off the residual water is pumped back into the water tank While the water is being pumped the display shows PUMP This message stays on until the temperature of the water reaches 167º F before it can be pumped back to the water tank Wa...

Page 18: ... and keys and confirm by pressing the Temperature Selection key again Cancelling a cooking cycle If you wish to cancel the cooking process press the Stop key twice You will then hear 3 beeps and the message End will appear on the display End of a cooking cycle At the end of the set duration or when you press the Stop key to finish the cooking cycle the oven starts the steam reduction function This...

Page 19: ...s especially noticeable in winter time or in high moisture environments Residual water in the oven To reduce the residual water in the oven it is recommended to insert a tray in the bottom rack level The condensation released from the food begins to drip on the tray The remaining residual water can be easily dried with a cloth ...

Page 20: ...orated container is used to steam sensitive foods e g compotes and dumplings The rack is used when cooking with small containers as for example dessert bowls and to regenerate plate dishes For more precise information refer to the tables The suggested times and temperatures are guideline values The actual cooking time can vary according to the type and quality of the foods To remove the rack lift ...

Page 21: ...perature ºF Time min Container Level Chicken leg 4 10 210 40 45 Perforated 2 Chicken breast 4 6 210 25 35 Perforated 2 Smoked pork loin 17 64 35 27oz 210 40 50 Perforated 2 Turkey escalope 4 8 210 20 25 Perforated 2 Pork filet whole 4 8 210 20 30 Perforated 2 Sausages 175 210 10 15 Perforated 2 Steam cooking Eggs Eggs Temperature ºF Time min Container Level Eggs in Glass 210 10 15 Rack 2 Eggs hard...

Page 22: ... peppers in stripes 210 12 15 Perforated 2 Hot pepper 210 12 15 Perforated 2 Mushrooms in quarters 210 12 15 Perforated 2 Leeks in slices 210 10 12 Perforated 2 Brussels sprouts 210 25 35 Perforated 2 Celery in stripes 210 15 20 Perforated 2 Asparagus 210 20 35 Perforated 2 Spinach 210 12 15 Perforated 2 Celery stalks 210 25 30 Perforated 2 Courgette in slices 210 12 18 Perforated 2 Steam cooking ...

Page 23: ... 25 Not perforated 2 Lentils 210 15 20 Not perforated 2 Noodles 210 15 20 Not perforated 2 Two level cooking Some suggestions When cooking with two levels the grill always belongs to the 2nd or 3rd level of insertion from the bottom to the top This way the usual vessels of porcelain Jena glass or of stainless steel can be put inside the oven The container of cooking perforated or not will be inser...

Page 24: ...sh 18 24 15 20 Spread lightly with butter After half of cooking time turn and spread with seasoning Meat Sausages 6 8 units 22 26 Prick after half cooking time and turn Frozen hamburgers 3 units 18 20 Spare rib approx 3 cm thick 14 11 oz 25 30 After half of cooking time baste and turn Others Toast 4 units 1 3 Watch toasting Toasted sandwiches 2 units 5 10 Watch toasting Heat up the grill beforehan...

Page 25: ...ing Cakes Type Container Level Temperature ºF Time min Walnut cake Spring form type tin 1 340 355 30 35 Fruit tart Spring form type tin 2 300 320 35 45 Fruit cakes Cake tin with central hole 1 340 375 30 45 Savoury tarts Spring form type tin 2 320 355 50 70 Simple cake sponge cake Spring form type tin 1 320 340 40 45 Almond cakes Cake tray 2 230 35 45 Puff pastry Cake tray 2 340 355 35 45 Advice o...

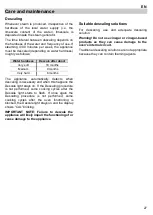
Page 26: ...sen the knurled nuts 2 in the back of the shelf guides in an anti clockwise direction Do not completely remove these nuts Pull the shelf guides to the inside of the cavity and remove from the front To put them back insert the shelf guides into the knurled nuts 2 in the back and position on the screws in the front Screw the knurled nuts 1 and 2 in a clockwise direction till tight Removing the appli...

Page 27: ...escaling is necessary and when this happens the Descale light stays on If the Descaling procedure is not performed some cooking cycles after the Descale light starts to flash If once again the Descaling procedure is not performed some cooking cycles after the oven functioning is blocked the Descale light stays on and the display shows CAL blinking IMPORTANT NOTE Failure to descale the appliance wi...

Page 28: ...5L remove the water tank 4 Pour 0 5 litres of an adequate descaling solution into the water tank and put the water tank back 5 Press the Start key The Descale cycle is initiated and takes about 30 minutes 6 When the Descale display shows 1L flashing and the oven emits a beep remove and empty the water tank 7 Fill the water tank with 1 0 litres of cold water and put the water tank back 8 Press the ...

Page 29: ...ace Immediately remove limescale fat starch or egg white stains Corrosion can occur under these stains Do not let any water get inside the oven Oven interior After use remove any water on the bottom of the cooking space with a soft cloth Leave the appliance door open so that the cooking space can cool down To remove dirt that is harder to shift use a non aggressive cleaning product Do not use oven...

Page 30: ...ses are normal there is no problem The food doesn t heat up or heats very slowly Check if You have selected the correct operating times and temperature setting The food you have put inside the oven is a larger amount or colder than you usually put in If the message Err_ appears in the display please contact the Customer Care The appliance still makes a noise after the cooking process is finished T...

Page 31: ...erature or foodstuff group Clock or time setting Indication that water tank is missing Clock The water tank must be removed emptied and reinserted Special functions Water level A1 to A5 Time setting Special functions with predefined temperatures and times to C1 to C5 to Heating up Water level to Time setting Special functions with predefined temperatures and times Steam reduction VAP Clock Indicat...

Page 32: ...AC Voltage see rating plate Power required 2900 W Current required 13 A Steam power 1500 W Broiler power 1200 W Convection power 1600 W Exterior dimensions W H D 29 x 18 x 21 Interior dimensions W H D 16 x 8 x 15 Oven capacity 1 34 ft3 Weight 78 lbs ...

Page 33: ...ed if the oven does not function correctly or if it has been damaged or dropped Contact the Technical Assistance Service Place the oven on a flat and stable surface The oven must not be put close to any sources of heat radios or televisions Electrical supply Before installing the oven have a qualified electrician verify that your home is provided with adequate electrical service and that the addit...

Page 34: ...off connect the flexible conduit from the oven to the junction box using a U L listed conduit connector The figures and the instructions provided below present the most common way of connecting the ovens Your local codes and ordinances of course take precedence over these instructions WARNING Risk of Electric Shock frame grounded to neutral of appliance through a link Grounding through the neutral...

Page 35: ...oven to the GROUND wire in the junction box bare or green colored wire Connect the red and black leads from the oven to the corresponding leads in the junction box After installation The oven only functions when the door is closed correctly After the first use clean the inside of the oven and the accessories following the cleaning instructions given in the section Oven cleaning and maintenance ...

Page 36: ...n 70 Dimensions d Installation 73 Cher client Nous vous remercions d avoir préféré notre produit BERTAZZONI Nous sommes certains que ce four à vapeur moderne fonctionnel et pratique fabriqué avec des matériaux de première qualité vous donnera toute satisfaction Nous vous demandons une lecture attentive des instructions de ce manuel Elles vous permettront d utiliser votre four en obtenant les meill...

Page 37: ...grâce a la fuite permise par le fil de terre L appareil vient équipé avec un fil de terre ainsi que la prise de terre La fiche doit être branchée dans une prise correctement installée et liée à la terre Attention UNE MAUVAISE LIAISON À LA TERRE PEUT PROVOQUER UN RISQUE DE CHOC ÉLECTRIQUE S il vous plait consulter les instructions d installation pour plus d informations ...

Page 38: ...tilisation de l appareil 5 Entretien par l utilisateur Ne pas réparer ou remplacer toute pièce de l appareil à moins d une recommandation précise dans le manuel Tout autre entretien doit être confié à un technicien qualifié 6 Rangement dans ou sur l appareil Les matériaux inflammables ne doivent pas être stockés dans un four 7 Ne pas utiliser d eau sur un feu de graisse Étouffer le feu ou les flam...

Page 39: ...uleur foncée 15 Les surfaces intérieures d un four deviennent assez chaudes pour causer des brûlures Pendant et après l utilisation ne pas toucher laisser des vêtements ou d autres matériaux inflammables en contact avec les éléments chauffants ou les surfaces intérieures du four avant qu ils aient eu le temps de refroidir Ce Four à Vapeur est destiné à un usage domestique ...

Page 40: ...arried out by technicians authorized by the manufacturer ADVERTISSEMENT L intérieur de l appareil devient chaud lorsqu il est en fonctionnement Ne touchez pas les éléments chauffants se trouvant dans l appareil Utilisez toujours des gants de cuisine pour retirer ou enfourner des accessoires ou des plats allant au four La température des surfaces accessibles peut être élevée pendant le fonctionneme...

Page 41: ...tructure de l appareil D éventuels contacts avec les pièces conductrices ou modifications des composants électriques ou mécaniques peuvent constituer un danger pour la sécurité de l utilisateur et perturber le bon fonctionnement de l appareil ATTENTION Les réparations et entretiens tout particulièrement sur les pièces sous tension ne peuvent être effectués que par des techniciens agréés par le fab...

Page 42: ...rie 1 Affichage et réglage du niveau d eau de détartrage b Voyant de fonctionnement 2 Voyants du niveau d eau de détartrage c Touches et 3 Affichage et réglage température poids d Touches marche et arrêt 4 Touche température groupe de nourriture 5 Affichage et réglage de l heure de la durée du type de nourriture 6 Voyants de l heure de la durée du type de nourriture b c 1 2 3 4 5 6 d 150 600 12 00...

Page 43: ...uisson des légumes L air chaud Vapeur Gratins ragoûts et viandes L air chaud Gâteaux pains et rôtis Gril Steaks poissons et saucisses et de pain grillé brunissement et gratins Gril L air chaud Cuisson de morceaux de poissons ou de viande Grillades de volaille Pommes de terre dégel produits et brunissement congelés Régénération stérilisation Régénération des plats et des plats préparés Stérilisatio...

Page 44: ...r en gardant la touche Clock Heure Si vous souhaitez à nouveau afficher l heure appuyez à nouveau sur la touche Clock Heure Réglage de la dureté de l eau L appareil est équipé d un système qui détecte automatiquement lorsqu un détartrage est nécessaire Le système peut être optimisé pour les foyers disposant d une eau très douce même si celle ci résulte de l utilisation d un adoucisseur d eau et di...

Page 45: ...affichage de l heure clignote 2 Appuyez sur les touches et pour remettre la minuterie 3 Appuyez sur la touche Minuterie pour enregistrer La minuterie commencera à décompter Quand le temps indiqué s est écoulé le four émettra un bip qui se répétetent toutes les 30 secondes ou jusqu à ce que vous ailliez appuyé sur les touches Minuterie ou Stop Pendant le fonctionnement de la minuterie le voyant de ...

Page 46: ... Ce réglage est optionnel Passez directement au point 6 si vous ne souhaitez pas régler la durée 5 Sélectionner le temps de fonctionnement que vous souhaitez en appuyant sur les touches et par exemple pour 20 minutes 6 Appuyez sur la touche Start Démarrer Le four commencera à fonctionner Gril 1 Appuyez sur la touche Grill La touche fonction s allume 2 Appuyez sur la touche Durée pour changer le te...

Page 47: ...s souhaitez en appuyant sur les touches et par exemple pour 20 minutes 6 Appuyez sur la touche Start Démarrer Le four commencera à fonctionner Chaleur tournante Vapeur 1 Appuyez sur la touche Chaleur tournante Vapeur La touche fonction s allume 2 Appuyez sur la touche Température pour régler la température souhaitée Le voyant respectif clignotera 3 Pour changer la température appuyez sur les touch...

Page 48: ...ppuyez sur la touche Grill Fane La touche fonction s allume 2 Appuyez sur la touche Durée pour changer le temps de fonctionnement Le voyant respectif clignotera 3 Sélectionner le temps de fonctionnement que vous souhaitez en appuyant sur les touches et par exemple pour 25 minutes 4 Appuyez sur la touche Start Démarrer Le four commencera à fonctionner ...

Page 49: ...ommencera à fonctionner Programme Type de nourriture Température ºF Temps min Instructions r 1 Plats 210 13 r 2 Plats préparés congelés 210 18 Retirez le couvercle du récipient et positionner le sur la grille r 3 Haricots 210 35 Stérilisation Les temps et températures sont basés sur des récipients de 1L r 4 Cerises 175 35 r 5 Prunes 195 35 Fonction de cuisson automatique LÉGUMES 1 Appuyez sur la t...

Page 50: ...gnotera 3 Appuyez sur les touches et pour changer le programme par exemple 01 voir le tableau suivant 4 Appuyez sur la touche Start Démarrer Le four commencera à fonctionner Programme Type de poisson Température ºF Temps min 01 Truite 175 25 02 Crevette 195 15 03 Filet de poisson 175 18 04 Moules 210 25 05 Homard 210 30 Programme Type de légumes Température ºF Temps min 01 Brocoli fleurette 210 20...

Page 51: ...e de nourriture Le voyant respectif clignotera 3 Appuyez sur les touches et pour changer le programme par exemple 01 voir le tableau suivant 4 Appuyez sur la touche Start Démarrer Le four commencera à fonctionner Programme Type de viande Température ºF Temps min 01 Blanc de poulet 210 30 02 Bacon morceaux 210 45 03 Escalope de dinde 210 20 04 Filet de porc entier 210 25 05 Saucisses de Vienne 210 ...

Page 52: ...dans le réservoir RISQUE DE DEBORDEMENT Message concernant le réservoir d eau Quand le réservoir est enlevé ou mal positionné l affichage du niveau d eau indique le message RES Pour que le message disparaisse positionnez correctement le réservoir Vider le réservoir d eau Quand l appareil est éteint l eau résiduelle est renvoyée dans le réservoir Pendant que l eau est renvoyée l affichage indique P...

Page 53: ...hage et le voyant respectif clignoteront Pour changer le paramètre appuyez sur les touches et et confirmez votre sélection en appuyant à nouveau sur la touche de sélection de la température Annuler un cycle de cuisson Si vous souhaitez annuler le cycle de cuisson appuyez sur la touche Stop deux fois Vous entendrez 3 bips et le message End s affichera Fin du cycle de cuisson A la fin d une durée dé...

Page 54: ...isible en hiver ou dans un environnement très humide Eau résiduelle dans le four Afin de diminuer la quantité d eau résiduelle dans le four il est conseillé de placer un plateau en métal sur la grille inférieure Le liquide condensé commence à suinter de la nourriture et goutte en eau résiduelle dans le plateau Ce qui reste d eau résiduelle peut être facilement essuyée avec un chiffon ...

Page 55: ...r ex de la compote des quenelles et les plats à base d eau La grille s utilise pour étuver les récipients de cuisson plus petits que l emplacement prévu comme par exemple des coupes à dessert et pour régénérer des assiettes Les informations précises sont contenues dans les tableaux Les valeurs de durée de cuisson et de température sont fournies à titre indicatif En fonction du type d aliment et de...

Page 56: ...ré 2 Haddock 35 27 42 33 oz 175 20 25 bac perforé 2 Filet de thon 17 64 35 27oz 175 15 20 bac perforé 2 Sandre 4 x 8 82 oz 175 25 30 bac perforé 2 Viande Viande Quantité Température en ºF Temps de cuisson en min Accessoire Récipient Niveau des supports en partant du bas Boulettes de poulet 4 10 210 40 45 bac perforé 2 Poitrine de poulet 4 6 210 25 35 bac perforé 2 Côte de porc façon Kassel 17 64 3...

Page 57: ...210 15 20 bac perforé 2 Fenouil Coupé en deux 210 20 30 bac perforé 2 Pommes de terre avec peau Entières très petites 210 20 25 bac perforé 2 Pommes de terre avec peau Entières très grosses 210 45 50 bac perforé 2 Pommes de terre sans peau En cubes 210 20 25 bac perforé 2 Chou rave En lamelles 210 20 25 bac perforé 2 Haricots mange tout 210 15 20 bac perforé 2 Carottes En rondelles 210 25 30 bac p...

Page 58: ...e pêches 17 64 52 9 oz 210 15 20 bac non perforé 2 Fruits Stériliser réduire Fruits Quantité Température en ºF Temps de cuisson en min Récipient Niveau des supports en partant du bas Poires 4 6 verres de 4 fl oz 210 30 35 grille 1 Cerises 4 6 verres de 4 fl oz 210 30 35 grille 1 Pêches 4 6 verres de 4 fl oz 175 30 35 grille 1 Prunes 4 6 verres de 4 fl oz 175 30 35 grille 1 Régénérer Réchauffer Qua...

Page 59: ...ux les récipients doit toujours être placée aux niveaux 2 ou 3 e au niveau 1 en partant du bas Temps de cuisson différents sont contrôlés comme suit Les aliments qui nécessitent un temps de cuisson plus long doivent être placés dans la partie supérieure du four Les aliments nécessitant un temps de cuisson plus court sont donc placés au premier niveau Un exemple Légumes pommes de terre et poisson M...

Page 60: ...e Sardine rascasse rouge 28 22 oz 6 8 unités 18 24 15 20 Beurrez légèrement Quand la moitié du temps est écoulée retournez et ajoutez les condiments Viande Saucisse 6 8 unités 22 26 Percez et retournez quand la moitié du temps est écoulée Hamburger congelé 3 unités 18 20 Retourner 2 ou 3 fois Entrecôte environ 3 cm d épaisseur 14 11 oz 25 30 Saucez et retournez quand la moitié du temps est écoulée...

Page 61: ...ez pas Conseils pour la cuisson Retournez les pièces de viande à la moitié du temps de cuisson Quand le rôti est cuit laissez le reposer 20 minutes dans le four éteint et fermé Le jus de la viande sera ainsi mieux réparti La température et le temps de cuisson dépendent du type et de la quantité d aliment S il n y a pas d indication du poids exact du rôti dans le tableau choisissez le poids immédia...

Page 62: ...n couteau fin sur le dessus du gâteau Si la pâte ne colle pas au couteau le gâteau est cuit Le gâteau est très foncé La prochaine fois sélectionnez une température plus basse et laissez cuire le gâteau plus longtemps Le gâteau est très sec Faites de petits orifices avec une petite fourchette dans le gâteau déjà cuit puis arrosez avec du jus de fruit ou une boisson alcoolique La prochaine fois mont...

Page 63: ...du support dans le sens inverse des aiguilles d une montre Dévissez légèrement l écrou 2 de la surface de fixation du support dans le sens inverse des aiguilles d une montre Ne pas ôter l écrou Tirez légèrement le support vers l avant et sortez le du four Pour remettre en place les supports glissez les dans l écrou 2 Vissez l écrou 1 dans le sens des aiguilles d une montre jusqu à la butée revisse...

Page 64: ... Si le détartrage n est pas effectué le voyant se met à clignoter Si après plusieurs cuissons l appareil n est toujours pas détartré le fonctionnement sera bloqué Le message CAL s affiche et les voyants clignotent REMARQUE IMPORTANTE si l appareil n est pas détartré l appareil fonctionnera moins bien ou sera endommagé Produits détartrants appropriés Pour le détartrage utilisez le produit détartran...

Page 65: ...servoir d eau et remettez le réservoir d eau 5 Appuyez sur la touche Start Démarrer Le cycle de détartrage commence et prend environ 30 minutes 6 Lorsque 1 0L clignote sur l affichage détartrage et que le four émet un bip retirez et videz le réservoir d eau 7 Remplissez le réservoir d eau avec 1 0 litre d eau froide et remettez le réservoir d eau 8 Appuyez sur la touche Start Démarrer Le premier c...

Page 66: ...tement les tâches de calcaire de graisse d amidon et de blanc d œuf Ces tâches peuvent provoquer une corrosion Ne laissez pas l eau pénétrer dans l enceinte de cuisson Aire de cuisson Nettoyez les surfaces intérieures après chaque utilisation à l aide d un torchon humide Laissez la porte ouverte afin que l enceinte de cuisson refroidisse et sèche N utilisez pas de produit nettoyant agressif pour é...

Page 67: ...me Les aliments ne chauffent pas ou très lentement Vérifiez si vous avez choisi la bonne température et la bonne durée de cuisson vous avez introduit une quantité d aliment supérieure ou inférieure à d habitude à l intérieur de l appareil Si le message Err_ s affiche veuillez contacter le service client Après la fin d un processus de cuisson un bruit retentit Ce n est pas un problème Le ventilateu...

Page 68: ...e de nourriture réglage de l heure ou du temps Indication qu il manque le réservoir d eau clock heure Le réservoir d eau doit être retiré vidé et réintroduit Fonctions spéciales Niveau d eau A1 à A5 réglage de l heure Fonctions spéciales avec des temps et températures prédéfinis à C1 à C5 à Chauffage Niveau d eau à réglage de l heure Fonctions spéciales avec des temps et températures prédéfinis Ré...

Page 69: ...fication Puissance exigé 2900 W Courant requis 13 A Puissance du Vapeur 1500 W Puissance du Gril 1200 W Puissance de l air chaud 1600 W Dimensions extérieures lxhxL 29 x 18 x 21 Dimensions de l enceinte de cuisson lxhxL 16 x 8 x 15 Contenance du four 1 34 ft3 Poids 78 lbs ...

Page 70: ...le côté intérieur de la porte et le devant de la cavité ne sont pas abîmés S ils le sont appelez le Service d assistance technique N UTILISEZ PAS LE FOUR si le conduit flexible est endommagé si le four ne fonctionne pas correctement ou s il est endommagé ou bien tombé Appelez le Service d assistance technique Installez le four sur une surface stable le plus loin possible des radios télévisions et ...

Page 71: ...z le conduit flexible depuis le four jusqu au boîtier de raccordement en utilisant un connecteur de conduit U L listed Les figures suivantes et les instructions fournies présentant la manière la plus commune de brancher un four Vos codes locaux et règlements sont évidemment prioritaires sur ces instructions Effectuez les connexions électriques conformément aux codes locaux et les règlements AVERTI...

Page 72: ...ans le boîtier de raccordement fil nu ou coloré vert Connectez les broches de raccordement rouge et noir du four aux broches de raccordement correspondantes dans le boîtier de raccordement Après l installation Le four ne fonctionne que si la porte est correctement fermée Avant la première utilisation nettoyez l intérieur du four ainsi que les accessoires en suivant les indications figurant au poin...

Page 73: ...73 Installation dimensions Dimensions d Installation ...

Page 74: ... the appliance to the cabinet using the four screws provided Insert the screws through the front holes FR Introduisez le four dans le meuble jusqu à ce que l avant du four butte sur le bois et alignez le Ouvrez la porte du four et fixez ce dernier aux parois latérales du meuble au moyen des 4 vis fournies par les trous prévus à cet effet ...

Page 75: ......

Page 76: ...ARKWAY ROSELAND NJ 07068 Connecticut DC Delaware Maine Maryland Massachusetts New Hampshire New Jersey New York North Carolina Pennsylvania Rhode Island South Carolina Vermont Virginia ECHELON HOME PRODUCTS INC 1051 ANDOVER PARK EAST TUKWILA WA 98188 Alaska Idaho Montana Oregon Washington Wyoming PURCELL MURRAY 185 PARK LANE BRISBANE CA 94005 California Nevada PINNACLE EXPRESS INC PO BOX 1836 3383...

Reviews: