background image

17

Step 3: visula checks

Surface burners

The burner 

fl

 ame color should be blue with no yel-

low on the tips. It is not uncommon to see orange 
in the

fl

 ame color; this indicates the burning of airborne 

impurities in the gas and will disappear with use. 
With propane (LP) gas, slight yellow tips on the 
primary icone are normal.
The 

fl

 ame should burn completely around the bur-

ner cap. If it doesn’t, check that the cap is posi-
tioned
correctly on the base and that the ports are not 
blocked.
The 

fl

 ame should be stable with no excessive noi-

se or 

fl

 uttering.

After performing all these visual checks, reinstall 
the bottom panel of the oven compartment and 
proceed to setting the minimum for each burner.

Step 4: minimum 

fl

 ame adjustment

WARNING!
These adjustments should be made only for use 
of the appliance with natural gas. For use with li-
quid propane gas, the choke screw must be fully 
turned in a clockwise direction.

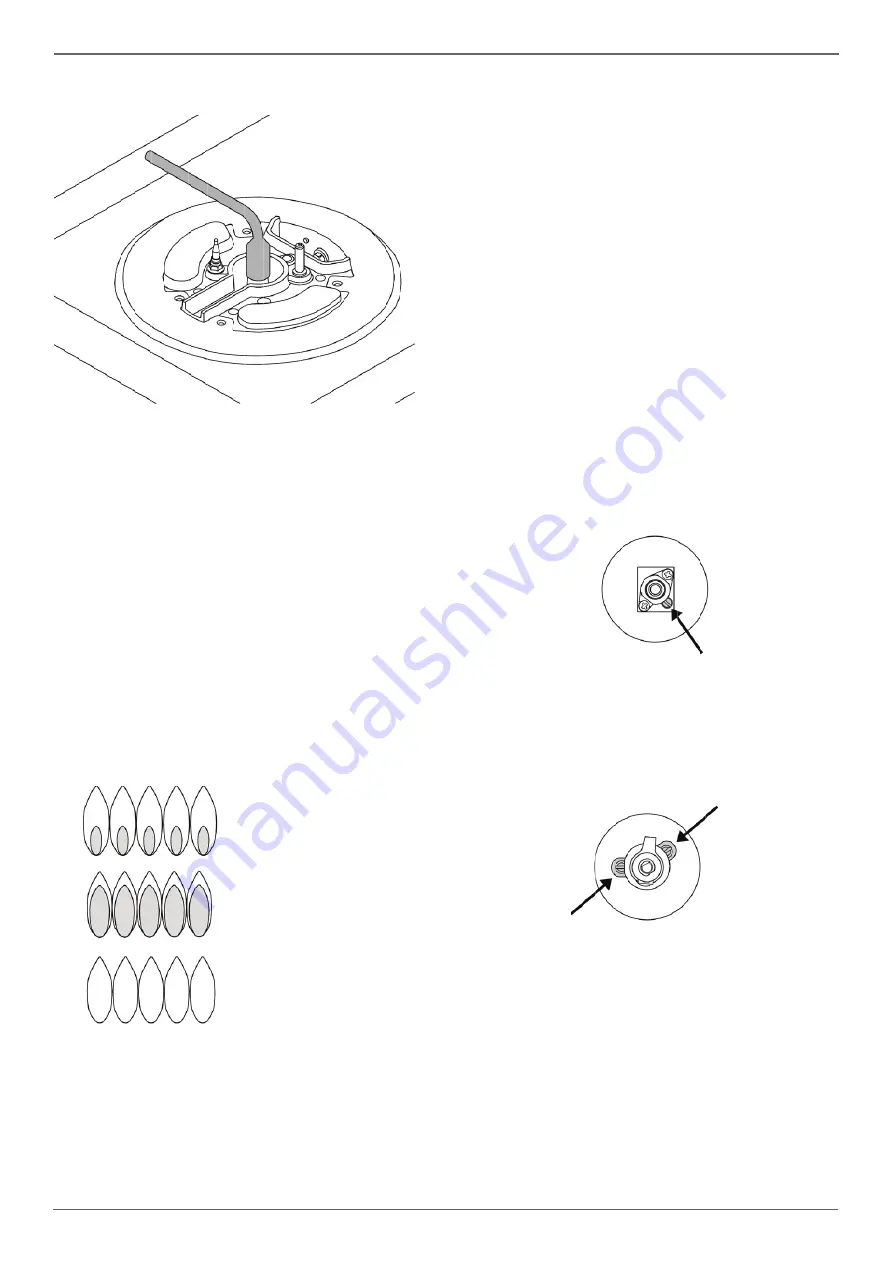
SURFACE BURNERS
Light one burner at a time and set the knob to the 
MINIMUM position (small 

fl

 ame).

Remove the knob.
The rangetop is equipped with a safety valve. 
Using a small-size slotted screwdriver, locate the 
choke valve on the valve body and turn the choke 
screw to the right or left until the burner 

fl

 ame is 

adjusted to desired minimum.
Make sure that the 

fl

 ame does not go out when 

switching quickly from the MAXIMUM to the MINI-
MUM position.

For the gas valve of dual burner the choke valve is 
located on the valve body, the A screw adjust the 
outer ring, the B screw adjust the inner ring. 

/ Gas conversion

yellow 

fl

 ames:

further adjustment is required

yellow tips on outer cones:
normal for LP gas

soft blue 

fl

 ames:

normal for natural gas

A

B

Summary of Contents for MAST366RTBXT

Page 1: ...BERTAZZONI INSTALLATION USER MANUAL GAS RANGETOP 3100515 WWW BERTAZZONI COM ...

Page 2: ...______________________________________ INSTALLATION ________________________________________________________________ Unpackaging the rangetop_____________________________________________________ Installing the worktop frontguard ________________________________________________ Installing the island trim _______________________________________________________ Installing backguard optional _________...

Page 3: ...3 Models Models MAST366RTBXT PROF366RTBXT MAST366RTXE MAST486GRTBXT PROF486GRBXT Models ...

Page 4: ...t be properly grounded Grounding reduces the risk of electric shock by providing a safe pathway for electric current in the event of a short circuit Warning To avoid risk of property damage personal injury or death follow information in this ma nual exactly to prevent a fire or explosion WARNING If the information in these instructions is not followed exactly a fire or explosion may result causing...

Page 5: ...5 Warnings WARNING Cancer and Reproductiv Harm www P65Warnings ca gov ...

Page 6: ...anual shutoff valve during any pressure testing of the gas supply piping system at test pressures equal to or less than 1 2 PSI 13 8 w c or 3 5 kPa All opening and holes in the wall and floor back and under the appliance shall be sealed before installation of the appliance A manual valve shall be installed in an accessible location in the gas line external to the appliance for the purpose of turnin...

Page 7: ...nce For island installations the hood width should overhang the range by a minimum of 3 76 mm on each side Hood Placement For best removal of smoke and odors the lower edge of the hood should be installed between 25 1 2 65 cm and 31 1 2 80 cm above the range cooking surface If the hood contains any combustible materials i e a wood covering it must be installed at a minimum of 36 914 mm above the c...

Page 8: ...nces shown in figure are required 3 The gas and electrical supply must be locat ed in an area that is accessible without requiring removal of the cooktop The appliance electrical power cord and gas pipe connection are located on the left rear Prepare the finished opening for the rangetop according to dimensions shown in the illustration on the follows page The platform must include a cut out at th...

Page 9: ...wall cabinets above the rangetop shall be 13 33 0 cm Cabinet Shaded area behind range indicates minimum clearance to combustible surfaces combustible materials cannot be located within this area 12 305 mm min to combustible surface with Flush Island Trim For Flush Island installations counter surface should have a cantilever edge meeting the back section of the Flush Island Trim accessory As defin...

Page 10: ...conductors only Failure to follow these instructions could re sult in serious injury or death This unit is manufactured for a polarized groun ded 120 volt 60 Hz 16 amp system Electric power consumption is about 200 W for 36 1200W for 48 The minimum of 102 VAC is required for proper operation of gas ignition systems The circuit must be grounded and properly pola rized The unit is equipped with a SJ...

Page 11: ...rvice 1 9 0 6LPE HVFULSWLRQ JU UHHQ HDUWK Q ODFN OLQH EL KLWH QHXWUDO 2 2856 6LPE HVFULSWLRQ 1 JQLWLRQ 0LFUR VZLWFKHV 6SDUN HQHUDWRU 1 EL EL 1 Q Q 1 9 0 6LPE HVFULSWLRQ U 5HG JU UHHQ HDUWK Q ODFN OLQH EL KLWH QHXWUDO 2 2856 6LPE HVFULSWLRQ 1 JQLWLRQ 0LFUR VZLWFKHV 6SDUN HQHUDWRU ULGGOH 7KHUPRVWDW 5 5 ULGGOH HOHPHQW 766 6DIHW 7KHUPRVWDW 1 EL Q EL JY EL 1 Q Q 5 5 766 6 EL Q EL EL U U D U Q ...

Page 12: ...THE PACKAGE CONTAINING THE CONVERSION NOZZLES SHIPPED WITH EVERY RANGETOP Please provide the service person with this ma nual before work is started on the rangetop MANUAL SHUT OFF VALVE THIS VALVE IS NOT SHIPPED WITH THE AP PLIANC AND MUST BE SUPPLIED BY THE IN STALLER The manual shut off valve must be installed in the gas service line between the gas hook up on the wall and the appliance inlet in...

Page 13: ...ld pres sure in order to check the regulator The regulator used on this range can withstand a maximum input pressure of 1 2 PSI 13 8 iwc or 3 5 kPa If the line pressure exceeds that amount a stepdown regulator is required The appliance its individual shut off valve and the pressure regulator must be disconnected from the gas line during any pressure testing of that sy stem at pressures in excess of...

Page 14: ...cking it In the event of transport damage do not plug it Take pictures of the damage and report it immediately to the freight forwarder The grates griddle plate burner caps and oven racks should be removed to facilitate handling INSTALLING THE WORKTOP FRONTGUARD To increase the clearance between the front edge of the worktop and the burners it is possible to install a front guard for the worktop T...

Page 15: ...D TRIM The island trim is only placed on the cooktop re move all tape and packaging before installing it INSTALLING BACKGUARD OPTIONAL The backguard is an optional contact you dealer for buying it Installation 1 1 2 2 3 3 4 4 ...

Page 16: ... a convertible type pressure regulator for use with Natural Gas at a nominal outlet pressure of 4 iwc or LP gas at a nominal outlet pressure of 10 iwc and it is pre arranged from the factory to operate with one of these gas pressure as indica ted in the labels affixed on the appliance package and Instruction booklet To convert the regulator for use with the other gas Unscrew by hand the upper cap of...

Page 17: ... WARNING These adjustments should be made only for use of the appliance with natural gas For use with li quid propane gas the choke screw must be fully turned in a clockwise direction SURFACE BURNERS Light one burner at a time and set the knob to the MINIMUM position small flame Remove the knob The rangetop is equipped with a safety valve Using a small size slotted screwdriver locate the choke val...

Page 18: ...should be wiped with hot soapy water and with a liquid stainless steel cleanser If buildup occurs do not use steel wool abrasive cloths cleaners or powders If it is necessary to scrape stainless steel to remove encrusted materials soak with hot wet cloths to loosen the material then use a wood or nylon scraper Do not use a metal knife spatula or any other metal tool to scrape stainless steel Scrat...

Page 19: ...19 User BERTAZZONI USER MANUAL GAS RANGETOP ...

Page 20: ... must be properly installed and grounded by a qua lified technician DO NOT attempt to adjust repair service or replace any part of your appliance un less it is specifically recommended in this manual All other servicing should be referred to a qualified servicer Have the installer show you the location of the gas shut off valve and how to shut it off in an emergency A certified technician is require...

Page 21: ...ion cooktop con nection cable insulation can melt if in contact with heat and this may result in an injury and a property damage Recommended Utensils Use pans with flat bottoms and handles that are easily grasped and stay cool Avoid using unstable warped easily tipped or loose handled pans Also avoid using pans especially small pans with heavy handles as they could be unstable and easily tip Pans ...

Page 22: ...l and local standards Electrical shock hazard Make sure all controls are OFF before cleaning Failure to do so can result in burns or electrical shock WARNING Cancer and Reproductiv Harm www P65Warnings ca gov Worktop and knobs layout 1 2 3 4 5 6 Left front burner Left rear burner Central front burner Central rear burner Right front burner Right rear burner Heating element 1 2 3 4 5 6 7 Left front ...

Page 23: ...height depends on size and material of pan being used food being cooked amount of liquid in the pan Never extend the flame beyond the base of the pan Use a low or medium flame for pan materials that conduct the heat slowly such as porcelain coated steel or glass ceramic Because the edges of the flame are much hotter than its center the flame tips should stay benea th the bottom of the cookware Fla...

Page 24: ...und bottom woks must be used with a support ring In some models the porcelain coated cast iron wok support ring must be purchased separately Simmer ring For very slow cooking the porcelain coated sim mer ring should be used In some models the por celain coated cast iron simmer ring must be pur chased separately Simmer ring must be used for pan with diametr less than 4 inches NOTE In the event of a...

Page 25: ...o cool Repeat step 3 covering the entire surface with the oil Turn off the heat and allow the griddle to cool Wipe the entire surface of the griddle using a heavy cloth Apply a very thin layer of vegetable oil The griddle is now ready for use too much oil can damage the griddle USING THE ELECTRIC GRIDDLE Press and turn the knob anti clockwise to the selected position The activation of the griddle i...

Page 26: ... with hot towels to soften the residue then use a wooden or nylon spatula or scraper DO NOT use a metal knife spatula or any other me tal tool to scrape stainless steel DO NOT permit citrus or tomato juice to remain on stainless ste el surface as citric acid will permanently discolor stainless steel Cleaning painted surfaces Clean with a soft cloth warm water and non abra sive dishwashing liquid W...

Page 27: ...ers have flame failure devices fitted as standard Therefore after lighting the burner keep the knob pressed for a few seconds to de activate the flame failure device The ignition candles are sparking continuously Is the cooktop wet from cleaning or a boil over Turn off the electricity supply and thoroughly dry the burner components and igniters The control knob are getting too hot Are you cooking w...

Page 28: ...an a Bertazzo ni authorized service agency Damage or repair service to correct service pro vided by an unauthorized agency or the use of unauthorized parts Installation not in accordance with local electrical codes gas codes or plumbing codes Defects or damage due to improper storage of the product Defects or damage or missing parts on products sold out of the original factory packaging or from di...

Page 29: ......

Page 30: ......

Page 31: ......

Page 32: ......

Page 33: ...u réparations eff ectués afi n de corriger une réparation réalisée par une société non autorisée ou utilisation de composants non autorisés L installation non conforme aux réglementations locales relatives à l électricité au gaz et à la plomberie Les défauts ou dommages dus à un entreposage inapproprié du produit Les défauts ou dommages ou pièces manquantes concernant des produits vendus sans leur ...

Page 34: ...du Le brûleur s allume mais s éteint dès que le bouton est relâché Les brûleurs sont équipés d un dispositif d arrêt du gaz Une fois le brûleur allumé maintenir le bouton enfoncé pendant quelques secondes pour désactiver le dispositif d arrêt du gaz Les bougies d allumage font continuelle ment des étincelles La surface de cuisson est elle encore humide après un nettoyage ou un débordement Couper l...

Page 35: ...umide et chaud pour ramollir le dépôt puis utiliser une spatule en bois ou en nylon ou une raclette NE PAS utiliser de couteau de spatule ou tout autre ustensile en métal pour gratter l acier inoxydable NE PAS laisser de jus de citron ou de tomate sur la surface en acier inoxydable l acide citrique pouvant décolorer de façon indélébile l acier inoxydable Nettoyage des surfaces peintes Nettoyer ave...

Page 36: ...isser le grill refroidir Répéter l étape 3 en appliquant de l huile sur toute la surface Éteindre le grill et le laisser refroidir Frotter toute la surface du grill à l aide d un linge épais Appliquer une très fi ne couche d huile végétale Le grill est désormais prêt à être utilisé Attention une trop grosse quantité d huile peut l endommager UTILISATION DU GRILL ÉLECTRIQUE Appuyer sur le bouton et...

Page 37: ...du wok en fonte émaillée doit être acheté séparément Diff useur mijoteur Pour une cuisson à feu très doux utiliser le diff useur mijoteur émaillé Pour certains modèles le diff useur mijoteur en fonte émaillée doit être acheté séparément Le diff useur mijoteur doit être utilisé avec des récipients de cuisson d un diamètre inférieur à 4 pouces 10 cm REMARQUE En cas de coupure d électricité les brûleurs ...

Page 38: ...es aliments cuisinés du volume de liquide dans le récipient de cuisson Ne jamais faire dépasser la fl amme du fond du récipient de cuisson Utiliser une fl amme petite ou moyenne pour les récipients de cuisson faits dans un matériau qui conduit la chaleur lentement comme l acier à revêtement céramique ou la vitrocéramique Les bords de la fl amme étant beaucoup plus chauds que le centre les pointes ...

Page 39: ... cuisson Ventilation de la pièce Il convient d associer un ventilateur extracteur à l appareil Celui ci doit être installé conformément aux normes locales et nationales en vigueur Le fonctionnement d une hotte aspirante peut avoir une incidence sur d autres appareils de ventilation Elle doit être installée conformément aux normes locales et nationales en vigueur Risque de décharge électrique S ass...

Page 40: ...es infl ammables non attachés ou à manches longues pendant une cuisson Les vêtements peuvent s enfl ammer ou s accrocher aux poignées d un ustensile Ne pas brancher d appareils aux prises situées au dessus ou à proximité de la surface de cuisson à induction L isolation du cordon d alimentation pourrait fondre en cas de contact avec la chaleur et entraîner des blessures et des dommages matériels Us...

Page 41: ...ute sécurité l appareil doit être correctement installé et mis à la terre par un technicien qualifi é NE PAS tenter de régler réparer réviser ou remplacer un composant de l appareil à moins que le présent manuel ne le recommande spécifi quement Toute autre intervention doit être réalisée par un opérateur qualifi é L installateur montrera l emplacement de la vanne de fermeture du gaz et les modalit...

Page 42: ...19 utilisation BERTAZZONI MANUEL D UTILISATION TABLE DE CUISSON À GAZ AUTONOMES ...

Page 43: ...ier inoxydable Toutes les parties du corps en acier inoxydable doivent être nettoyées avec de l eau chaude savonneuse et un détergent liquide adapté à l acier inoxydable En présence de dépôts ne pas utiliser de laine d acier de linges abrasifs de produits ou de poudres nettoyants Si l acier inoxydable doit être gratté pour en retirer les incrustations mouiller avec un chiff on humide et chaud pour ...

Page 44: ...d un tournevis plat de petites dimensions repérer la soupape d étranglement sur le corps de la soupape et tourner la vis d étranglement vers la droite ou la gauche jusqu à ce que la fl amme du brûleur atteigne le minimum souhaité S assurer que la fl amme ne s éteint pas lors du passage rapide de la position MAXIMUM à la position MINIMUM Pour la vanne de gaz du double brûleur la soupape d étranglem...

Page 45: ...type convertible adapté à une utilisation avec du gaz naturel à une pression nominale de sortie de 4 inH2O ou avec du gaz LPG à une pression nominale de sortie de 10 inH2O Il a été réglé en usine pour fonctionner avec l un de ces gaz ou pressions comme indiqué sur les étiquettes apposées sur l appareil l emballage et dans le livret d instructions Convertir le régulateur pour l utiliser avec un aut...

Page 46: ... et matériaux d emballage avant son installation Avant l installation portez des gants de sécurité INSTALLATION DE LA PROTECTION ARRIÈRE EN OPTION La protection arrière est un équipement en option Contactez votre revendeur pour vous la procurer Avant l installation portez des gants de sécurité Installation 1 1 2 2 3 3 4 4 ...

Page 47: ...ésultant du transport ne pas la brancher Prendre des photos du dommage et en informer immédiatement le transporteur Retirer les grilles plaques et chapeaux des brûleurs pour faciliter le déplacement de la table de cuisson INSTALLATION DE LA PROTECTION FRONTALE DE LA SURFACE DE CUISSON Afi n d augmenter l espace entre le bord frontal de la surface de cuisson et les brûleurs il est possible d instal...

Page 48: ...elle dans le collecteur afi n de pouvoir contrôler le régulateur Le régulateur utilisé avec l appareil est adapté à une pression d alimentation maximale de 1 2 psi 13 8 inH2O ou 3 5 kPa Si la pression d alimentation dépasse cette valeur un hacheur série est nécessaire L appareil sa vanne de fermeture individuelle et le régulateur de pression doivent être débranchés de la conduite de gaz en cas de ...

Page 49: ...CONVERSION EST DÉCRITE DANS CE MANUEL ET DANS LE SACHET CONTENANT LES DIFFÉRENTS INJECTEURS FOURNI AVEC LA TABLE DE CUISSON Ce manuel doit être fourni à la personne en charge de l entretien avant toute intervention sur la table de cuisson VANNE DE FERMETURE MANUELLE CETTE VANNE N EST PAS EXPÉDIÉE AVEC LA TABLE DE CUISSON ET DOIT ÊTRE FOURNIE PAR L INSTALLATEUR La vanne de fermeture manuelle doit ê...

Page 50: ... une fois l entretien réalisé 1 9 0 6LPE HVFULSWLRQ JU UHHQ HDUWK Q ODFN OLQH EL KLWH QHXWUDO 2 2856 6LPE HVFULSWLRQ 1 JQLWLRQ 0LFUR VZLWFKHV 6SDUN HQHUDWRU 1 EL EL 1 Q Q 1 9 0 6LPE HVFULSWLRQ U 5HG JU UHHQ HDUWK Q ODFN OLQH EL KLWH QHXWUDO 2 2856 6LPE HVFULSWLRQ 1 JQLWLRQ 0LFUR VZLWFKHV 6SDUN HQHUDWRU ULGGOH 7KHUPRVWDW 5 5 ULGGOH HOHPHQW 766 6DIHW 7KHUPRVWDW 1 EL Q EL JY EL 1 Q Q 5 5 766 6 EL Q E...

Page 51: ...re Utiliser uniquement des conducteurs en cuivre Le non respect de ces instructions pourrait entraîner de graves blessures voire la mort Cette table de cuisson a été fabriquée pour être branchée sur un système de 16 A 120 V 60 Hz mis à la terre et polarisé Sa consommation électrique est d environ 200 W pour 36 et de 1200 W pour 48 Un minimum de 102 Vca est nécessaire pour un fonctionnement correct...

Page 52: ...dessus de la cuisinière doit être de 13 33 cm Meuble de cuisine La zone grisée derrière la table de cuisson indique l espace minimum à respecter par rapport à la surface de la table de cuisson Aucun matériau combustible ne doit se trouver dans cette zone 12 305 mm min par rapport aux surfaces combustibles avec garniture affl eurante Pour des installations autonomes la surface de travail doit être do...

Page 53: ...saires 3 L alimentation en gaz et en électricité doit être située dans une zone accessible sans nécessiter l enlèvement de la table de cuisson Le cordon d alimentation électrique de l appareil et la raccordement du tuyau de gaz sont situés à l arrière gauche Préparer l ouverture fi nie pour la table de cuisson en fonction des dimensions indiquées dans l illustration de la page suivante La plate fo...

Page 54: ...e ventilation En cas d installations autonomes la largeur de la hotte doit dépasser celle de la table de cuisson d au moins 3 76 mm de chaque côté Positionnement de la hotte Pour une meilleure extraction des fumées et des odeurs le bord inférieur de la hotte doit se trouver entre 25 1 2 65 cm et 31 1 2 80 cm au dessus de la surface de cuisson de la cuisinière Si la hotte contient des matériaux com...

Page 55: ... test de pression du système d alimentation en gaz à des pressions de test inférieures ou égales à 1 2 psi 13 8 inH2O ou 3 5 kPa Toutes les ouvertures et les trous dans le mur et le plancher derrière et sous l appareil doivent être scellés avant l installation de celui ci Une vanne manuelle doit être installée dans un emplacement accessible sur la conduite d alimentation en gaz indépendante de l a...

Page 56: ...5 Avertissements AVERTISSEMENT Cancer et Troubles de l appareil repro ducteur www P65Warnings ca gov ...

Page 57: ... terre réduit le risque de décharge électrique en fournissant un passage sécurisé au courant électrique en cas de court circuit Avertissement Pour éviter les risques de lésion de blessure mortelle ou de dommages aux biens suivre scrupuleusement les informations contenues dans ce manuel visant à prévenir les incendies ou les explosions AVERTISSEMENT Si les informations dans ce manuel ne sont pas su...

Page 58: ...3 Modèles Modèles MAST366RTBXT PROF366RTBXT MAST366RTXE MAST486GRTBXT PROF486GRBXT Modèles ...

Page 59: ..._____________________________ INSTALLATION ________________________________________________________________ Déballage de la table de cuisson_________________________________________________ Installation de la protection frontale de la surface de cuisson ________________________ Installation de la garniture ____________________________________________________ Installation de la protection arrière e...

Page 60: ...1 BERTAZZONI MANUEL D INSTALLATION ET D UTILISATION TABLE DE CUISSON À GAZ AUTONOMES 3100515 WWW BERTAZZONI COM ...

Reviews: