background image

14

15

GB

 WARNING

If the information in this manual 
is not followed exactly, a fire or 
explosion may result causing 
property damage, personal injury or 
death.

Introduction

Please read these instruction 
COMPLETELY AND CAREFULLY. They 
will save you time and effort and help to 
ensure optimum oven performance.
Be sure to observe all WARNINGS. 
These installations are intended for use 
by a qualified installer.
In addition to these instructions, the 
oven shall be installed:
•  In the United States, in accordance 

with the National Electric Code/
State and Municipal codes and/or 
local codes.

•  In Canada, in accordance with 

Canadian Electric Code C22.1-
latest edition/Provincial and 
Municipal codes and/or local 
codes.

These shall be carefully followed at all 
times.

NOTE: IF INSTALLING YOUR OVEN 
IN CANADA PLEASE CHECK TO 
MAKE SURE THAT YOU HAVE 

A MODEL WITH THE CANADIAN 
LISTING.

MARK, AS SHOWN ABOVE:

Mark as shown above means the oven 
complies with both US and CANADIAN 
Standards.

Tools you will need

The following tools are needed to install 
your new oven:
•  Tape measure and straight edge 

or rules

•  Pencil
•  Phillips screwdriver
•  Level 
•  Wire cutters and wire stripper
•  Hand or saber saw
•  1” (2,5 cm) Hole saw
•  Drill and drill bit
•  Safety gloves and goggles
•  Volt meter (0-250VAC)

Packaging

Remove all tape and packaging before 
using the oven.
Destroy the packaging after unpacking 
the oven following the rules in force in 
your town. Never allow children to play 
with packaging material.

Power requirements

The oven must be supplied with the 
proper voltage and frequency. The oven 
is manufactured to be connected to a 
three-wire, single phase,120/240V, 60 

Installation instructions

Location of rating plate 

14

15

GB

Hz AC electrical supply on a separate 
circuit fused in both sides of the line. A 
circuit breaker or time delay fuse sized 
not to exceed the circuit rating of the 
appliance specified on the rating plate 
located on the frame behind the door 
of the oven is recommended.
The oven must be supplied with copper 
or aluminum wires.
If aluminum wire is provided to 
connect oven to branch circuit, UL 
listed connectors for joining copper 
and aluminum must be used. Follow 
instructions provided with connectors.
If is recommended that you have the 
electrical wiring and hook-up of your 
oven performed by a qulified electrician. 
After installation is complete have the 
electrician show you where the main 
disconnect is and which of the circuit 
breakers/fuses are for the oven.

Choosing oven location

Carefully select the location where the 
oven will be placed.
The oven should be located for 
convenient use in the kitchen, but away  
from strong drafts.
Strong drafts may be caused by open 
doors or windows, or by heating and/
or air conditioning vents or fans. Make 
sure that electrical power can be 
provided to the location selected.

Steps for installation

The following pages provided the 
necessary information for proper 
installation of the oven and are 
arranged as follows: 
•  Technical Data
•  Installation Cutout Dimensions, 

Required Clearances and 
Mounting instructions for:

- Under counter installation, Single 

Oven

- Wall installation, Single Oven


•  Electrical supply and Wiring 

Requirments, Programming 
required if connecting to 120/208 
Volt Circuit. Electrical Connections 
for 3-wire or 4-wire Branch Circuit.

•  Final Checklist.

Summary of Contents for PROFS24XV

Page 1: ...24 BUILT IN ELECTRIC OVEN USER CARE INSTALLATION INSTRUCTION GUIDE D UTILISATION ET D ENTRETIEN INSTRUCTIONS D INSTALLATION Model PROFS24XV ...

Page 2: ......

Page 3: ...T THEY DO NOT PLAY WITH THE APPLIANCE Dear Customer we would like to thank you and congratulate you on your choice This new product has been carefully designed and built using top quality materials and meticulously tested to ensure that it meets all your culinary requirements Please read and observe these simple instructions which will enable you to achieve excellent results from the very first ti...

Page 4: ...ded use as described in this manual Do not use corrosive chemicals vapors or nonfood productsinthisappliance Thistype of oven is specifically designed to heat or cook It is not designed for industrial or laboratory use The use of corrosive chemicals in heating or cleaning will damage the appliance In the event that personal clothing or hair catches fire DROP AND ROLL IMMEDIATELY to extinguish flam...

Page 5: ...Do not use the cavity for storage purposes Do not leave paper products cooking utensils or food in the cavity when not being used 6 If materials inside the oven should ignite keep oven door closed Turn oven off and disconnect the circuit at the circuit breaker box 7 Do not block any vent openings 8 Make sure the blower fan is running whenever the oven is in operation If the fan does not work do no...

Page 6: ...et hot air on steam escape before removing or replacing food Do not heat unopened food containers Build up of pressure may cause the container to burst and cause injury Always place oven racks in desired location while oven is cool If a rack must be moved while oven is hot do not let pot holder contact the got heating elements Use only pot holders Moist or damp pot holders on hot surfaces may resu...

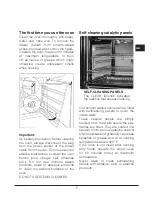
Page 7: ...not use chlorine based products acids or abrasive products to clean the painted surfaces of the oven DO NOT USE STEAM CLEANERS Self cleaning catalytic panels SELF CLEANING PANELS The CLEAN function activates the reaction that causes cleaning Our smooth walled ovens can be fitted with selfcleaning panels to cover the inside walls These special panels are simply hooked on to the walls before the sid...

Page 8: ...n light stays on while oven is in use Top and bottom heating elements Thermostat setting from MIN 120 F to MAX Top heating element small low Thermostat setting from MIN 120 F to 400 F Top and bottom heating elements with fan Thermostat setting from 140 F to MAX Circular heating element with fan Thermostat setting from MIN 120 F to MAX Lower heating coil with fan Regulation of the thermostat from M...

Page 9: ...hen the food is of different types fish meat etc Defrosting By selecting one of the fan cooking functions and setting the thermostat to zero the fan allows cold air to circulate inside the oven In this way frozen food can be rapidly defrosted It is not essential to pre heat the oven but you are advised to do so when cooking pastries Grill cooking Use the grill to grill or brown foods Some ovens ma...

Page 10: ...gh the oven door It is turned on when the temperature of the outer shell of the oven reaches 140 F By switching on the oven with the thermostat at 400 F the fan starts working after approx 10 min It is turned off when the temperature of the outer shell of the oven drops below 140 F By switching off the oven with the thermostat at 400 F the fan stops working after approx 30 min Thermostat Use the t...

Page 11: ...appears figure 2 Press and to set the required time To set the minute counter at a later stage press the central button for 3 seconds and adjust as described above The minute counter beeps when it finishes counting To disable it press any button Cooking time Fig 3 This is a semi automatic cooking function It can be used to set cooking times Press the central button for 3 seconds Then press it agai...

Page 12: ...ude scratches stains surface imperfections on stainless steel paint and porcelain with the exclusion of slight differences in color due to materials and painting enamelling technologies Exclusions are labor costs B stock items out of box appliances and display units HOW TO OBTAIN SERVICE To obtain warranty service please contact Bertazzoni Customer Service at the numbers below and provide model nu...

Page 13: ...the product to the home of the owner 15 Defects and damage arising from external forces beyond the control of Bertazzoni SpA such as fire flood earthquakes and other acts of God In case the product will be installed in a remote area where certified trained technicians are not reasonably available the customer will be responsible for the transportation costs for the delivery of the product to the n...

Page 14: ...ed at all times NOTE IF INSTALLING YOUR OVEN IN CANADA PLEASE CHECK TO MAKE SURE THAT YOU HAVE A MODEL WITH THE CANADIAN LISTING MARK AS SHOWN ABOVE Mark as shown above means the oven complies with both US and CANADIAN Standards Tools you will need The following tools are needed to install your new oven Tape measure and straight edge or rules Pencil Phillips screwdriver Level Wire cutters and wire...

Page 15: ...nnect is and which of the circuit breakers fuses are for the oven Choosing oven location Carefully select the location where the oven will be placed The oven should be located for convenient use in the kitchen but away from strong drafts Strong drafts may be caused by open doors or windows or by heating and or air conditioning vents or fans Make sure that electrical power can be provided to the lo...

Page 16: ...he oven with multi functional gas or gas electric cookers 21 1 4 54 cm 23 3 8 59 4 cm 23 3 8 59 4 cm 21 53 5 cm 7 8 2 1 cm A B C Elec trical supply junction box D E E A C B E E Elec trical supply junction box Mounting strip Finished sides same finish like the cabinet I Ltr DIMENSION inch cm A Cutout Width 22 1 16 56cm B Cutout Depth min 22 1 16 56cm C Cutout Height 23 58 5cm D Floor Bottom of Cuto...

Page 17: ...ea where local codes prohibit grounding through the neutral conductor For installations where grounding through the neutral conductor For installations where grounding through the neutral conductor is prohibited Disconnect the ground from the neutral at free end of conduit Use grounding terminal or lead to ground unit and usual procedure 3 Wire branch circuit for US only 4 Wire branch circuit for ...

Page 18: ......

Page 19: ...ENFANTS POUR S ASSURER QU ILS NE JOUENT PAS AVEC L APPAREIL Cher Client Vous venez d acheter l un de nos produits et nous vous en remercions vivement Ce nouveau produit minutieusement conçu et construit avec des matériaux de tout premier choix a été soigneusement testé afin de satisfaire chacune de vos exigences en matière de cuisson Nous vous prions de lire et de respecter ces instructions simple...

Page 20: ...u par le fabricant toute autre utilisation étant exclue Si vous avez des questions quelles qu elles soient contactez le fabricant Ne couvrez ni ne bloquez les ouvertures de l appareil Utilisez l appareil uniquement selon les modalités décrites dans ce manuel Ne pas utiliser sur cet appareil de produits chimiques corrosifs vapeurs ou produits non adaptés à l usage alimentaire Ce type de four est a ...

Page 21: ...re cuire excessivement les aliments Bien surveiller le four s il y a du papier du plastique ou autre matériel combustible à l intérieur Ne pas utiliser la cavité comme endroit de stockage Ne pas laisser des produits en papier des ustensiles de cuisine ou des aliments dans la cavité du four quand celui ci n est pas en marche Si le matériel qui se trouve dans le four prend feu laissez la porte du fo...

Page 22: ... air chaud et à la vapeur de sortir avant d extraire ou d introduire les aliments Ne pas réchauffer des récipients contenant des aliments sans les ouvrir L augmentation de la pression pourrait provoquer l explosion du récipient et provoquer des blessures Toujours veiller à ce que le four soit froid quand on souhaite positionner les grilles à l intérieur Si vous devez déplacer la grille alors que l...

Page 23: ...diqué sur la figure Il convient de n insérer la nourriture que lorsque le four a atteint la température préétablie c est à dire quand s éteint le voyant lumineux Important A titre de précaution avant d effectuer toute opération de nettoyage du four quelle qu elle soit débrancher toujours la fiche de la prise de courant ou couper la ligne d alimentation de l appareil Veiller à ne pas utiliser de su...

Page 24: ...t pas propre après la cuisson d aliments très gras le faire fonctionner à vide à la température maximum pendant 60 minutes maximum Les panneaux autonettoyants ne doivent être ni lavés ni nettoyés avec des produits abrasifs ou des produits contenant des acides ou des alcalis Respect de l environnement La documentation de cet appareil est imprimée sur du papier blanchi sans chlore ou sur du papier r...

Page 25: ...la partie postérieure fait circuler l air chaud à l intérieur du four en le répartissant uniformément La cuisson se fait plus rapidement que par rapport à la cuisson conventionnelle Le système se prête bien à la cuisson sur plusieurs étages et également d aliments de différents types poisson viande etc Decongelation En sélectionnant une des fonctions Lampe du four reste allumée pendant la marche R...

Page 26: ...mpérature comprise entre MIN 120 F à 400 F Ventilateur de refroidissement REFROIDISSEMENT TANGENTIEL Un système forcé de circulation de l air qui contribue à réduire la température de l échange de chaleur au niveau des parties latérales et frontales des fours si compris dans la fourniture Le ventilateur est placé sur la partie supérieure du four et crée une circulation d air de refroidissement à l...

Page 27: ...e 3 secondes sur la touche centrale Lorsque le symbole apparaît réglez l heure en utilisant les touches ou Attendre qu un signal acoustique indique que le réglage de l heure a été pris en compte figure 1 Pourmodifierleréglagedel heureparla suite entrez en mode de configuration en appuyant simultanément sur les touches et et procédez ensuite comme indiqué ci dessus Minutage Fig 2 Cette fonction est...

Page 28: ...e permet de programmer la durée de la cuisson Exercez une pression de plus de 3 secondes sur la touche centrale puis appuyez à nouveau sur cette même touche pour faire apparaître la mention dur figure 3 Utilisez les touches et pour régler la durée de cuisson désirée Fin de cuisson Fig 4 Cette fonction permet de régler l heure de fin de cuisson Exercez une pression de plus de 3 secondes sur la touc...

Page 29: ...lisation du produit dans le cadre commercial GARANTIE ESTHETIQUE Bertazzoni SpA couvre les pièces présentant des défauts cosmétiques de matériaux et de fabrication pour une période de trente 30 jours à compter de la date d installation de l unité Cette couverture inclura les rayures les taches les imperfections de surface sur l acier inoxydable de la peinture et de la porcelaine à l exclusion de l...

Page 30: ... achat 13 Défauts et dommages résultant d un accident modification mésusage abus mauvaise installation 14 Défauts et dommages résultant du transport du produit à la maison du propriétaire 15 Les défauts et les dommages résultant de forces externes qui échappent au contrôle de Bertazzoni SpA tels que les incendies les inondations les tremblements de terre et autres catastrophes naturelles Au cas où...

Page 31: ...ns en matière électrique du Canadian Electric Code C22 1 dernière édition provinciales municipales ou locales Le respect minutieux de ces dispositions est de rigueur à tout moment REMARQUE SI VOUS INSTALLEZ VOTRE FOUR AU CANADA ASSUREZ VOUS QUE VOTRE MODÈLE EST POURVU DU LISTAGE CANADIEN SIGNE INDIQUÉ CI DESSUS Le signe reproduit ci dessus indique la conformité du four aux normes US et CANADIENNES...

Page 32: ...tion terminée faites vous expliquer par l électricien la position du sectionneur principal et identifier les coupe circuits et les fusibles correspondants au four Choix de la position du four Choisissez attentivement la position du four Le four doit être placé dans une position assurant une utilisation pratique dans la cuisine mais loin des courants d air forts Une porte ou une fenêtre ouverte l a...

Page 33: ...installé et connecté à la terre par un électricien qualifié Demandez à 21 1 4 54 cm 23 3 8 59 4 cm 23 3 8 59 4 cm 21 53 5 cm 7 8 2 1 cm A B C D E E A C B E E Boite de raccordement d alimentation eléctrique Boite de raccordement d alimentation eléctrique Baguettes de montage Côtés finis même finitionque l arriere I Ltr DIMENSION inch cm A Découpe largeur 22 1 16 56cm B Découpe profondeur min 22 1 1...

Page 34: ...llations avec mise à la terre à travers le conducteur neutre Pour installations dans lesquelles la mise à la terre à travers le conducteur neutre est interdite Déconnecter la terre du neutre à l extrémité libre du circuit Utiliser le terminal de mise à la terre ou les porter jusqu à l unité de mise à la terre en procédant comme d habitude A Connexion 3 fils Pour US seulement Connexion 4 fils Pour ...

Page 35: ...our s u u ...

Page 36: ...BERTAZZONI SpA Via Palazzina 8 42016 Guastalla RE ITALY WWW BERTAZZONI COM Cod 2 006 77 0 ...

Reviews: