background image

All and any operations performed in unauthorised 

centres or by unqualified persons will totally invali

-

date the warranty.

STORAGE

After  every  work  stint,  clean  the  machine  thor

-

oughly to remove all dust and debris, and repair 

or replace any faulty parts.

The machine must be stored in a dry place away 

from the elements and with the bar cover correctly 

fitted.

LONG PERIODS OF DISUSE

IMPORTANT

  If you are not going to use the 

machine for a period of more than 2-3 months, we 

recommend you do a few things before putting it 

away. This will make it easier when you want to 

use the machine again and will also prevent per-

manent damage to the engine.

• Storage

Before putting the machine away:
–  Clean and maintain the chain-saw before sto

-

ring.

–   Unscrew  the  nut,  disassemble  the  cover  and 

remove the chain and bar.

–   Empty the oil tank, fill with about 100-120 cc of 

specific liquid detergent and plug the cap.

–   Remove  the  cover  without  tightening  the  nut, 

making sure to insert the two rear fasteners in 

their respective slots properly.

–   Start the engine and keep it running until all de

-

tergent is used.

–   Start the engine and run it idle until it uses up all 

the fuel that is left in the tank and the carburettor.

–   Remove the spark plug after the engine cools.

–   Pour a teaspoon of (new) 2-stroke engine oil into 

the spark plug slot.

–   Pull the starter grip several times to deliver oil 

to the cylinder.

–   Replace  the  spark  plug  with  the  piston  in  the 

dead end upper position (visible from the spark 

plug slot when the piston is at maximum stroke).

•  Restarting work

When you wish to start using the machine again:
–  Remove the spark plug.

–   Pull  the  starter  rope  a  few  times  to  eliminate 

excess oil.

–   Check the spark plug as described in chapter 

“Checking the spark plug”.

–   Prepare the machine as indicated in the para

-

graph entitled “Preparing for work”.

If  you  sharpen  the  chain  yourself,  use  special 

round-section files with the right diameter depend

-

ing on the type of chain (see “Chain Maintenance 

Table”).  You  need  a  certain  amount  of  skill  and 

experience to avoid damaging the cutting edges.
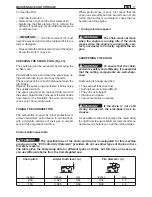
Sharpen the chain as follows (Fig. 24):
–   Switch off the engine, release the chain brake 

and secure the bar with the chain in a vice so 

that the chain can run smoothly.

–   Tighten the chain if it is loose.

–   Mount the file in the guide and then insert it in 

the tooth at a constant angle from the cutting 

edge.

–   Sharpen in a forward motion a few times and 

repeat this on all the cutting edges facing the 

same way (right or left).

–   Turn the bar over in the vice and repeat on all the 

other cutting edges.

–   Check that the limiter tooth does not stick out 

further  than  the  inspection  instrument  and  file 

any projecting parts with a flat file, rounding off 

the edge.

–   After sharpening, remove all traces of filing and 

dust and lubricate the chain in an oil bath.  

Replace the chain whenever:
–   The  length  of  the  cutting  edges  reduces  to  5 

mm or less;

–   There is too much play between the links and 

the rivets.

BAR MAINTENANCE (Fig. 25)

To avoid asymmetrical wear on the bar, make sure 

it is turned over periodically.

To keep the bar in perfect working order, proceed 

as follows:
–   grease  the  bearings  on  the  nose  sprocket  (if 

present) with the syringe;

–   Clean the bar groove with the scraper (not in

-

cluded);

–  clean the lubrication holes;

–   with a flat file, remove burr from the edges and 

level off the guides.

Replace the bar whenever:
–   the groove is not as deep as the height of the 

drive links (which must never touch the bottom);

–   the inside of the guide is worn enough to make 

the chain lean to one side.

EXTRAORDINARY MAINTENANCE

All  maintenance  operations  not  foreseen  in  this 

manual  must  be  performed  exclusively  by  your 

dealer.

18

MAINTENANCE AND STORAGE

EN

Summary of Contents for BG 2525

Page 1: ...g the machine IT Motosega a catena per potatura MANUALE DI ISTRUZIONI ATTENZIONE prima di usare la macchina leggere attentamente il presente libretto PT Motosserra para poda MANUAL DE INSTRU ES ATEN O...

Page 2: ......

Page 3: ...S Traduction de la notice originale FR ENGLISH Translation of the original instruction EN ITALIANO Istruzioni Originali IT PORTUGU S Tradu o do manual original PT POLSKI T umaczenie instrukcji orygina...

Page 4: ......

Page 5: ......

Page 6: ......

Page 7: ...orm ment aux normes en vigueur et elle ne sera fiable et s re que si vous l utilisez dans le plein respect des indications contenues dans ce manuel usage pr vu toute autre utilisation ou le non respec...

Page 8: ...e arr t du moteur 14 Commande d acc l rateur 15 Blocage de l acc l rateur au d marrage 16 Lanceur 17 Commande du starter 18 Commande du dispositif d amor age Primer 21 Bouchon du r servoir du carburan...

Page 9: ...egon 10 91P040X Guide cha ne Oregon 10 100SDEA041 Cha ne Oregon 10 91PJ040X Guide cha ne carving Qirui AT10 50 QR Cha ne Longer E1 25AP060T 1 ATTENTION La valeur des vibrations peut varier en fonction...

Page 10: ...eur Risques r siduels M me si l on utilise la scie cha ne en suivant les indications il existe toujours un risque r siduel qui ne peut pas tre limin En fonction du type de scie et de sa fabrication il...

Page 11: ...automatiquement et rapidement dans la position neutre le levier de l acc l rateur doit rester bloqu tant qu on n appuie pas sur le levier de s curit l interrupteur d arr t du moteur doit passer facil...

Page 12: ...plus extr me prudence lorsqu on coupe des broussailles et des arbustes jeunes Les tiges minces risquent de s encastrer dans la cha ne dent e et d tre projet es dans votre direction et ou de vous faire...

Page 13: ...r l lagage des arbres travaillant en hauteur l aide d un filin et d un harnais ne tra vaillent jamais seuls Il convient qu un travailleur au sol ayant re u un entra nement sur les proc dures d urgence...

Page 14: ...s pendant que l on tire la corde de d marrage avec la main droite ou 2 sur le c t droit maintenir la scie la main droite pos e sur l une des deux poign es en maintenant la scie distance du corps penda...

Page 15: ...oise en plastique 1 cette entretoise sert seulement pour le transport de la machine embal l e et apr s elle ne doit plus tre utilis e Fig 2 Monter le guide cha ne 2 en ins rant le goujon dans la rainu...

Page 16: ...tte machine est quip e d un moteur deux temps qui a besoin d un m lange compos d essence et d huile lubrifiante IMPORTANT Utiliser seulement de l essence ab me le moteur et entra ne la d ch ance de la...

Page 17: ...re les v rifications n cessaires Contr ler qu il n y ait aucune fuite Faire d marrer le moteur une bonne distance du point de ravitaillement de carburant Avant d ex cuter le remplissage Secouer nergiq...

Page 18: ...TANT Pour viter des cassures ne pas tirer le c ble sur toute sa longueur et ne pas le fai re frotter le long du bord du trou de passage du c ble re l cher graduellement le lanceur en vitant de le fair...

Page 19: ...essaire pour la lubrification de la cha ne se di sperse dans l environnement pour cette raison il ne faut employer que des huiles biod gradables sp cifiques pour cette utilisation Pour viter tout risq...

Page 20: ...e guide cha ne vers le haut et vers l op rateur comme cela se passe aussi au cas o la cha ne se bloque le long de la partie sup rieure du guide cha ne Dans ces deux cas le rebond peut provoquer la per...

Page 21: ...s ou de stabi lit r duite on peut ex cuter l abattage en ins rant des coins 2 du c t oppos au c t de chute et en battant sur les coins avec une masse jusqu la chute de l arbre Ebranchage apr s l abatt...

Page 22: ...iers Il est fondamental d effectuer correctement l entretien pour pouvoir maintenir pendant long temps l efficacit et la s curit d emploi origi nelles de la machine aintenir tous les crous et vis serr...

Page 23: ...s il est trop sale ou ab m il faut toujours le remplacer Enlever l l ment filtrant 3 et le couvercle 2 Revisser le pommeau 1 CONTR LE DE LA BOUGIE Fig 23 Pour acc der la bougie il faut enlever le cou...

Page 24: ...des limes sp ciales section ronde dont le diam tre est sp cifique pour chaque type de cha ne voir ableau d Entretien de la Cha ne cette op ration requiert une bonne dext rit et suffisamment d exp rien...

Page 25: ...fication bouch s Suivre les instructions voir chap 6 Contr ler la bougie voir chap 8 Nettoyer et ou remplacer le filtre voir chap 8 Contacter votre Revendeur Nettoyer et ou remplacer le filtre voir ch...

Page 26: ...manufactured in pursuance with current regulations and is safe and reliable if used in compliance with the instructions provided in this manual proper use Using the machine in any other way or non com...

Page 27: ...INTS 13 Engine stop switch 14 Throttle trigger 15 Throttle trigger lockout 16 Starter 17 Choke 18 Primer 21 Fuel tank cap 22 Chain oil tank cap 23 Air cleaner cover IDENTIFICATION PLATE 1 Sound power...

Page 28: ...ar Oregon 12 120SDEA041 Chain Oregon 12 91P045X Bar Oregon 10 100SDEA041 Chain Oregon 10 91P040X Bar Oregon 10 100SDEA041 Chain Oregon 10 91PJ040X Bar carving Qirui 10 AT10 50 QR Chain Longer 10 E1 25...

Page 29: ...must only be used outdoors Residual risks Even using the chain saw according to instructions there are always residual risks that cannot be eliminated The following are potential risks according to t...

Page 30: ...they must not need forcing and should return automati cally and rapidly back to the neutral position the throttle trigger must remain locked until the safety lever is pressed the engine stop switch m...

Page 31: ...s is released the spring loaded limb may strike the operator and or throw the chain saw out of control Use extreme caution when cutting brush and sap lings The slender material may catch the saw chain...

Page 32: ...Operators of tree service chainsaws for this work should be trained in general safe climbing and work positioning techniques and shall properly e quipped with harnesses ropes strops karabiners and ot...

Page 33: ...left or right of the body when starting 1 on the left side hold the saw with either the left hand on the front handle or the right hand on the rear handle and thrust the saw away from the body while h...

Page 34: ...drive sprocket and the point where the bar is to be fitted Fig 2 Remove the plastic spacer 1 this spacer must be used exclusively when transporting the ma chine in its packaging and must not be used...

Page 35: ...ires a mixture of petrol and lubricating oil IMPORTANT Using petrol alone will dam age the motor and will cause for invalidation of the warranty IMPORTANT Only use quality fuels and oils to maintain h...

Page 36: ...chine if the chain brake does not function correctly and have it inspected by your dealer Never remove the fuel tank cap or add fuel while the engine is running or still hot Check for any leaks Start...

Page 37: ...the same time The movement is transmitted from the engine to the chain by a centrifugal mass clutch that pre vents the chain from moving when the engine is running at minimum speed STARTING THE ENGINE...

Page 38: ...of waste materials after sawing Scrupulously comply with local regulations and provisions for the disposal of oils damaged parts or any elements which have a strong im pact on the environment A certa...

Page 39: ...bumper if provided Fig 12 1 Dig the spiked bumper into the log and use it as a pivot Cut with an arched motion to make the bar penetrate the wood 2 Repeat several times if necessary changing the point...

Page 40: ...the instructions under For your safety 3 1 WARNING Do not work standing on unstable bases or rung ladders Do not overreach Do not cut above shoulder height 1 Stand opposite the branch you want to cut...

Page 41: ...ing hours WARNING For your safety and that of others Correct maintenance is essential to main tain the original efficiency and safety of the machine over time Keep all nuts bolts and screws tight to b...

Page 42: ...harpen the chain using the right tools to ensure minimum removal of mate rial and even sharpness on all the cutting edges To clean the filter Unscrew the knob 1 Remove the lid 2 and the filter element...

Page 43: ...g Prepare the machine as indicated in the para graph entitled Preparing for work If you sharpen the chain yourself use special round section files with the right diameter depend ing on the type of cha...

Page 44: ...ty oil Lubrication holes are clogged Follow the instructions see chapter 6 Check the spark plug see chapter 8 Clean and or replace the filter see chapter 8 Contact your dealer Clean and or replace the...

Page 45: ...a nuova macchina stata progettata e costruita secondo le normative vigenti risulta sicura ed affidabile se usata nel pieno rispetto delle indicazioni contenute in questo manuale uso previsto qualsi as...

Page 46: ...motore 14 Comando acceleratore 15 Bloccaggio acceleratore 16 Manopola avviamento 17 Comando arricchitore Starter 18 Comando dispositivo di adescamento Primer 21 Tappo serbatoio miscela 22 Tappo serbat...

Page 47: ...peratori addestrati alla manutenzione degli alberi vedi manuale di istruzioni Valori massimi di rumorosit e vibrazioni 1 Livello di pressione acustica orecchio operatore Incertezza di misura dB A dB A...

Page 48: ...icazioni c sem pre un rischio residuo che non pu essere eliminato In base al tipo e alla costruzione della motosega esistono i seguenti rischi potenziali Contatto con i denti scoperti della catena ris...

Page 49: ...ore deve spostarsi facilmente da una posizione all altra i cavi elettrici ed in particolare il cavo della candela devono essere integri per evitare il generarsi di scintille e il cap puccio deve esser...

Page 50: ...ntata e venire proiettati nella vostra direzione e o facendovi perdere l equilibrio Trasportare la sega a catena per l impugnatura fron tale quan do spenta mantenendola lontana dal vo stro corpo Quand...

Page 51: ...rocedure di emergenza ap propriate opportuno che gli operatori di motoseghe per po tatura ab biano ricevuto per questo lavoro un addestramento generale sulle tecniche di arrampicata sicura e di posizi...

Page 52: ...ia utilizzata una sega a mano o una motosega per liberare una motosega incastrata opportuno che i tagli siano fatti verso la cima del ramo ossia tra la motosega incastrata e la cima del ramo e non tra...

Page 53: ...l comple tamento del montaggio devono essere effet tuati su una superficie piana e solida con spazio sufficiente alla movimentazione della macchina e degli imballi avvalendosi sempre degli attrezzi ap...

Page 54: ...tipo di olio impiegato Per la preparazione della miscela Immettere in una tanica omologata circa met del quantitativo di benzina Aggiungere tutto l olio secondo la tabella Immettere il resto della ben...

Page 55: ...i significativi effettuare il rifornimento di miscela e olio riem piendo i rispettivi serbatoi controllare che non vi siano viti allentate sulla mac china e sulla barra controllare che la catena sia a...

Page 56: ...atore AVVIAMENTO DEL MOTORE ATTENZIONE L avviamento del motore deve avvenire ad una distanza di almeno 3 metri dal luogo dove si effettuato il riforni mento di carburante Prima di avviare il motore Si...

Page 57: ...brificazione della catena per questa ragione usare solo olii biodegradabili specifici per questo utilizzo Per evitare il rischio di incendio non lasciare la macchina a motore caldo fra le foglie o l e...

Page 58: ...atto all estremit della catena pu causare un rapidissimo scatto in direzione inversa spingendo la barra guida verso l alto e verso l operatore come pure nel caso in cui la catena venisse bloccata lung...

Page 59: ...dei cunei 2 dal lato opposto a quello di caduta e battendo con una mazza sui cunei fino alla caduta dell albero Sramatura dopo l abbattimento Fig 15 ATTENZIONE Fare attenzione ai punti di appoggio del...

Page 60: ...a vostra ed altrui si cu rezza Una corretta manutenzione fondamentale per mantenere nel tempo l efficienza e la si curezza di impiego originali della macchina Mantenere serrati dadi e viti per essere...

Page 61: ...e IMPORTANTE L elemento filtrante 3 non deve mai essere lavato e deve essere sempre sostituito se risulta troppo sporco o danneggiato Rimontare l elemento filtrante 3 e il coperchio 2 Riavvitare il po...

Page 62: ...are lateralmente la catena INTERVENTI STRAORDINARI Ogni operazione di manutenzione non inclusa in questo manuale deve essere eseguita esclusiva mente dal vostro Rivenditore Operazioni eseguite presso...

Page 63: ...spurgare il serbatoio e i condotti con liquido detergente e sostituire l olio Pulire INCONVENIENTE CAUSA PROBABILE RIMEDIO La tabella contiene l elenco di tutte le possibili combinazioni fra barra e c...

Page 64: ...s Esta sua nova m quina foi projectada e fabricada segundo as normas vigentes resultando segura e fi vel se usada respeitando plenamente as instru es presentes neste manual uso previsto qualquer outra...

Page 65: ...o motor 14 Comando do acelerador 15 Bloqueador de seguran a 16 Interruptor de arranque 17 Arrancador Starter 18 Comando dispositivo de escorva Primer 21 Tampa do dep sito de combust vel 22 Tampa do de...

Page 66: ...on 12 91P045X L mina Guia Oregon 10 100SDEA041 Corrente Oregon 10 91P040X L mina Guia Oregon 10 100SDEA041 Corrente Oregon 10 91PJ040X L mina Guia carving Qirui 10 AT10 50 QR Corrente Longer 10 E1 25A...

Page 67: ...om as indica es h sempre um risco res duo que n o pode ser eliminado Conforme o tipo e a fabri ca o da motosserra existem os seguintes riscos potenciais Contato com os dentes descobertos da corrente r...

Page 68: ...palmente o cabo da vela devem estar nte gros para evitar a produ o de fa scas e o capuz deve estar montado correctamente na vela as pegas e as protec es da m quina devem estar limpas e secas e fixadas...

Page 69: ...e ou fa zer perder o equil brio Transporte a serra de corrente pela pega da frente quando est desligada mantendo a longe do pr prio cor po Quando se trans porta ou se guarda a serra de cor rente preci...

Page 70: ...os de emerg ncia recomend vel que os operadores de motosserras para a poda tenham recebido para este trabalho um adestramento geral sobre as t cnicas de escalada segura e de posi es de trabalho e que...

Page 71: ...arranque com a m o direita ou 2 no lado direito mantenha a motosserra com a m o direita apoiada em uma das duas pegas segurando a motosserra longe do corpo enquanto puxa o cabo de arranque com a m o...

Page 72: ...mina guia Fig 2 Remova o espacejador de pl stico 1 este espace jador s serve para o transporte da m quina quando embalada e n o deve voltar a ser usado Fig 2 Monte a l mina guia 2 introduzindo o pris...

Page 73: ...to de abastecimento 1 PREPARA O DO COMBUST VEL Esta m quina dotada de um motor de dois tempos que requer um combust vel composto de gasolina e leo lubrificante IMPORTANTE O uso s de gasolina danifica...

Page 74: ...ador Liberte o trav o ATEN O N o use a m quina se o tra v o da corrente n o funciona correctamente e con tacte o seu Revendedor para os controlos ne ces s rios Antes de executar o abastecimento Bata c...

Page 75: ...nte o controlo da m quina e da cadeia IMPORTANTE Para evitar quebras n o puxe todo o comprimento do cabo n o deixe que o mesmo se arraste ao longo da beirada do furo guia cabo e solte gradualmente o i...

Page 76: ...evitar o risco de inc ndio n o deixe a m quina com o motor quente entre as folhas ou relva seca ATEN O Use uma roupa adequada durante o trabalho O seu Revendedor pode forne cer lhe as informa es mas...

Page 77: ...2 1 Crave a garra de abate no tronco e fazendo alavanca na garra de abate a motoserra deve efectuar um movimento em arco que permita l mina guia de penetrar na madeira 2 Repita v rias vezes a opera o...

Page 78: ...ua seguran a 3 1 ATEN O N o trabalhe sobre bases n o est veis ou esca das port teis N o se estique muito N o corte acima de seus ombros 1 Posicione se no lado oposto em rela o ao ramo a cortar 2 Inici...

Page 79: ...a balho ATEN O Para a sua seguran a e dos outros Uma manuten o correcta fundamental para manter ao longo do tempo a efici ncia e a segu ran a de uso originais da m quina Mantenha bem apertados os para...

Page 80: ...sujo ou danificado Remonte o elemento filtrante 3 e a tampa 2 Aperte de novo o bot o 1 CONTROLO DA VELA Fig 24 A vela acess vel removendo a tampa do filtro de ar Periodicamente desmonte e limpe a vel...

Page 81: ...adas neste manual devem ser efectuadas exclusivamente pelo seu Revendedor Opera es executadas junto a estruturas n o adequa das ou por pessoas n o qualificadas implicam na anu la o de qualquer forma d...

Page 82: ...e as condutas com l quido detergente e substitua o leo Limpar PROBLEMA CAUSA PROV VEL SOLU O A tabela cont m a lista de todas as poss veis combina es entre l mina guia e corrente com a indica o da que...

Page 83: ...enie zosta o zaprojektowane i skonstruowane zgodnie z obowi zuj cymi obecnie wymogami jest ono wi c bezpieczne i niezawodne je li u ywane jest przy cis ym przestrzeganiu wskaz wek zawartych w niniejsz...

Page 84: ...ania silnika 14 Przycisk przyspiesznika gazu 15 Blokada przyspiesznika 16 Uchwyt rozruchu 17 Przycisk rozrusznika Starter 18 Przycisk pompki paliwa Primer 21 Korek zbiornika na mieszank paliwow 22 Kor...

Page 85: ...egon 10 100SDEA041 cuch Oregon 10 91P040X Prowadnica Oregon 10 100SDEA041 cuch Oregon 10 91PJ040X Prowadnica rze ba Qirui 10 AT10 50 QR cuch Longer 10 E1 25AP060T 1 UWAGA Warto wibracji mo e si zmieni...

Page 86: ...k w konstrukcji pi y silnikowej ponosi u yt kownik a nie producent Pi a silnikowa mo e by u ytkowana tylko na terenie otwartym Pozosta e zagro enia Nawet przy u ytkowaniu pi y silnikowej zgodnym z zal...

Page 87: ...j pozycji przycisk przyspiesznika musi pozosta zablokowanay je eli nie zostaje naci ni ta odblokowana blokada przyspiesznika wy cznik zatrzymania silnika musi by swobodnie przestawiany z jednej pozycj...

Page 88: ...ostro no podczas ci cia krzak w i m o dych krzew w Cienkie materia y mog utkn w a cuchu z batym i zosta wyrzucone w waszym kierunku i lub spo wo do wa stracenie r wnowagi Przenosi pi a cuchow za pomoc...

Page 89: ...operatora znajduj cego si na ziemi kt ry odby szkolenie w zakresie odpo wiednich procedur awaryjnych Konieczne jest aby operatorzy pi spalinowych do podcinania drzew otrzymali podstawowe przeszkolenie...

Page 90: ...n do uruchomienia lub 2 na boku prawym trzyma pi praw r k opart na jednym z dw ch uchwyt w trzymaj c pi z dala od cia a w momencie poci gania lew r k za lin do uruchomienia Konieczne jest aby hamulec...

Page 91: ...STRZE ENIE Rozpakowanie i doko c ze nie monta u musi by wykonane na r w nym i twardym pod o u z wystarczaj c przestr zeni na porusza nie maszyny i zdj cie o pakowania korzystaj c za wsze z od po wied...

Page 92: ...niania paliwa 1 PRZYGOTOWANIE MIESZANKI PALIWA Urz dzenie ta jest wyposa ona w dwusuwowy silnik kt ry wymaga mieszanki paliwa skomponowanej z ben zyny i oleju smarowego WA NE U ywanie samej benzyny n...

Page 93: ...y w celu prze prowadzenia niezb dnych kontroli Przed przyst pieniem do wlewania paliwa Wstrz sn energicznie karnistrem mieszanki Ustawi urz dzenie na p askim stabilnym te re nie z korkiem zbiornika sk...

Page 94: ...est regulowana przyci skiem przyspiesznika 1 znajduj cym si na tylnym uchwycie 2 URUCHOMIENIE SILNIKA OSTRZE ENIE Uruchomienie silnika musi by dokonywane w odleg o ci przynajmniej 3 me tr w od miejsca...

Page 95: ...zaj cych rodowisko Podczas pracy dostaje si do rodowiska pewna ilo oleju niezb dna do oliwienia a cucha z tego powodu nale y u ywa tylko olei rozpuszczalnych bio logicznie specyficznych do rob t tego...

Page 96: ...z Waszym sprzedawc U ytkowanie haka o ile jest przewidziany Rys 12 1 Wbi hak w pie i u ywaj c haka jak d wigni wy kona pi ruch ukiem kt ry pozwoli prowadnicy wg bi si w drewno 2 Powt rzy czynno kilka...

Page 97: ...k bezpiecze stwa przestrzega dok adnie zalece zawartych w Dla waszego bezpiecze stwa 3 1 OSTRZE ENIE Nie pracowa stoj c na podstawach niestabil nych lub na drabinach Nie wychyla si zbytnio Nie ci powy...

Page 98: ...zczenie musi by przeprowadzane co15 godzin pracy OSTRZE ENIE Dla bezpiecze stwa waszego i innych os b W a ciwa konserwacja jest podstawowym ele mentem dla zachowania z up ywem czasu wy daj no ci i bez...

Page 99: ...ieczne oczy ci go przy pomocy spr onego powietrza pod niskim ci nieniem WA NE Element filtruj cy 3 nigdy nie mo e by myty i zawsze kiedy jest zbyt brudny lub uszkodzony musi zosta wymieniony Ponownie...

Page 100: ...Zabiegi przeprowadzane przez nieodpowiednie serwisy lub osoby niekompetentne powoduj utrat wszystkich udzielonych gwarancji PRZECHOWYWANIE Po ka dorazowym zako czeniu pracy wyczy ci do k adnie z kurz...

Page 101: ...ia zatkane Post powa zgodnie ze wskaz wkami patrz rozdz 6 Sprawdzi wiec patrz rozdz 8 Oczy ci i lub wymieni filtr patrz rozdz 8 Skontaktowa si z waszym Sprzedawc Oczy ci i lub wymieni filtr patrz rozd...

Page 102: ...VI 2005 88 EC D Lgs 262 2002 ANNEX VI proc 1 Italy e Organisme de certification EMCD 2014 30 EU 4 Renvoi aux Normes harmonis es EN ISO 11681 2 2011 A1 2017 EN ISO 14982 2009 g Niveau de puissance sono...

Page 103: ...ora garantito i Potenza netta installata n Persona autorizzata a costituire il FascicoloTecnico o Luogo e Data PT Tradu o do manual original Declara o CE de Conformidade Diretiva de M quinas 2006 42 C...

Page 104: ......

Page 105: ...SAS EQUIPEMENT DE LA MAISON 24 rue Auguste Chabri res 75015 PARIS France dB LWA Type s n Art N...

Reviews: