22
700 Maintenance and Service
701 Routine Maintenance
Best Power designed your Axxium Pro system to provide years of trouble-free operation. Its internal control
system checks the batteries and inverter periodically to ensure reliable operation. In fact, you’ll probably find
that your Axxium Pro system requires less maintenance than any of your other computer peripherals.
Nevertheless, the Axxium Pro UPS and optional external battery cabinets do require some attention to assure
continued reliable service. Best Power recommends that you schedule preventive maintenance checks at least
every six months. At these checks, the service technician should follow Best Power’s Recommended
Maintenance Schedule, which includes the following items:
• Inspect and clean the unit.
• View and record the alarm and inverter logs.
• Check the batteries.
• Check the displayed UPS readings against actual measurements and recalibrate if necessary.
• Perform a system test.
• Check and record the values of the parameters in menu 4 on line and on batteries.
• Check the MOV surge suppression pack.
Details of these tests and procedures are contained in the Axxium Pro UPS Service Manual.
Technicians must observe important safety precautions while performing these checks. For more
information on what your technician should do in a Preventive Maintenance check, or to schedule Preventive
Maintenance with a Best Power-authorized field service representative, call Best Power’s Worldwide Service.
We’ll be happy to help you.
702 Battery Replacement
Axxium Pro system batteries may be removed and replaced while the UPS is operating under load (“hot-
swapped”) with no loss of power to the load or damage to the batteries. NOTE: The Axxium Pro UPS will
operate with uncharged (or no) batteries, but will have limited (or no) battery backup capability. Backup
protection requires at least three battery strings for every four power modules.
Replace battery modules in pairs, as described below.
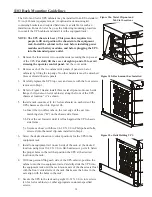
1. Remove the front panel bezel(s) covering the battery modules you need to replace. Label the original
module with masking tape or some other identifier.
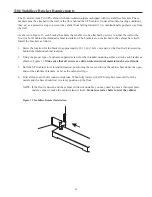
2. Grasp the battery module handle and press down on the latch release.
3. Pull the module out approximately 7 inches (170 mm) to the secondary stop on top of the module.
4. Press down on the secondary stop release, pull the module out further, and support the module weight
with your second hand as you remove the module from the chassis rack. Remove the battery module
beside the first in a similar manner.
5. After removing a pair (one string) of battery modules, install a replacement pair. Replacements may be
installed in empty rack slots before removing original battery modules.
6. When all desired battery modules have been replaced, reinstall the front panel bezel(s).


