background image

7

SOLA Never Stops Innovating

www.solaaust.com.au

Connection to External Battery Packs

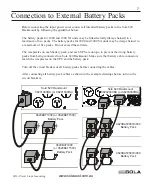
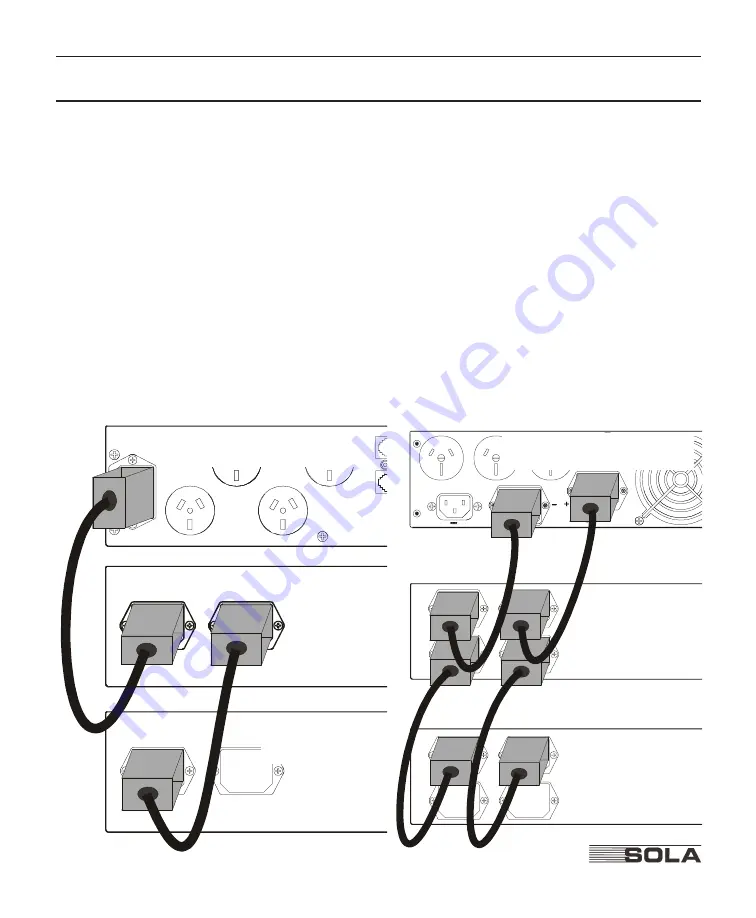
Before connecting the input power cord, connect all intended battery packs to the Sola 620
Rackmount by following the guidelines below.

The battery packs for 1000 and 1500 VA units may be linked serially (daisy-chained) to a 
maximum of two packs. The battery packs for 2000 and 3000 VA units may be daisy-chained to
a maximum of five packs. Do not exceed these limits.

The receptacles on each battery pack, and each UPS are unique, to prevent the wrong battery
packs from being connected to a Sola 620 Rackmount. Make sure that battery cable connectors
match the receptacles on the UPS and the battery pack.

Turn off the circuit breaker of all battery packs before connecting the cables.

After connecting all battery pack cables as shown in the example drawings below, turn on the
circuit breakers.

0620BAT1000 (or 0620BAT1500)

Battery Pack

0620BAT1000

(or 0620BAT1500)

Battery Pack

Sola 620 Rackmount

06201000RA (or 06201500RA)

Sola 620 Rackmount

06202000RA (or 06203000RA)

0620BAT2000/3000

Battery Pack

0620BAT2000/3000

Battery Pack

Summary of Contents for SOLA UPS 620 Rackmount 1000 VA

Page 1: ...USER GUIDE ups 620 Rackmount 1000 VA 1500 VA 2000 VA and 3000 VA A Company ...

Page 2: ...t generated by the UPS This UPS generates no more than 1 mA of current To limit the total leakage current to 3 5 mA the load leakage must be limited to 2 5 mA The three wire receptacle that you plug the UPS into must have a good low impedance ground protec tive earth connection to provide a safe path for leakage current ...

Page 3: ...u p s 6 2 0 Rackmount 1000 VA 1500 VA 2000 VA and 3000 VA User Guide STM 0303A Copyright 1999 Best Power All rights reserved A Company ...

Page 4: ...horisation RA number When you return a SOLA 620 Rackmount to the factory for any reason please use the original packing material in which your unit was shipped to you You may be responsible for repair charges for damaged units which are not packed in SOLA packing material If you have discarded the original packing material please call the nearest SOLA office so that we can ship new packing materia...

Page 5: ... Alarms 9 BestDock 11 Troubleshooting 12 Replacing the Batteries 13 Battery Replacement Instructions 14 Interface Port 15 Interface Port Pinouts 15 Specifications 16 Warranty 17 SOLA Australia Offices 21 Appendix A Adjusting Input Frequency Tolerance 22 Trademarks Windows is a registered trademark of Microsoft Corporation All other brand and product names are trademarks or registered trademarks of...

Page 6: ...recharge the batteries more often CAUTION Whenever the Sola 620 Rackmount is On there may be dangerous voltage present at the unit s outlets This is true because the unit s battery supplies power even if the unit is not plugged into the wall outlet The unit contains dangerous voltages To reduce the risk of electric shock install in a temperature controlled and humidity controlled indoor area free ...

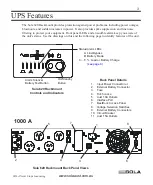
Page 7: ...ngs on this and the following page to identify features of the unit On Standby Button Alarm Silence Battery Test Button 1 Input Power Connector or 2 External Battery Connector 3 Fuse 4 RJ45 Jacks 5 Aust 10A Outlets 6 Interface Port 7 BestDock Access Panel 8 Voltage Selection Switches 9 External Battery Connectors 10 Circuit Breaker 11 Aust 15A Outlets 1000 A Sola 620 Rackmount Controls and Indicat...

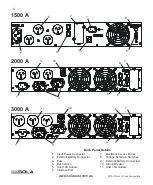
Page 8: ... 2 7 8 1 1 1 9 10 10 10 11 5 9 1500 A 1 Input Power Connector 7 BestDock Access Panel 2 External Battery Connector 8 Voltage Selection Switches 3 Fuse 9 External Battery Connectors 4 RJ45 Jacks 10 Circuit Breaker 5 Aust 10A Outlets 11 Aust 15A Outlets 6 Interface Port Back Panel Details ...

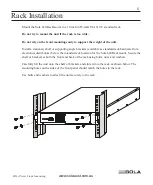
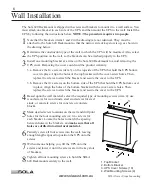
Page 9: ...f or supporting angle brackets available as standard rack hardware from electronics distributors below the intended rack location for the Sola 620 Rackmount Secure the shelf or brackets at both the front and back of the rack using bolts nuts and washers Carefully lift the unit onto the shelf or brackets and slide it into the rack as shown below The mounting holes on the sides of the front panel sh...

Page 10: ... cover screw holes Then replace the screws to attach the bracket and secure the cover to the UPS 3 b Remove the five screws on the bottom side of the UPS that hold the UPS bottom cover in place Align the holes of the bottom bracket with the cover screw holes Then replace the screws to attach the bracket and secure the cover to the UPS 4 Based upon the wall material select the required type of moun...

Page 11: ...The receptacles on each battery pack and each UPS are unique to prevent the wrong battery packs from being connected to a Sola 620 Rackmount Make sure that battery cable connectors match the receptacles on the UPS and the battery pack Turn off the circuit breaker of all battery packs before connecting the cables After connecting all battery pack cables as shown in the example drawings below turn o...

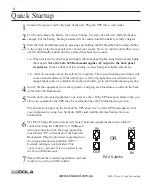
Page 12: ... on If the unit beeps or if the top light does not remain on even though input power is available from the wall outlet go to the Troubleshooting section 4 Switch off the equipment you want to protect and plug each load into an outlet on the back of the Sola 620 Rackmount 5 Switch on the protected equipment one load at a time If the UPS beeps an alarm when you start your equipment the UPS may be ov...

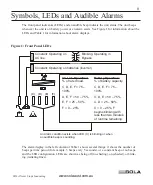
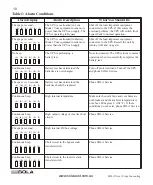
Page 13: ...ible beep is sounding AC Line Operation of rated load C D E F 75 100 D E F 50 75 E F 25 50 F 0 25 Battery Operation of battery capacity C D E F 75 100 C D E 50 75 C D 25 50 C 0 25 F begins blinking with less than two minutes of runtime remaining Blinking Operating in Bypass Figure 1 Front Panel LEDs The alarm display in the left column of Table 1 shows several things it shows the number of beeps p...

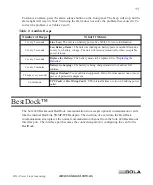
Page 14: ...etes the battery test Continuous beep Battery test has determined the batteries are overcharged Turn off protected loads Turn off the UPS and phone SOLA Service 3 beeps every 5 seconds Battery test has determined the batteries should be replaced Phone SOLA Service Continuous beep Continuous beep 2 beeps per second Continuous beep Continuous beep Short circuit in the inverter static transfer switch...

Page 15: ...nection point for configuring the card in the BestDock Number of Beeps What It Means 1 every 5 seconds Line Loss The unit is on battery power See Table 3 for more information 2 every 5 seconds Low Battery Alarm The unit was running on battery power and shut down due to very low battery voltage The unit will restart automatically when acceptable power returns 2 beeps every second Output Overload To...

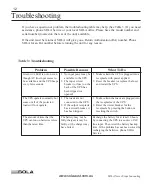
Page 16: ...the back of the UPS has been tripped or opened 1 Make certain the UPS is plugged into a receptacle with power applied 2 Reset the breaker or replace the fuse and restart the UPS The UPS operates normally but some or all of the protected loads will not operate 1 The loads are not connected to the UPS 2 If the output receptacle has a circuit breaker it has been tripped 1 Make certain the loads are p...

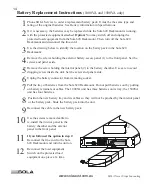
Page 17: ...t carry metal objects in your pockets these objects could fall into the UPS Never allow any tool to contact both a battery terminal and the UPS cabinet or another battery terminal Do not lay tools or metal parts on top of batteries To ensure continued superior performance of your UPS and to maintain proper charger operation you must replace the UPS batteries with the same number and type of batter...

Page 18: ...el aside 5 Remove the screw holding the interior panel 2 to the battery chamber Use care to avoid dropping screw inside the unit Set the screw and panel aside 6 Unplug the battery connector from its mating socket 7 Pull the tray of batteries from the Sola 620 Rackmount Do not pull batteries out by pulling on battery terminals or cables The 1000VA unit has three batteries on its tray the 1500VA uni...

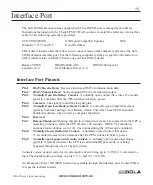
Page 19: ...PS switches to battery power Pin 4 Common The signal ground for all signal pins Pin 5 Normally Open Low Battery Alarm Contact A normally open contact that closes pulls to Common during a Low Battery Alarm This tells CheckUPS II and other shutdown software when to start a computer shutdown Pin 6 Reserved Pin 7 Remote Shutdown Shorting this pin to common for at least 5 seconds while the UPS is opera...

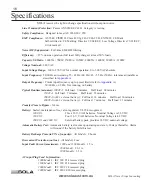
Page 20: ...A 50 60 Hz 0 5 Hz free running on battery Typical Runtime minutes 1000VA Full load 9 minutes Half load 24 minutes 1500VA Full load 7 minutes Half load 23 minutes 2000VA with 1 external battery Full load 14 minutes Half load 36 minutes 3000VA with 1 external battery Full load 7 minutes Half load 21 minutes Transfer Time to Bypass 0 4 ms Battery Sealed maintenance free valve regulated UL 924 recogni...

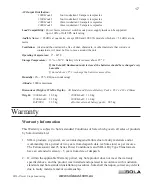
Page 21: ... more often Humidity 0 95 RH non condensing Altitude 3000m maximum Dimensions Height x Width x Depth All Models and External Battery Packs 85 2 x 483 x 490mm Weight 1000 Model 18 5 kg 2000 Model 11 0 kg 1500 Model 21 5 kg 3000 Model 11 0 kg BAT1000 23 5 kg all other external battery packs 28 5 kg Warranty Warranty Information This Warranty is subject to Sola s standard Conditions of Sale which gov...

Page 22: ... to prevent shipping damages and pay freight charges to the location nominated by Sola Australia Approval to return goods must by obtained from SOLA Australia Ltd before the goods are despatched 5 Units returned for in warranty repairs which are found not to be defective will be subject to an inspection and handling charge plus transportation charges 6 High grade batteries designed for Uninterrupt...

Page 23: ... Yes you will receive mail from SOLA at least three 3 times per year q No 1 Where did you purchase this SOLA UPS from q Retail Store q Computer Store q SOLA Distributor q Direct from SOLA q Electrical Wholesaler q Mail Order Catalogue q Internet q Other 2 Why did you purchase a SOLA UPS Check all that apply q Recommendation q Reputation q After Purchase Support q Features q Price q Other 3 What pr...

Page 24: ...SOLA Australia Ltd 13 Healey Road DANDENONG VIC 3175 AUSTRALIA AFF IX PO STAGE STAMP ...

Page 25: ... except Melbourne 9768 3105 Melbourne only http www solaaust com au Customer Service Offices Adelaide PO Box 481 Marlestone Business Centre SA 5033 Phone 08 8347 3622 Fax 08 8445 6328 Brisbane Unit 2 8 Lockhart Street Woolloongabba QLD 4102 Phone 07 3891 1211 Fax 07 3891 2492 Perth Unit 2 321 Great Eastern Highway Redcliffe WA 6104 Phone 08 9478 3511 Fax 08 9479 4577 Sydney 67A Ryedale Road West R...

Page 26: ...inate to display the current frequency tolerance selection LEDs 1 and 6 indicate 7 LEDs 2 and 5 indicate 5 and LEDs 3 and 4 indicate 2 2 Press the Alarm Silence Battery Test button for 1 second to advance through the various selections until the LEDs indicate the desired frequency tolerance 3 When the desired LED display is illuminated as shown in the drawing below press and hold the Alarm Silence...

Reviews: