background image

5

First Time Set Up

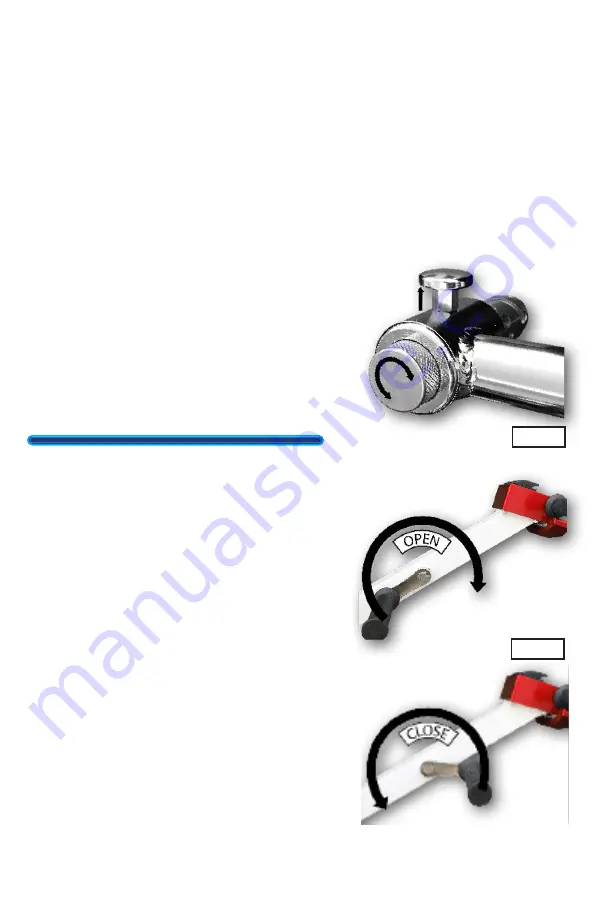
Right Connecting Arm

 - Pull out Drop 

Pin and spin the Slide out, so the open 

end is as close as possible to the center 

of the connecting arm. (FIG 1) 


L

eft Connecting Arm

 - Repeat step 

one process on left arm. 

1. 

Rotate locking arm upwards to open 

right connecting arm and move the 

tug, position the Slides, so they are 

close to the tow pin. 

2. 

Close the arms. (FIG 2 & 3) Slides are 

not expected to close on the tow pin 

in this step.

3. 

Twist Slides until firmly attached to 

the tow points. Correct set up should 

leave very little to no slop on the 

connection. 

4. 

Wiggle tug slightly to confirm the 

pins are firmly cupped and secured.

 FIG 2

Drop Pin

Drop Pin

 
Please familiarize yourself with how long it takes for your plane to ramp up/down 
and stop; that “coast” when slowing is due to the software that protects your 
nose gear from unnecessary damage and stress. Take the time to get used to this 
feature and be aware of it as you move your aircraft.  
 
Check your plane’s POH to verify the maximum turn radius for your particular 
nose gear. The tug can turn your plane at an angle that may exceed the nose 
gear’s maximum turn radius. Best Tugs™ assumes no responsibility for any 
damage caused by the tug operator misusing the equipment. As the operator, 
you have the responsibility to be familiar with your tug, your plane, and their 
specific limitations.   

 FIG 1

 
Check the plane’s surroundings, remove any 
obstructions, verify that your path is clear, and 
your propulsion systems (prop), wings, and tail 
clear. Please verify that your wheel is secure on 
the tug, including strapping it down. Finally, 
remove the wheel chocks. You are ready to 
move your plane.

Slide

Summary of Contents for ALPHA A2

Page 1: ...ALPHA USER MANUAL A2 and A3 Best Tugs Because Your Plane Deserves It ...

Page 2: ......

Page 3: ...nd workmanship of your tug exceeds your expectations and are confident that you will see the difference in every part of your Best Tugs experience We designed this guide to provide you the information needed to make your experience even better and while we are confident that this guide will answer your questions we are always here to chat with you on the phone You can reach us at 800 914 2003 Than...

Page 4: ...aps 3 On the opposite end of the crate the required wall is marked with a red 4 and stripes remove the screws securing the end wall to the crate Remove the end wall FIG 2 4 In the crate cut the band securing the control arm 5 Grab the tug s handle and pivot the tug up with the tug s weight resting on the tires 6 Push the master switch to the on position 7 Left thumb pressure moves the tug backward...

Page 5: ...he kickstand to the back of the Alpha s control arm 10 Observing all safety precautions attach your Best Tugs tug to your aircraft 11 Most importantly enjoy your new Best Tugs Tug Please Email cool pictures of your tug and plane to sales besttugs com You may see it on our website or social media By sending images you expressly permit us to use these images for marketing purposes FIG 3 UNCRATING IN...

Page 6: ...ng on your plane type If you have more planes you d like to move with your tug give us a call and we can ship the appropriate adapters out to you Quick Connect Pins 3 Charger Adapters Connecting Arms Items Depending on Aircraft 3 1 2 Storage slot when pivoting ...

Page 7: ... make sure the arm is fully rotated down and secured in place 5 VARIABLE SPEED THROTTLE Right thumb pressure moves tug forward left thumb pressure moves tug backward 6 DIGITAL READ OUT Displays your tug s state of charge 3 2 5 1 4 INITIAL USE We strongly recommend using your tug without an aircraft attached to get used to the controls and movements this is a very user friendly system but it can ta...

Page 8: ...ane to ramp up down and stop that coast when slowing is due to the software that protects your nose gear from unnecessary damage and stress Take the time to get used to this feature and be aware of it as you move your aircraft Check your plane s POH to verify the maximum turn radius for your particular nose gear The tug can turn your plane at an angle that may exceed the nose gear s maximum turn r...

Page 9: ...throttle start stop speeds and movements of the tug we strongly recommend you push pull your plane in an open area to familiarize yourself with how your plane moves Pushing may take a few tries before you re comfortable but once you find your system it is easy If you prefer to use your Best Tugs tug with the pivoting base locked place pin 3 back in the lock slot Make sure the pin seats as shown FI...

Page 10: ... following this step in case you accidentally bump the throttle while close to your aircraft 2 Position the tug with arms on either side of the plane 3 Insert the right arm into onto tow connection 4 Use locking arm to close the left connecting arm Moving Your Plane Check the surroundings of the plane remove any obstructions and verify you have removed the wheel chocks We recommend slow and steady...

Page 11: ...y from the aircraft Switching Out Arms 1 Pull the detention pin holding the connecting arm in place and slide out connecting arm 2 Insert new connecting arm reinsert pin Attaching Trailer Attachment option 1 Remove both connecting arms with accompanying pins from the tug 2 IInsert trailer attachment connections into connecting arm slots Insert pins to secure the attachment in place FIG 6 FIG 6 FIG...

Page 12: ... Limited exposure to rain and snow does not affect the electrical systems However we do not recommend extended exposure If you do not plan on using your tug for an extended time leave your tug plugged in and our smart charger can take care of the battery Always turn off your tug and accessories Maintenance Tighten the wheel lugs once a quarter to 70 ft lbs The recommended tire pressure for inner t...

Page 13: ...he battery to discharge completely are the two most common ways to damage a lead acid battery Even new batteries can be ruined in just a few weeks by being discharged too much or left uncharged for too long for this reason Best Tugs cannot warranty the batteries as we have no control over the end users actions Modern microprocessor based smart chargers use switching circuits they are lightweight a...

Page 14: ...e companies Length 7 17 in Width 3 03 in Height 6 57 in Voltage 12 Lead Acid Type Deep Cycle Capacity 18ah Chemistry Lead Acid Lead Acid Design AGM Product Category Sealed Lead Acid Product Subcategory Deep Cycle Terminal Type M6 Nut and Bolt NB Nut and Bolt Screw 3 Screw 4 FIG 8 Screw 2 Screw 1 To access the batteries take off the four 4 Allen screws with a 5 32 wrench which will release the cove...

Page 15: ...sion fails As the operator it is your responsibility to keep your aircraft within safe limits Never move an aircraft on a slope or environment where the loss of tug breaking would put you or your aircraft in danger Exceeding the parameters of the tug can cause future power train failure Best Tugs tugs load ratings are designed for hard flat and level surfaces Use on a slope drastically changes tho...

Page 16: ...uddy a favor and move their King Air you have just damaged the gears Failure is now a matter of when not if Example 2 You used the same tug for your Cirrus SR22 and pulled it up a 3 degree slope you have just damaged the gears Failure is now a matter of when not if It would be best if you had used a tug with a higher rating such as the commercial version If you find that you have the wrong tug for...

Page 17: ...s LED Flood Lamp A high Intensity LED light to assist in load ing and unloading your airplane The control panel light switch controls the action of the light when the main power switch is on Note The main power must be on for the LED lamp to light up Extinguisher Type BC Class BC extinguishers handle both Class B flammable liquid and Class C energized electrical equipment threats See the manual th...

Page 18: ...1 Aircraft Chocked or Brake Set 1 2 Throttle Fault 1 3 Speed Limit Fault 1 4 Low Battery Charge Required ASAP 1 5 Over Voltage Unplug tug before use 2 1 Main Contactor Driver Failed Open 2 3 Main Contactor Stuck driver fail or brake coil 2 4 Main Contactor Driver Failed Closed 3 1 HPD Fault 3 2 Brake on Electromagnetic brake open or shorted 3 3 Pre Charge Fault Low Battery 3 4 Brake Off Electromag...

Page 19: ...or application nor does it extend to Best Tugs parts which have been repaired or altered outside of Best Tugs provided maintenance of an authorized service representative Furthermore any modification of Best Tugs electrical system MUST be pre approved and documented in writing by Best Tugs Failure to do so voids the unit s electrical component warranty Best Tugs parts which have been repaired or a...

Page 20: ...252 West 3560 North Spanish Fork UT 84660 Release Date April 22 2020 Contact us at support besttugs com or call 1 800 914 2003 Sales Ext 2 Support Ext 3 Best Aviation Products ...

Reviews: