- 7 -
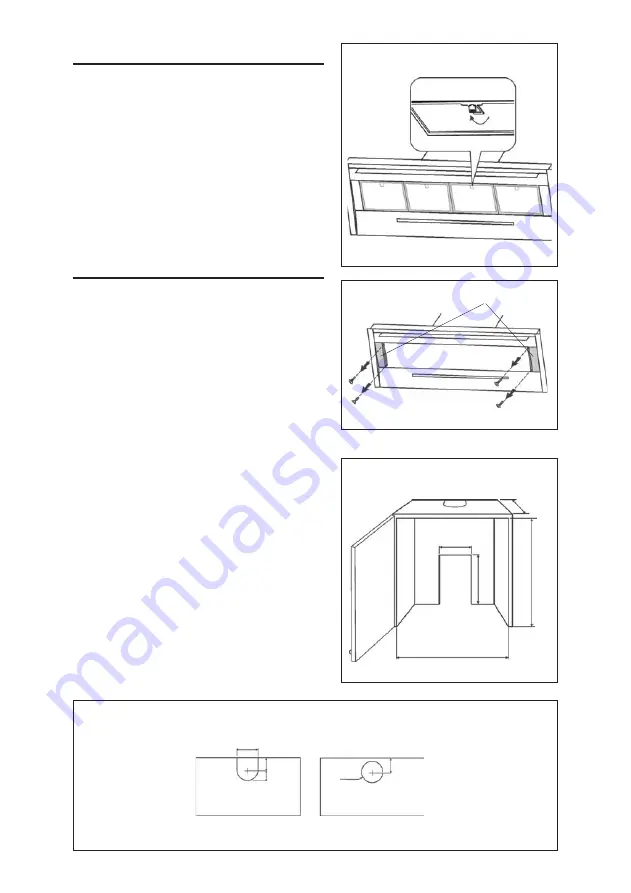
PREPARE THE HOOD
1. Remove the grease filters by pulling
down in the filter latch, and pull the filter
downwards (Fig. 4); repeat for all filters.
2. Remove (2) grease filter spacers,
unscrewing (4) screws (Figure 5).
FIGURE 4
FIGURE 5
INSTALLATION
Remove the plastic protective film from all
exterior surfaces, decorative flues and
filters, prior to final installation
The hood is intended to be installed
inside a cabinet.
ATTENTION: 2 people are required for
proper installation; the unit should be
installed by a qualified operator.
For the cabinet measurements, refer to
Figure 6 and 7.
For new construction it is recommended to
install a wood support that is flush with
interior surface of wall studs (Figure 11 ).
Make sure:
a)the wood support is centered over
installation location.
b)the height of the wood support will allow
the hood to be installed within the
dimensions shown.
Notes: Minimum cabinet hood distance
above cook top must not be less than 24”. A
maximum of 30” above cook top is highly
recommended for best capture of cooking
impurities. Distances over 30” are the
installer and user discretion.
FIGURE 6
from 16.5 to 28.1”
13”
from 34.5 to 34.75”
12.7”
16.34”
FIGURE 7
Top view
(ducted hood)
Top view
(non-ducted hood)
7.95”
4.37”
3.98”
ø6.29”
4.37”
GREASE FILTERS
GREASE FILTER
SPACERS
FRONT
FRONT
Summary of Contents for CC45
Page 19: ... 19 SERVICE PARTS CC45I90SB ...
Page 20: ... 20 SERVICE PARTS CC45E90SB ...
Page 39: ... 39 PIECES DE RECHANGE CC45I90SB ...
Page 40: ... 40 PIECES DE RECHANGE CC45E90SB ...
Page 59: ... 59 LISTA DE PIEZAS DE RICAMBIO CC45I90SB ...
Page 60: ... 60 LISTA DE PIEZAS DE RICAMBIO CC45E90SB 99046062C 04308835 3 ...


