background image

USER WARNINGS

SPECIFICATIONS

Pg. 3

The following safety hazards may result in serious injury or death:

 Never leave a child unattended.

 Always sit in the seat when using this vehicle. 

 Keep your hands, hair, and clothes away from moving parts.

 Always wear shoes when operating this vehicle.

 Only one rider is allowed on the vehicle at a time.

 Children under 3 years of age cannot use the vehicle.

 Only drive on level ground.

 Do not go near swimming pools or other bodies of water, drop-offs, or up and down steep inclines.

 Do not drive the vehicle into loose dirt, mud, sand, fine gravel, or on wet surfaces.

 Do not drive the vehicle on streets or near cars.

Overall Dimensions

Weight

Weight Capacity

Age Range

Max Speed

Charging Time

Run Time

Battery Type

Fuse

Electric Motor

Charger

Materials

45"(L) x 24"(W) x 25"(H)

39 lbs.

77 lbs.

3 – 7 years old

2.2 mph.

8 – 12 hours

1 – 2 hours

12V 7AH

13A

Double-drive 12V

DC 12V1000MA

Plastic, Metal

Summary of Contents for SKY2069

Page 1: ...SKY2069 SKY2338 SKY2581 Ver 2 INSTRUCTION MANUAL Ride On Convertible Truck...

Page 2: ...this vehicle in an unsafe manner Examples include but are not limited to Pulling the vehicle with another vehicle or similar device Allowing more than one rider Pushing the user Traveling at an unsafe...

Page 3: ...rs of age cannot use the vehicle Only drive on level ground Do not go near swimming pools or other bodies of water drop offs or up and down steep inclines Do not drive the vehicle into loose dirt mud...

Page 4: ...D 2 PC H 1 PC SEAT REAR WHEEL driving wheel 2 12 PCS SCREW 3 6 PCS 4 4 PCS TOOLS REQUIRED APPROXIMATELY 45 MIN ASSEMBLY 2 PERSON ASSEMBLY PHILLIPS SCREWDRIVER C 2 PC G 1 PC STEERING WHEEL FRONT WHEEL...

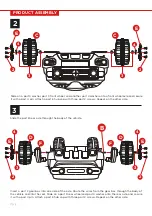
Page 5: ...PRODUCT ASSEMBLY Pg 5 1 1 1 Flip the vehicle over and lay it on a level surface Attach the two part A center frame pieces with ten part 1 screws five on each center frame piece A A...

Page 6: ...r box into one side of the axle Route the wires from the gear box through the body of the vehicle and into the seat Slide on a part D rear wheel and part 3 washer onto the rear axle and secure it with...

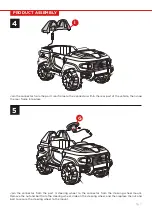
Page 7: ...f the vehicle then snap the rear frame into place 5 4 Join the connector from the part G steering wheel to the connector from the steering wheel mount Remove the nut and bolt from the steering wheel s...

Page 8: ...Pg 8 PRODUCT ASSEMBLY 6 Join the connector from the part J front frame mirrors to the connector within the front part of the vehicle then snap the front frame mirrors into place J...

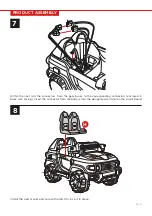
Page 9: ...to lock it in place PRODUCT ASSEMBLY 7 Within the seat join the connectors from the gear boxes to the corresponding connectors enclosed in black wire casing Insert the connector from the battery into...

Page 10: ...n completely Do not allow the battery to drain completely Check the battery and charger supply cord connector for wear and damage before charging Do not charge the battery if damage has occurred Only...

Page 11: ...mpletely press in switches Plug in battery connectors Fully charge the battery Reduce the weight on the vehicle Drive on flat pavement Ensure the motor is properly connected to the battery Properly co...

Page 12: ...he reason for return is a result of an error by Best Choice Products then Best Choice Products will provide a pre paid shipping label via email Boxes for return shipping will not be provided by Best C...

Reviews: