P61726ASS18
CLEANING THE SPA
Detergent residues and dissolved solids from bathing suits and chemicals may build
up on the spa walls. Use soap and water to clean the walls and rinse thoroughly.
NOTE: DO NOT use hard brushes or abrasive cleaners.
Make sure the spa and pump are completely dry. This is essential to extend the life of
the spa. We recommend using the pump to blow dry the spa, pump and pipes.
Remove the filter sets and discard the used filter cartridges. Re-attach the two
stopper caps onto the spa’s inlet and outlet valves. It is recommended you store the
spa in its original package in a warm [above 15°C (59°F)] and dry place.
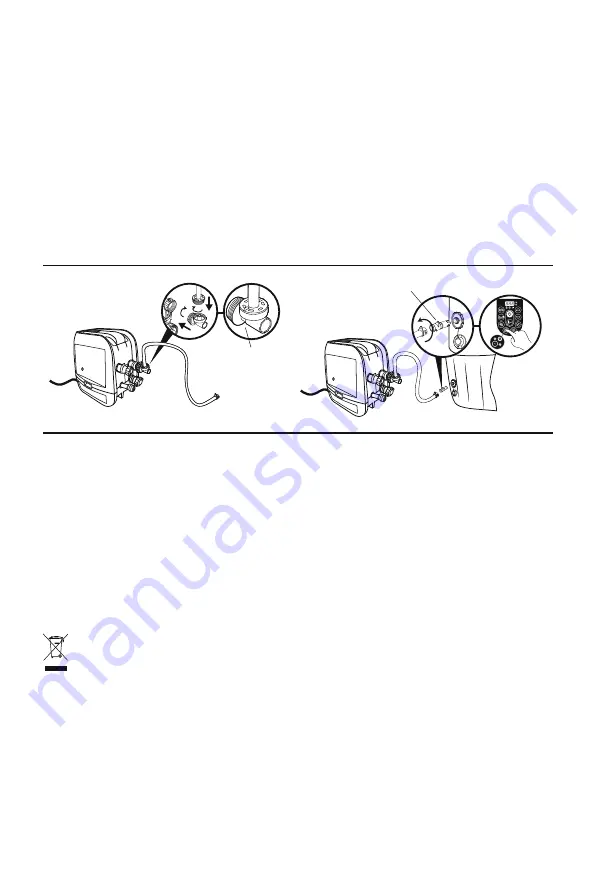
DEFLATION
Your spa is equipped with a deflation function to remove all the air from inside the
chamber to make it easier to pack and store.
Disposal
Waste electrical products should not be disposed of with household waste. Please recycle where facilities exist.
Check with your local authority or retailer for recycling advice.
REPAIR
For PVC part.
If the spa is torn or punctured, use the provided underwater adhesive repair patch.
1. Clean area to be repaired.
2. Carefully peel patch.
3. Press patch over area to be repaired.
4. Wait 30 seconds before inflation.
For Tritech PVC material.
If the spa is torn or punctured, use the provided PVC repair patch and glue (not included) following these steps:
1. Clean and dry area to be repaired.
2. Cut the provided PVC patch to appropriate size.
3. Use glue (not included) to coat the one side of the newly cut patch. Make sure the glue is evenly distributed.
4. Wait for 30 seconds and then place the cut patch with glue over the damaged area.
5. Smooth out any bubbles of air that may be trapped underneath, and press firmly for two minutes.
6. The product is once again ready for use. Repeat this process should further leaks occur.
7. Wait 30 minutes before inflation.
P61727ASS18
25
Summary of Contents for Lay-Z-Spa
Page 1: ...EN PT ES DE FI NL IT FR EL RU PL HU SV OWNER S MANUAL ...
Page 16: ...6 7 8 4 5 min A B C Maldives 5 2 5 1 16 ...
Page 24: ...DRAINING THE SPA 1 2 3 4 5 6 7 P05347 x 8 DISASSEMBLY AND STORAGE 24 ...
Page 42: ...6 7 8 4 5 min A B C Maldives 5 2 5 1 42 ...
Page 50: ...ESVAZIAMENTO DO SPA 1 2 3 4 5 6 7 P05347 x 8 DESMONTAGEM E ARMAZENAMENTO 50 ...
Page 68: ...6 7 8 4 5 min A B C Maldives 5 2 5 1 68 ...
Page 76: ...DRENAJE DEL SPA 1 2 3 4 5 6 7 P05347 x 8 DESMONTAJE Y ALMACENAMIENTO 76 ...
Page 94: ...6 7 8 4 5 min A B C Maldives 5 2 5 1 94 ...
Page 102: ...ENTLEEREN DES WHIRLPOOLS 1 2 3 4 5 6 7 P05347 x 8 ABBAU UND LAGERUNG 102 ...
Page 120: ...6 7 8 4 5 min A B C Maldives 5 2 5 1 120 ...
Page 128: ...SPA ALTAAN TYHJENTÄMINEN 1 2 3 4 5 6 7 P05347 x 8 PURKAMINEN JA VARASTOINTI 128 ...
Page 146: ...6 7 8 4 5 min A B C Maldives 5 2 5 1 146 ...
Page 154: ...DE SPA LEGEN 1 2 3 4 5 6 7 P05347 x 8 DEMONTEREN EN OPBERGEN 154 ...
Page 172: ...6 7 8 4 5 min A B C Maldives 5 2 5 1 172 ...
Page 180: ...SVUOTAMENTO DELLA PISCINA 1 2 3 4 5 6 7 P05347 x 8 SMONTAGGIO E CONSERVAZIONE 180 ...
Page 198: ...6 7 8 4 5 min A B C Maldives 5 2 5 1 198 ...
Page 206: ...VIDANGE DU SPA 1 2 3 4 5 6 7 P05347 x 8 DÉMONTAGE ET RANGEMENT 206 ...
Page 224: ...6 7 8 4 5 min A B C Maldives 5 2 5 1 224 ...
Page 232: ...ΑΠΟΣΤΡΑΓΓΙΣΗ ΤΟΥ SPA 1 2 3 4 5 6 7 P05347 x 8 ΑΠΟΣΥΝΑΡΜΟΛΟΓΗΣΗ ΚΑΙ ΑΠΟΘΗΚΕΥΣΗ 232 ...
Page 250: ...6 7 8 4 5 min A B C Maldives 5 2 5 1 250 ...
Page 258: ...СЛИВ ВОДЫ ИЗ СПА БАССЕЙНА 1 2 3 4 5 6 7 P05347 x 8 РАЗБОРКА И ХРАНЕНИЕ 258 ...
Page 276: ...6 7 8 4 5 min A B C Maldives 5 2 5 1 276 ...
Page 284: ...WYPUSZCZANIE WODY W SPA 1 2 3 4 5 6 7 P05347 x 8 DEMONTAŻ I PRZECHOWYWANIE 284 ...
Page 302: ...6 7 8 4 5 min A B C Maldives 5 2 5 1 302 ...
Page 310: ...A FÜRDŐ LEERESZTÉSE 1 2 3 4 5 6 7 P05347 x 8 SZÉTSZERELÉS ÉS TÁROLÁS 310 ...
Page 328: ...6 7 8 4 5 min A B C Maldives 5 2 5 1 328 ...
Page 336: ...TÖMMA SPABADET 1 2 3 4 5 6 7 P05347 x 8 DEMONTERING OCH FÖRVARING 336 ...


