background image

23


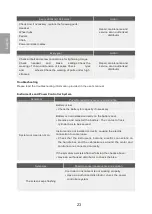
Every 3000km (1864 miles)


Action


Check and, if necessary, replace the following parts: 

Headset


Wheel hubs 

Pedals 

Chain


Power controller cables


Repair, maintenance and 

service at an authorized 

distributor


Every year


Action


Check all bolt and screw connections for tightening torque 

Check      headset       and       brake        settings Check the 

wearing of  chain and tension of  spokes Check             tyres               

and               wheels Check the wearing of parts under high 

stresses


Repair, maintenance and 

service at an authorized 

distributor


Troubleshooting


Please read the troubleshooting information provided in the user's manual.


Instruments and Power Controller System


Symptom


Possible cause/consequence and solution


System or screen is not on.


Battery is low.


• Check the battery for capacity if necessary.


Battery is not installed correctly on the battery seat.


• Remove and reinstall the battery. The contact of lock 

cylinder has to be secured.


Instrument is not installed correctly, causing the electric 
connection to come loose.


• Check  that  the  instrument,  buttons,  electric  connectors  on 

the  handle  bar, and  the  cables/wires  around  the  motor  and 

controller are connected correctly.


If the symptom persists after performing the checks above;


• Have an authorized distributor to check the bike.


Symptom


Possible cause/consequence and solution


The screen keeps flashing


Controller or instrument is not working properly.


• Have an authorized distributor check the power 

controller system.


En

g

lis

h


Summary of Contents for PSF1

Page 1: ...002 EMC Directive 2004 108 EC including EN 15194 2009 AI 2011 2006 42 EC on machinery including EN 15194 2017 The battery charger of the product is described as follows Product Battery charger Function Batter y charger for the electric bike Model BESV 072 0360 The product is designed and manufactured based on EU USA and Australian Communications and Media Authority ASMA standards as well as releva...

Page 2: ...purpose is to encourage cautious use of natural resources which are the building blocks of the plant we live on and to take the needs of nature and human being into consideration As a responsible person for environmental protection you may protect the environment by starting to ride an electric bike The consumption of energy is related to the power controller system gear change system brake system...

Page 3: ... so may result in damage of the bike o r risk of your safety You may select an electric bike that meets your specific needs based on the model and standards provided in the manual but there may be slight differences depending on countries In some cases your bike may not have all the features described for it due to system function and safety Therefore your bike may be somewhat different from the d...

Page 4: ... use In addition part of your body or clothing may be caught in moving or rotating parts such as wheels chain pedals or pedal cranks Make sure that any part of your body clothing or objects you are carrying will not be caught in these parts as they are moving or rotating Also scarf is not recommended A few parts on this bicycle may become very hot after braking such as the braking system front for...

Page 5: ...and luggage Do not carry more than the total weight allowed The BESV e bike is not designed to be a towing vehicle nor allowed to ride behind a towing vehicle tow another bike or pull another bike with a bike linking system Make sure that your e bike is used correctly as it is intended If the bike is not used in the way it is designed to the parts may break down leading to accident or injury The e...

Page 6: ...ad Innovation Bike is in the Warranty Card The serial number of your new Darad Innovation bike and its frame number validate your after sale warranty service Therefore check that the serial numbers of the bike and the frame are intact when you are going to buy a bike Do not buy a bike with a sign that these numbers are tampered with The new bike serial number is found in the warranty card The fram...

Page 7: ... 1 Saddle 2 Battery 3 Folding Fork 4 Folding Stem 5 Break System 6 Crank 7 Pedal 8 Rear Suspension 9 Rear Suspension Joint 10 Supporting Stand 11 Chain 12 Front Wheel 13 Rear Wheel 14 Motor 15 Kickstand 16 U shaped Socket 17 Shaft Pull in ...

Page 8: ...HMI 8 Derailleur Lever HMI introduction 1 Backlight Brightness 2 Information Option 3 Assistant Mode 4 Riding Information 5 Time 6 Battery Remaining Capacity 7 USB charging indicator 8 Bluetooth connection indicator 9 USB charging port Instrument Switch Button 1 Information selection Entry menu 2 Up Increase 3 Down Reduce ...

Page 9: ...and keep them in mind when riding on a road It is for the safety of yours and others on the road Pre riding Check Check the Tires and Wheels While riding an electric bike the tire valve may break if you sit one sidedly on the bike If this happens the tire will lose pressure and there is a risk of accident Therefore always check that the valve is at the correct location It has to extend from the ed...

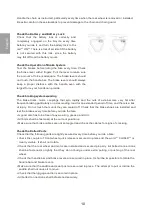
Page 10: ...descending road for an extended period of time and there is a risk of injury Do not touch them until they are cooled off Check that the brake shoes are installed and test the brakes every time before you ride the bike A good disc has to be free of any wearing grease and dirt All bolts shall be fastened at the current positions Make sure that brake cables are not entangled and check the cables for ...

Page 11: ...it unless the safety lock is properly released according to the correct unlocking steps Please be sure to confirm it carefully otherwise there will be an accidental risk Please make sure that the rear suspension joint must be completely locked to the end correctly Any extra push and pull will not move it unless the safety lock is properly released a ccording to the correct unlocking steps Please b...

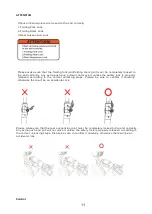
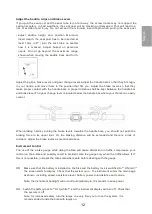
Page 12: ...n easily control When braking hard by pulling the brake levers towards the handle bars you should not push the braking force to its upper limit Or the braking distance will be extended and there is a risk of accident Adjust the brake levers as mentioned above Instrument Control The use of the e bike gauge while riding the bike will cause distraction in traffic compromise your control on the e bike...

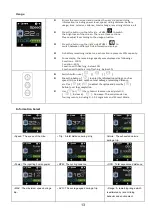
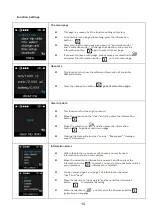
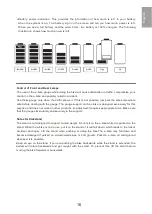
Page 13: ...on 20 1 section with flashing below 10 1 section with battery icon flashing below 5 Switch button use Press the button to enter the information settings such as speed trip calories cadence total mileage remaining distance etc Use 或 to adjust the option and press the button to set the completion Use or the set assist level can be adjusted Increase Decrease The assist mode has four segments includin...

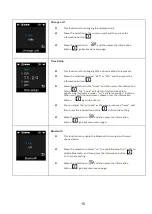
Page 14: ...ction is for clearing trip record Move the selection to the clear and then press the information button Move the selection to and then press the information button to go back main menu page Clearing trip data will also clear calorie Max speed Average speed information Information select With Info selection you can multi choose you mostly used information to show on main display Move the selection ...

Page 15: ...o flash and be able to adjusted by assistance mode or assistance mode buttons When you finish the adjustment please press the information button again to confirm You can adjust the minutes as the same process as hours and then press the information button to finish the setting Move the selection to and then press the information button go back main menu page Bluetooth This function is to enable th...

Page 16: ...ike is designed exclusively for this purpose and does not work on other products Its adjustment requires appropriate t ools Make sure that the gauge sits squarely and securely in the support Notes for Kickstand The stand is not designed to support human weight Do not sit on the e bike while it is parked on the stand When the e bike is not in use put it on the stand or it will fall down which leads...

Page 17: ...s fixing points If the luggage carrier is overloaded the cargo may fall off the bike causing the risk of accident and injury The maximum weight allowed on the luggage carrier is 10kg 22lbs When carrying objects on the luggage carrier of the e bike make sure that the tail light and reflectors are clearly visible to others on the road The rear luggage carrier on the e bike is not designed to carry a...

Page 18: ...re not yet familiar with the braking power of the mechanical disc brake please do so on a surface with good traction and away from traffic Avoid braking consecutively When on a long down slope use both brakes in a steady burst of short braking actions The brakes will cool down when you apply them intermittently Stop the bike at any sign of overheating The symptoms of overheating include extra brak...

Page 19: ...k of electric shock or even mortal injury Use only the battery charger delivered with the product t Use only dry charger undamaged power cable and charger Replace damaged power cable and charger immediately Remove any possible foreign object from the charging socket such as dusts ice or snow before plugging in Using any battery charger other than the one delivered with the product may cause overhe...

Page 20: ...on off switch on the charger Make sure to unplug for energy saving if no chargin is required Do not pedal the bike while the battery is being charged or there is a risk of damaging the charging socket on the bike The battery can be charged onboard or independently Do not move or pedal the bike while the battery is being charged onboard Install the Batter y The battery is not safe if the lock cylin...

Page 21: ...here is a risk of accident and serious injury Tires and Wheels The water jet coming from a high pressure cleaning machine may lead to damage to the chain that is superficial but unseen to naked eye A part that is so damaged may malfunction and lead to a risk of accident Therefore do not use a high pressure cleaning machine to clean your bike The tires and chain must be replaced immediate if damage...

Page 22: ...shing until the braking efficiency is fully restored Washing the bike with water should be kept to a minimum and the electric contacts shall be protected against water Use rubber covers to cover the electric contacts on the battery mount Use soft sponge or brush to clean the bike Use moist wipe to clean the battery mount Check the electric connections after washing and allow the bike to dry comple...

Page 23: ...r System Symptom Possible cause consequence and solution System or screen is not on Battery is low Check the battery for capacity if necessary Battery is not installed correctly on the battery seat Remove and reinstall the battery The contact of lock cylinder has to be secured Instrument is not installed correctly causing the electric connection to come loose Check that the instrument buttons elec...

Page 24: ...ave an authorized distributor check the power controller system Batter System Symptom Possible cause consequence and solution The screen does not show the battery is full even though a complete charging cycle is performed The battery may be subject to surrounding temperature The battery becomes hot while being charged Allow the battery to cool down before repeat the charging cycle Follow the corre...

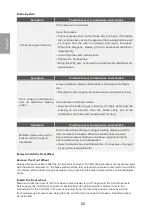
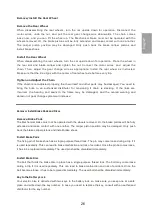
Page 25: ...ll the Front Wheel Remove the Front Wheel Release the brake calipers after the front wheel is removed The Mechanical brake must not be operated with the wheels removed Or the brake pistons will be fully extended and make contact with one another The caliper piston position may be damaged Only push back the brake caliper pistons and install brake shoes Install the front wheel Make sure that the lev...

Page 26: ... Incorrect the bearing and seals in the frame may be damaged and the overall wearing and abrasion of gear change system will increase Remove install Brake Pads and Discs Remove Brake Pads The Mechanical brake must not be operated with the wheels removed Or the brake pistons will be fully extended and make contact with one another The caliper piston position may be damaged Only push back the brake ...

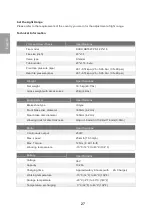
Page 27: ...40 7lbs Gross weight with accessories 20kg 44lbs Brake System Specifications Brake shoe type IS type Front brake disc diameter 160mm 6 29in Rear brake disc diameter 160mm 6 29in Wearing limit for disc thickness Origin 1 8mm 0 07in limit 1 6mm 0 06in Motor Specifications Continuous output 250W Max speed 25km h 15 5mph Max Torque 12Nm 8 49 1lb ft Working temperature 10 C 14 F to 40 C 104 F Battery S...

Reviews: