Made in Thailand
H196431022012
Indoor Use Only
2
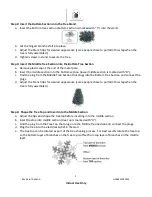
Step 2: Insert the Bottom Section into the Tree Stand
a.
Insert the bottom tree section (bottom section is marked with “C”) into the stand.
b.
Let the hinged branches fall into place.
c.
Adjust the branch tips for desired appearance (some people chose to perform this step when the
tree is fully assembled).
d.
Tighten screws in stand to secure the tree.
Step 3: Insert the Middle Tree Section into the Bottom Tree Section
a.
Remove plastic cap at the end of the metal pole.
b.
Insert the middle section into the bottom section (lower middle section is marked with “B”).
c.
Find the plug from the Middle Tree Section that plugs into the Bottom Tree Section and connect the
plugs.
d.
Adjust the branch tips for desired appearance (some people chose to perform this step when the
tree is fully assembled)
Step 4: Shape the Tree Top and Insert into the Middle Section
a.
Adjust the tips and shape the treetop before inserting into the middle section.
b.
Insert treetop into middle section (tree top is marked with “A”).
c.
Find the plug from the Tree Top that plugs into the Middle Tree Section and connect the plugs.
d.
Plug the tree into the electrical outlet in the wall.
e.
The tree top can be rotated as part of the tree shaping process. For best results rotate the tree top
so the bottom layer of branches on the tree top is offset from top layer of branches on the middle
layer.


