Headbox
11.
Once the brackets have been installed and levels checked open the access clips on the bracket and slide the headbox
into the brackets
12.
Close the clips and
click
them into the locking position.
13.
Carefully lower the blind slats to the lowered position by releasing the cord lock mechanism and supporting the cords.
Please ensure that both the tilt and lifting cords are free from tangles and knots and hanging unobstructed.
14.
Tilt the blinds open and closed to check the clearance and operation of the slats and mechanisms.
15.
If all is operating correctly install the optional hold down brackets into the bottom fixing points to match the pin location in
the bottom rail of the blind
16.
For Face Fit Woodlook Pelmets with Returns
. Attach returns using the small “L” bracket supplied. Be careful not to
break the pelmet when pushing the “L” brackets into place as they can be a tight fit
17.
Woodlook Venetians fix the brackets
carefully
to the rear of the pelmet by placing them in the desired positions for even
hanging. Once their position is established hold the bracket sideways and insert the tabs into the groove in the back of
the pelmet and turn the bracket 90 degrees clockwise to lock it into the groove correctly. Clip the pelmet over the front lip
of the headbox and alter the alignment position if required.
18.
Providing that the handling, installation and care and maintenance is carried out correctly the quality of this product can
supply many years of trouble-free operation.
Maintenance and cleaning
Regularly remove surface dust gently with a clean dry soft cloth, feather duster or soft brush or wipe with a dry sponge.
Recommended cleaning agent is mild detergent in lukewarm water. Stains and smudges can be removed with lukewarm water
and neutral soap on a sponge. Professional ultrasonic cleaning can be undertaken by specialist cleaning businesses.
Warranty
Betta Blinds guarantee the quality on all venetian slats free from defects for one (1) year from date of purchase. Betta Blinds
guarantee the quality on all our blind components free from defects and/or failure for five (5) years from the date of purchase.
The guarantee on Betta Blinds products does not cover defects or damage caused by accidents, alterations, misuse, abuse,
wear and tear or failure to comply with cleaning and maintenance instructions. Betta Blinds does not warranty the fading of
fabrics and venetians caused by direct and/or indirect sunlight. Under the guarantee Betta Blinds shall not be liable or
responsible for incidental or consequential damages or any other direct or indirect damage, loss, cost, expense or fee.
⬧
To avoid creating a possible strangulation hazard for children, the corded internal window covering must be installed in such a way
that a loose cord cannot form a loop 220mm or longer at a height of less than 1,600mm above floor level.
⬧
No part of a cord guide may be installed lower then 1,600mm above floor level unless, the cord guide will remain firmly attached to a
wall or structure specified in the installation instructions when subjected to tension force of 70 N applied in any direction for 10 seconds
and the cord is sufficiently secured or tensioned to prevent the formation of a loop 200mm or longer.
⬧
If a cord guide is installed lower than 1,600 above floor level it must be designed to prevent a child from being able to remove the
cord.
⬧
If a cleat is used to secure the cord it must be at least 1,600mm above floor level because a child is capable of unwinding a cord
from a cleat.
⬧
The person installing a corded internal window covering must attach a label to the corded window covering containing the
name and contact details of the person or company responsible for the installation.
⬧
They also must ensure that any warning label or swing tag supplied with the corded window covering remains attached to
the cord.
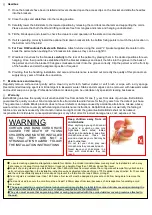
WARNING
:
CURTAIN AND BLIND CORDS HAVE
CAUSED THE DEATH OF YOUNG
CHILDREN AND MUST BE INSTALLED
SO
THAT
THEY
ARE
NOT
A
STRANGULATION HAZARD. FOLLOW
THE INSTALLATION
I
NSTRUCTIONS
Keep children away from all
cords/chains
Move anything a young child can sit
in, stand in or climb on (like cots,
highchairs, beds, sofas, tables,
chairs and bookshelves) away from
cords/chains
—even
those
tied
around a cleat, as your child may be
able to untie them.
Do not let your child play near
cords/chains they can easily reach.
Never leave your child alone in a
room with cords/chains they can
reach.


