background image

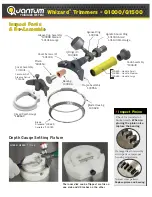
Blade Housing

#

102074

Blade

#

Q620  102078

#

Q625  102079 

Cover Assembly

#

101039

Q620
Poultry Cover 

  #

Asm 101146

Bearing 

#

100996

Frame 

Assembly

#

101086

Thumb Support

#

101021

Grease Cup Assembly

    #

101090 Small

    #

100998 Medium

Handle Spacer Ring 

  #

  101030 Small

    #

101130 Med/Large 

Grease Ring 

#

100961

Pinion 

#

183365

Cover Screws (2)

#

183376

O-Rings (2)

#

103388

Inspect Parts

& Re-Assemble

Inspect Parts

& Re-Assemble

Q625

 Cover

w/Steeling Device

#

101078


Knob Assembly

#

100649

#

100639 – Handle, Small

#

100693 – Handle, Medium

#

100694 – Handle, Large

Serrated Blade Q625

#

102092

Poultry Cover

 #

Q620 101192

#

Q625  101192

Q620 / Q625 Trimmers
 

Check for rounded or 
broken teeth.  

When re-

placing the pinion also 
replace the bearing. 


Damaged teeth caused by 
worn parts or improper 
housing adjustment.   

Normal wear pattern. 


Replace pinion and bearing.

4

Inspect Pinion 

TRIMMER SYSTEM

Micro-Break Strap

#103060

Summary of Contents for Whizard Quantum Q1000

Page 1: ...om quantum Quantum Whizard The Pioneer in Trimming and the Bettcher design are trademarks of Bettcher Industries Inc U S and international patents 2015 Bettcher Industries Inc All rights reserved Toll Free 800 321 8763 Tel 440 965 4422 Fax 440 328 4535 Offices in Brazil China Europe t h e P i o n e e r i n Tr i m m i n g ...

Page 2: ... passes through the gauge is worn Replace Blade With the gear teeth facing the back simply drop a blade into the gauge Blade Wear Gauge Simple Go No Go Test Compressed Air Helps Case 184331 4 gallons and pump Gallon 184332 Whizard Cleaning Tools Kit 184334 4 4 Part Trimmer Model s 163918 Q360 Q350 360M2 350M2 L P 163923 Q620 625M2 Low Profile 173577 Q620 Low Profile 163924 Q625 620M2 Low Profile 1...

Page 3: ...up Assembly 101090 Small 100998 Medium Inspect Parts Re Assemble Inspect Parts Re Assemble Bottom View Close Up Easy to Train Simple to Use Top View Flat Blades Top View Straight Blades EdgeMaster Steeling Fixture The EdgeMaster handheld steeling device quickly restores rolled edges using a fixture that guarantees the correct angle every time E Z Edge blue handle takes just seconds to sharpens and...

Page 4: ...s 2 103388 Inspect Parts Re Assemble Inspect Parts Re Assemble Q625 Cover w Steeling Device 101078 Knob Assembly 100649 100639 Handle Small 100693 Handle Medium 100694 Handle Large Serrated Blade Q625 102092 Poultry Cover Q620 101192 Q625 101192 Q620 Q625 Trimmers Check for rounded or broken teeth When re placing the pinion also replace the bearing Damaged teeth caused by worn parts or improper ho...

Page 5: ...1363 Serrated Q850 102087 Grease Cup Assembly 100998 Medium 101316 Large Knob Assembly 100649 100639 Handle Small 100693 Handle Medium 100694 Handle Large Q750 Cover Assembly 101374 Inspect Parts Re Assemble Inspect Parts Re Assemble Q1880 Cover Assembly with Steel 101443 Q750 Poultry Cover 101375 Q750 Q850 Q880 Q1880 Trimmers Check for rounded or broken teeth When re placing the pinion also repla...

Page 6: ...sembly 100649 100639 Handle Small 100693 Handle Medium 100694 Handle Large Handle Spacer Ring 101030 Small 101130 Med Large O Rings 2 103388 Grease Cup Assembly 100998 Medium 101316 Large Inspect Parts Re Assemble Inspect Parts Re Assemble Q1400 Q1500 173348 Closed Depth Gauge 183160 Whizard Trimmers Q1000 Q1500 Check for rounded or broken teeth When re placing the pinion also replace the bearing ...

Page 7: ...sembly 100956 Grease Ring 100961 Knob Assembly 100649 100639 Handle Small 100693 Handle Medium 100694 Handle Large Handle Spacer Ring 101030 Small 101130 Med Large O Rings 2 103388 Grease Cup Assembly 100998 Medium 101316 Large Post Handle Kit 101280 Inspect Parts Re Assemble Inspect Parts Re Assemble Open Depth Gauge 183159 Blade Standard 100630 Serrated 100781 Whizard Trimmers Q1300 Q1400 TRIMME...

Page 8: ...using in the direction of the arrow shown in Image 2 and the blade rotates freely A slight amount of clearance is all that is needed Finally tighten both cover screws to the recommended torque and recheck the blade clearance and rotation Recommended Torque 30 35 lb in 3 4 4 0 N m Important Make sure the blade is free to move in the housing If the blade does not move freely it may cause the trimmer...

Page 9: ... demonstrating these test procedures To view the video go to Torque Limiting T Handle 4 Begin with a properly tightened cover using the Bettcher Torque Limiter 30 35 lb in 3 4 4 0 N m Apply gentle pressure if the housing moves the cover is worn The cost of a T handle torque limiter is about the same as a new pinion cover so it makes sense to invest in this tool to ensure all Trimmer parts are prop...

Page 10: ...t 48 Large Dia w Driver 101051 60 Large Dia w Driver 101054 84 Large Dia w Driver 102671 48 Large Dia 100618 60 Large Dia 100619 84 Large Dia 102551 4Quick Disconnect 48 Small Dia w Driver 102758 60 Small Dia w Driver 102760 48 Large Dia w Driver 101055 60 Large Dia w Driver 101056 84 Large Dia w Driver 102672 TRIMMER SYSTEM 35 lb Pail 102612 13 5 oz Cartridge 102609 Listed for use in federally in...

Page 11: ...riveline the driver assembly may be removed and used on the new casing To remove driver assembly n Hold the worn casing end in vise n Unscrew the drive end assembly turning counterclockwise using the wrench flats on the drive end assembly n Remove the washer and latch collar from casing n Discard the old casing but reuse the driver assembly on the new casing Assembling the Driver Assembly to the C...

Page 12: ...Excessive curves accelerate wear Eliminate droopy flex shafts Motor position for left or right hand dominance P a r t P a r t Dec Dec Jan Jan Nov Nov May May Jun Jun Jul Jul Aug Aug Sep Sep Oct Oct Feb Feb Mar Mar Apr Apr Pinion Driveline Blade Blade Housing Bearing Weeks Weeks Blade 4 6 Driveline Small Blade Housing Large Blade Housing 8 10 20 24 Pinion Gear 8 10 Bearing 10 12 Weeks Weeks P a r t...

Reviews: