background image

53

Leggere attentamente le presenti istruzioni per 

l'uso, conservarle per impieghi futuri, renderle 

accessibili ad altri utenti e attenersi alle 

indicazioni.


ITALIANO

Sommario

Fornitura

• 1 videocamera

• 2 alimentatore 

• 1 unità genitore

• 1 batteria agli ioni di litio per l'unità genitore

• 1 copia delle presenti istruzioni per l'uso

1. Introduzione ................................................................... 54
2. Spiegazione dei simboli ..............................................54
3. Uso conforme ................................................................ 55
4. Note ................................................................................ 55
5. Descrizione dell'apparecchio ....................................... 57
6. Messa in funzione .......................................................... 58
7. Funzionamento .............................................................. 59

  7.1 Luce notturna a infrarossi .......................................... 59
  7.2 Impostazione del volume ........................................... 59
  7.3 Regolazione della luminosità ..................................... 59
  7.4 Funzione parla/ascolta ............................................... 60
  7.5 Menu delle impostazioni  ........................................... 60

8. Informazioni importanti sul babyphone ....................... 62
9. Manutenzione e pulizia ................................................. 63
10. Che cosa fare in caso di problemi? ........................... 63
11. Smaltimento ................................................................. 64
12. Dati tecnici ................................................................... 65

Summary of Contents for BY 77

Page 1: ...ions for use F Babyphone vidéo Mode d emploi E Intercomunicador para bebés con vídeo Instrucciones de uso I Babyphone video Istruzioni per l uso T Görüntülü bebek telsizi Kullanım kılavuzu r Видеоняня Инструкция по применению Q Elektroniczna niania wideo Instrukcja obsługi ...

Page 2: ...Akku für Elterneinheit 1x Diese Gebrauchsanweisung 1 Zum Kennenlernen 3 2 Zeichenerklärung 3 3 Bestimmungsgemäßer Gebrauch 4 4 Hinweise 4 5 Gerätebeschreibung 6 6 Inbetriebnahme 7 7 Bedienung 8 7 1 Infrarot Nachtlicht 8 7 2 Lautstärke einstellen 8 7 3 Helligkeit einstellen 8 7 4 Gegensprechfunktion 9 7 5 Einstellungs Menü 9 8 Wissenswertes rund ums Babyphone 11 9 Reinigung und Instandhaltung 12 10...

Page 3: ... Funktionen des Gerätes Dieses Video Babyphone ermöglicht Ihnen Tätigkeiten in anderen Räumen bzw im Garten nachzugehen und währenddessen Ihr Baby im Auge zu behalten Die 23 Kanäle gewährleisten eine maximal störungsfreie und sichere Verbindung Das Gerät verfügt über folgende Funktionen Videoüberwachung Infrarot Nachtsichtfunktion ECO Modus Energiesparmodus Reichweitenkontrolle mit akustischem Sig...

Page 4: ...in Reichweite Ihres Kindes sind Überzeugen Sie sich vor dem Einsatz des Video Babyphones von deren einwandfrei em Funktionieren und davon dass die Elterneinheit bei Akkubetrieb mit ausreichend geladenem Akku versehen ist Tauchen Sie die Kamera und die Elterneinheit niemals in Wasser Spülen Sie sie niemals unter fließendem Wasser ab Benutzen Sie die Kamera und die Elterneinheit niemals in der Nähe ...

Page 5: ...eit keinesfalls öffnen oder reparieren da sonst eine einwandfreie Funktion nicht mehr gewährleistet ist Bei Nichtbeachten erlischt die Garantie Sollten Sie noch Fragen zur Anwendung des Video Babyphones haben so wenden Sie sich bitte an Ihren Händler oder an den Kundenservice WARNUNG Sicherheitshinweise zum Umgang mit Akkus Wenn Akku ausgelaufen ist Schutzhandschuhe anziehen und Batteriefach mit e...

Page 6: ...leuchte 7 Anschluss für Steckernetzteil 4 Mikrofon 8 Temperatursensor Elterneinheit Monitor 1 2 9 3 8 4 7 5 6 1 Geräusche LEDs 2 Richtungstaste unten Helligkeit verringern 3 Richtungstaste rechts Lautstärke lauter 4 Gegensprechfunktion 5 OK Taste 6 Menü Taste 7 EIN AUS Taste 8 Richtungstaste links Lautstärke leiser 9 Richtungstaste oben Helligkeit erhöhen ...

Page 7: ...äche und richten Sie das Kameraob jektiv auf den Bereich den Sie überwachen möchten Achten Sie darauf dass sich keine anderen elektrischen Geräte in der Nähe befinden WARNUNG Platzieren Sie die Kamera NICHT in Reichweite des Babys 2 Verbinden Sie das kleine Ende des Kamera Steckernetzteils mit der Kamera 3 Verbinden Sie das andere Ende des Steckernetzteils mit der Steckdose 4 Um die Kamera einzusc...

Page 8: ...inden Sie das kleine Ende des Eltern Steckernetzteils mit der Elterneinheit 2 Verbinden Sie das andere Ende des Steckernetzteils mit der Steckdose 3 Elterneinheit schaltet sich automatisch ein Zum Ausschalten drücken Sie die EIN AUS Taste Wenn Elterneinheit und Kamera eingeschaltet sind erscheint auf dem Bildschirm der Elterneinheit automatisch das Übertragungsbild der Kamera 7 Bedienung 7 1 Infra...

Page 9: ... Taste können Sie sich durch das Menü wählen Zoomfunktion Die Elterneinheit verfügt über eine Zoomfunktion zur Vergrößerung des Übertragungs bildes Um die Zoomfunktion zu aktivieren gehen Sie wie folgt vor Wählen Sie mit den Richtungstasten oben unten Ihren gewünschten Zoomfaktor 1x oder 2x Bestätigen Sie mit der OK Taste Schlaflieder Sie können über die Elterneinheit eines von fünf Schlafliedern ...

Page 10: ... mit der OK Taste Auf dem Bildschirm erscheint 1 2 3 4 Wählen Sie mit den Richtungstasten oben unten eine Nummer und be stätigen Sie mit der OK Taste Auf dem Bildschirm erscheint und es wird nach einer Kamera gesucht Halten Sie nun an auf der Rückseite der Kamera die PAIR Taste solange gedrückt bis ein Signalton ertönt und das Übertragungsbild der hinzugefügten Kamera auf dem Bildschirm erscheint ...

Page 11: ...esparmodus Die Elterneinheit besitzt einen Energiesparmodus Wenn Sie den Energiesparmodus aktivieren schaltet sich der Bildschirm wahlweise nach 5 15 oder 60 Minuten auto matisch aus Wählen Sie mit den Richtungstasten links rechts den Menüpunkt Wählen Sie mit den Richtungstasten oben unten die Zeit nach der sich der Bildschirm automatisch ausschalten soll 5min 15min oder 60min Bestätigen Sie mit d...

Page 12: ...inigen Sie die Kamera Elterneinheit mit einem weichen trockenen Tuch Verwen den Sie keine scheuernden Reinigungsmittel 10 Was tun bei Problemen Elterneinheit Monitor lässt sich nicht einschalten Prüfen Sie ob das Steckernetzteil richtig eingesteckt ist der Akku korrekt eingesetzt ist der Akku voll ist bzw der Akku geladen werden muss oder beschädigt ist An der Elterneinheit Monitor ertönt ein akus...

Page 13: ... wie unter Kamera hinzufügen beschrieben die Kamera erneut einrichten 11 Entsorgung Akkus müssen Sie über speziell gekennzeichnete Sammelbehälter Sondermüllan nahmestellen oder über den Elektrohändler entsorgt werden Sie sind gesetzlich dazu verpflichtet Akkus zu entsorgen Im Interesse des Umweltschutzes darf das Gerät am Ende seiner Lebens dauer nicht mit dem Hausmüll entfernt werden Die Entsorgu...

Page 14: ...n Für Verschleißteile Bei Eigenverschulden des Kunden Sobald das Gerät durch eine nicht autorisierte Werkstatt geöffnet wurde Die gesetzlichen Gewährleistungen des Kunden bleiben durch die Garantie unberührt Für Geltendmachung eines Garantiefalles innerhalb der Garantiezeit ist durch den Kunden der Nachweis des Kaufes zu führen Die Garantie ist innerhalb eines Zeitraumes von 3 Jahren ab Kaufdatum ...

Page 15: ...battery for parent unit 1 x set of instructions for use 1 Getting to know your instrument 16 2 Explanation of symbols 16 3 Intended use 16 4 Notes 17 5 Unit description 18 6 Initial use 20 7 Operation 21 7 1 Infrared night vision 21 7 2 Set the volume 21 7 3 Set the brightness 21 7 4 Intercom function 21 7 5 Settings menu 21 8 Useful information about the baby monitor 24 9 Maintenance and cleaning...

Page 16: ...in other rooms or in the garden The 23 channels ensure a connection that is secure and as free of interference as possible The device has the following functions Video monitoring Infrared night vision function ECO mode energy saving mode Range control with acoustic signal Range of up to 300 m with a clear view 2 Explanation of symbols The following symbols appear in these instructions for use WARN...

Page 17: ...r Never use the camera and the parent unit in proximity to moisture Do not cover the camera and the parent unit with a towel or cover Only use the mains part plugs included in delivery Do not use the cable to pull the mains part plug out of the socket This device may be used by children over the age of eight and by people with reduced physical sensory or mental skills or a lack of experience or kn...

Page 18: ...battery has leaked put on protective gloves and clean the battery compartment with a dry cloth If your skin or eyes come into contact with fluid from the battery cell flush out the affected areas with plenty of water and seek medical assistance Risk of explosion Never throw batteries into a fire Do not disassemble split or crush the batteries Batteries must be charged correctly prior to use The in...

Page 19: ...n 8 Left arrow button Reduce volume 9 Top arrow button Increase brightness Display description 1X 2X 3 2 1 6h 4h 2h F C 4 3 2 1 60 15 5 1 5 4 Signal strength Temperature display Alarm clock Infrared night light Lullaby Intercom function Alternating camera image mode Camera number Battery state Menu for power saving mode Camera menu Temperature menu Alarm clock menu Lullabies menu Zoom menu ...

Page 20: ...nwards 3 Insert the battery included in delivery as shown 4 Slide the cover on the rear of the parent unit back up again until you can hear and feel it slot into place 5 Attach the assembly clip again 6 Press the ON OFF button to switch on the parent unit If the camera is already switched on the transmission image from the camera will automatically appear on the screen If the camera is still switc...

Page 21: ... the button on the parent unit and speak into the unit The words you have spoken can now be heard on the camera To deactivate the intercom function release the button again 7 5 Settings menu You can adjust the following settings in the menu of the parent unit zoom function lullabies alarm temperature unit add delete view camera alternating camera image and power saving mode To access the settings ...

Page 22: ...perature unit You can set the device to display the temperature in degrees Celsius C or degrees Fahrenheit F Use the left right direction arrows to select the menu item Use the up down direction arrows to select the required unit of tem perature Confirm using the OK button Add camera You can connect one parent unit with up to four cameras To add a camera to the parent unit proceed as follows Use t...

Page 23: ...n arrows to select the number of the camera that you wish to view Confirm using the OK button Alternating camera image If you have multiple cameras registered the Alternating camera image function is available When this function is activated the transmission images from the registered cameras appear on the screen in the form of a loop that changes every 12 seconds To activate this function proceed...

Page 24: ...aning The service life of the camera and the parent unit depend on careful handling IMPORTANT Remove the battery from the parent unit if the video baby monitor is not in use for an extended period You will get the maximum capacity from your battery if you run down the battery at least once every six months To do this disconnect the parent unit from the mains and run the battery down through normal...

Page 25: ...e parent unit is in energy saving mode Check whether the power saving mode has been selected in the menu and deactivate it where necessary The signal is weak the con nection keeps breaking up or there is interference If another technical device such as a microwave is in the area between the camera and the parent unit remove the technical device or switch it off Check whether other factors such as ...

Page 26: ...aste disposal 12 Technical data 23 channels Frequency 2 4 2 483 GHz Transmission power 18dBm Digital receiver 1 8 TFT display Infrared technology ECO mode Camera dimensions 9 x 6 5 x 5 8 cm Parent unit dimensions 11 5 x 6 9 x 2 4 cm Weight Camera 91 g parent unit 80 g battery 38 g Range up to 300 m with a clear view Operation Mains part included 5V USB 600mA Li Ion battery 2100 mA Rechargeable bat...

Page 27: ...d emploi 1 Familiarisation avec l appareil 28 2 Explication des symboles 28 3 Utilisation conforme aux recommandations 29 4 Remarques 29 5 Description de l appareil 31 6 Mise en service 32 7 Utilisation 33 7 1 Veilleuse infrarouge 33 7 2 Régler le volume 33 7 3 Régler la luminosité 33 7 4 Fonction de retour 33 7 5 Menu de réglage 34 8 Tout ce qu il faut savoir à propos du babyphone 36 9 Entretien ...

Page 28: ...n avec l appareil Fonctions de l appareil Ce babyphone vidéo vous permet de vaquer à vos occupations dans d autres pièces ou dans le jardin tout en gardant un œil sur votre bébé Les 23 canaux assurent une connexion sûre et avec le minimum de perturbations L appareil dispose des fonctions suivantes Surveillance vidéo Vision de nuit infrarouge Mode ECO mode économie d énergie Contrôle de la portée a...

Page 29: ... main de votre enfant Avant d utiliser le babyphone vidéo assurez vous qu il fonctionne correctement et que la batterie est suffisamment chargée si le moniteur fonctionne sur batterie Ne plongez jamais la caméra et l unité parents dans l eau Ne les rincez jamais sous l eau courante N utilisez jamais la caméra et l unité parents à proximité d humidité Ne recouvrez pas la caméra et l unité parents a...

Page 30: ...respect de cette consigne annulera la garantie Pour toute question concernant l utilisation du babyphone vidéo adressez vous à votre revendeur ou à notre service clients AVERTISSEMENT Consignes de sécurité relatives aux batteries Si la batterie a coulé enfilez des gants de protection et nettoyez le compartiment à batterie avec un chiffon sec Si du liquide de la cellule de batterie entre en contact...

Page 31: ...adaptateur secteur 4 Microphone 8 Capteur de température Unité parents Moniteur 1 2 9 3 8 4 7 5 6 1 LED de bruit 2 Touche directionnelle vers le bas Réduire la luminosité 3 Touche directionnelle droite Volume sonore plus haut 4 Fonction de réponse 5 Touche OK 6 Touche de menu 7 Touche MARCHE ARRÊT 8 Touche directionnelle gauche Volume sonore plus bas 9 Touche directionnelle vers le haut Augmenter ...

Page 32: ...caméra 1 Placez la caméra sur une surface solide et plane et dirigez l objectif de la caméra sur la zone que vous souhaitez surveiller Assurez vous qu il n y a pas d autre appareil électrique à proximité AVERTISSEMENT Ne placez PAS la caméra à portée du bébé 2 Raccordez la petite extrémité de l adaptateur secteur de la caméra à la caméra 3 Raccordez l autre extrémité de l adaptateur secteur à la p...

Page 33: ...unité parents s allume automatiquement Appuyez sur la touche MARCHE ARRÊT pour éteindre Si l unité parents et la caméra sont déjà allumées l image retransmise par la caméra apparaît automatiquement sur l écran de l unité parents 7 Utilisation 7 1 Veilleuse infrarouge Afin de pouvoir voir aussi voir à l écran des images nettes dans la pénombre le baby phone vidéo active automatiquement la veilleuse...

Page 34: ...om souhaité 1x ou 2x Confirmez avec la touche OK Berceuses À l aide de l unité parents vous pouvez activer l une des cinq berceuses qui est dif fusée par la caméra Procédez comme suit pour activer l une des berceuses Avec les touches directionnelles gauche droite sélectionnez le point de menu Avec les touches directionnelles haut bas sélectionnez la berceuse souhaitée 1 2 3 4 ou 5 Confirmez avec l...

Page 35: ...K apparaît à l écran et une caméra est recherchée Maintenez à présent la touche PAIR enfoncée à l arrière de la caméra jusqu à ce qu un signal sonore retentisse et que l image de la caméra ajoutée apparaisse à l écran Remarque Vous trouverez des caméras supplémentaires auprès du service client Beurer sous la référence 163 569 Supprimer une caméra Procédez comme suit si vous voulez supprimer la con...

Page 36: ...d énergie L unité parents comprend un mode économie d énergie Quand vous activez le mode économie d énergie l écran s éteint automatiquement après 5 15 ou 60 minutes au choix Avec les touches directionnelles gauche droite sélectionnez le point de menu Avec les touches directionnelles haut bas sélectionnez après combien de temps l écran doit automatiquement s éteindre 5 min 15 min ou 60 min Confirm...

Page 37: ...uence des chargements etc Protégez la caméra et l unité parents contre les chocs l humidité la poussière les produits chimiques les fortes variations de température les champs électromagné tiques et les sources de chaleur trop proches four radiateur Nettoyez la caméra l unité parents avec un chiffon doux et sec N utilisez pas de produits nettoyants abrasifs 10 Que faire en cas de problèmes Il est ...

Page 38: ...gnaux des appareils entre eux appariement 1 Allumer la caméra et l unité parents 2 Supprimer la caméra dans le menu de l unité pa rents et reconfigurer la caméra comme décrit dans Ajouter une caméra 11 Élimination des déchets Vous devez jeter les batteries dans des conteneurs spéciaux spécialement marqués des points de collecte réservés à cet usage ou chez un revendeur d appareils élec triques Cet...

Page 39: ...batterie li ion 2100 mA Durée de la batterie dépend de l état de la batterie de la température ambiante de la manière et de la fréquence du proces sus de charge etc Unité parent 12 heures Nous garantissons par la présente que ce produit est conforme à la directive euro péenne RED 2014 53 UE Veuillez contacter l adresse du SAV indiquée afin d obtenir de plus amples détails comme par exemple la décl...

Page 40: ...a padres 1 x estas instrucciones de uso 1 Información general 41 2 Explicación de los símbolos 41 3 Uso correcto 42 4 Consejos de uso 42 5 Descripción del aparato 44 6 Puesta en funcionamiento 45 7 Manejo 46 7 1 Luz de noche por infrarrojos 46 7 2 Ajustar volumen 46 7 3 Ajustar luminosidad 46 7 4 Función de intercomunicación 47 7 5 Menú de ajuste 47 8 Información importante sobre el intercomunicad...

Page 41: ...aparato Este intercomunicador para bebés con vídeo le permite realizar actividades en otras habitaciones o en el jardín sin dejar de estar pendiente de su bebé Los 23 canales garantizan una conexión completamente segura y sin interferencias El aparato dispone de las siguientes funciones Videovigilancia Función de visión nocturna por infrarrojos Modo ECO modo de ahorro de energía Control de alcance...

Page 42: ...erferencias Asegúrese de que no haya cables al alcance de su hijo Antes de usar el intercomunicador para bebés con vídeo asegúrese de que funciona correctamente y de que la batería de la unidad para padres tiene carga suficiente si la va a usar con batería No sumerja nunca en agua la cámara ni la unidad para padres No las lave nunca debajo del grifo No use nunca la cámara ni la unidad para padres ...

Page 43: ...dad para padres bajo ningún concepto Si lo hace ya no se garantizará su correcto funcionamiento El incumplimiento de esta disposición anula la garantía Si todavía tiene dudas sobre cómo usar el intercomunicador para bebés con vídeo póngase en contacto con su distribuidor o con el servicio de atención al cliente ADVERTENCIA Indicaciones de seguridad para el manejo de baterías Si se derrama el líqui...

Page 44: ...oma para bloque de alimentación 4 Micrófono 8 Sensor de temperatura Unidad para padres Monitor 1 2 9 3 8 4 7 5 6 1 LED de sonidos 2 Tecla de dirección abajo reducir luminosidad 3 Tecla de dirección derecha volumen más alto 4 Función de intercomunicación 5 Tecla OK 6 Touche de menu 7 Touche MARCHE ARRÊT 8 Touche directionnelle gauche Volume sonore plus bas 9 Touche directionnelle vers le haut Augme...

Page 45: ...de la cámara 1 Coloque la cámara sobre una superficie lisa y estable y dirija el objetivo de la cá mara a la zona que desea vigilar Asegúrese de que no hay ningún otro aparato eléctrico cerca ADVERTENCIA NO coloque la cámara al alcance del bebé 2 Conecte el extremo pequeño del bloque de alimentación de la cámara en la cámara 3 Conecte el otro extremo del bloque de alimentación en el enchufe 4 Para...

Page 46: ...ara padres en la unidad para padres 2 Conecte el otro extremo del bloque de alimentación en el enchufe 3 La unidad para padres se enciende automáticamente Para apagarla pulse la tecla de encendido y apagado Si la unidad para padres y la cámara están en cendidas en la pantalla de la unidad para padres aparecerá automáticamente la imagen transmitida por la cámara 7 Manejo 7 1 Luz de noche por infrar...

Page 47: ...á desplazarse por el menú con las teclas y Función de zoom La unidad para padres dispone de una función de zoom para ampliar las imágenes Para activar la función de zoom proceda del siguiente modo Seleccione con las teclas de dirección arriba abajo el factor de zoom que desee 1x o 2x Confirme con la tecla OK Nanas En la unidad para padres puede activar una de las cinco nanas que sonará a través de...

Page 48: ...s de dirección arriba abajo la opción de me nú Confirme con la tecla OK En la pantalla aparece 1 2 3 4 Seleccione con las teclas de dirección arriba abajo un número y con firme con la tecla OK En la pantalla aparece y se busca una cámara Mantenga pulsada en la parte trasera de la cámara la tecla PAIR hasta que suene un pitido y la imagen de la cámara agregada aparezca en la pantalla Nota Podrá sol...

Page 49: ...odo Seleccione con las teclas de dirección izquierda derecha la opción de menú Seleccione con las teclas de dirección arriba abajo la opción de me nú Confirme con la tecla OK Modo de ahorro de energía La unidad para padres dispone de un modo de ahorro de energía Si activa el modo de ahorro de energía la pantalla se apagará automáticamente tras 5 15 o 60 minu tos según desee Seleccione con las tecl...

Page 50: ...rgada cárguela de nuevo completamente Para conseguir el máximo rendimiento de una batería es necesario llevar a cabo el proceso de carga en varias ocasiones Además influyen otros factores entre otros el estado de la batería la temperatura ambiente o la frecuencia y el modo de carga de la batería Proteja la cámara y la unidad para padres de golpes humedad polvo sustancias químicas grandes cambios d...

Page 51: ...y conexión Compruebe si la cámara y la unidad para padres se encuentran dentro del radio de alcance máximo Cuando no se puede realizar ninguna transmisión tiene la posibilidad de volver a armo nizar digitalmente las señales de los aparatos Pairing 1 Encienda la cámara y la unidad para padres 2 En el menú de la unidad para padres borre la cá mara y vuelva a configurarla como se ha descrito en Agreg...

Page 52: ...00 m sin obstáculos Funcionamiento Fuente de alimentación adjunta 5V USB 600mA batería de iones de litio 2100 mA Duración con funcionamiento con batería depende del estado de la batería la tem peratura ambiente el modo de carga de la batería etc Unidad para padres 12 horas Garantizamos que este producto cumple la Directiva europea RED 2014 53 UE Póngase en contacto con el servicio técnico pertinen...

Page 53: ...le presenti istruzioni per l uso 1 Introduzione 54 2 Spiegazione dei simboli 54 3 Uso conforme 55 4 Note 55 5 Descrizione dell apparecchio 57 6 Messa in funzione 58 7 Funzionamento 59 7 1 Luce notturna a infrarossi 59 7 2 Impostazione del volume 59 7 3 Regolazione della luminosità 59 7 4 Funzione parla ascolta 60 7 5 Menu delle impostazioni 60 8 Informazioni importanti sul babyphone 62 9 Manutenzi...

Page 54: ... il bambino sempre sotto sorveglianza mentre si svolgono attività in locali o ad es in giardino diversi da quello in cui ripo sa I 23 canali garantiscono un collegamento il più possibile non disturbato e sicuro L apparecchio dispone delle seguenti funzioni videosorveglianza visione notturna a infrarossi modalità ECO modalità di risparmio energetico controllo della portata con segnale acustico port...

Page 55: ...modo corretto e in caso di utilizzo di una batteria ricaricabile per l unità genitore che la stessa sia sufficientemente carica Non immergere mai la videocamera e l unità genitore in acqua Non sciacquare mai sotto l acqua corrente Non utilizzare mai la videocamera e l unità genitore nelle vicinanze di umidità Non coprire la videocamera e l unità genitore con un asciugamano o una coperta Utilizzare...

Page 56: ...teriori domande sull utilizzo del babyphone video rivolgersi al proprio riven ditore o al Servizio clienti AVVERTENZA Avvertenze di sicurezza sull uso delle batterie ricaricabili In caso di fuoriuscita di liquido dalla batteria ricaricabile indossare guanti protettivi e pulire il vano batterie con un panno asciutto Se il liquido della batteria ricaricabile viene a contatto con la pelle e con gli o...

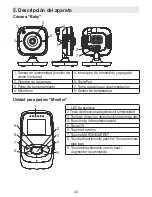
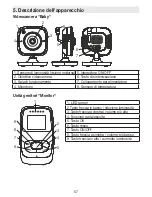
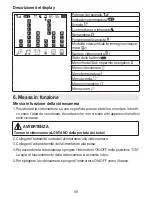
Page 57: ...e 3 Spia di funzionamento 7 Collegamento per alimentatore 4 Microfono 8 Sensore di temperatura Unità genitori Monitor 1 2 9 3 8 4 7 5 6 1 LED rumori 2 Tasto freccia in basso riduzione luminosità 3 Tasto freccia a destra volume più alto 4 Funzione parla ascolta 5 Tasto OK 6 Tasto menu 7 Tasto ON OFF 8 Tasto freccia a sinistra volume più basso 9 Tasto freccia in alto aumento luminosità ...

Page 58: ...unzione della videocamera 1 Posizionare la videocamera su una superficie piana e stabile e orientare l obietti vo verso l area da monitorare Accertarsi che non vi siano altri apparecchi elettrici nelle vicinanze AVVERTENZA Tenere la videocamera LONTANO dalla portata del bebè 2 Collegare l estremità corta dell alimentatore alla videocamera 3 Collegare l altra estremità dell alimentatore alla presa ...

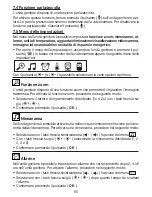
Page 59: ...corta dell alimentatore all unità genitore 2 Collegare l altra estremità dell alimentatore alla presa 3 L unità genitore si accende automaticamente Per spegnere premere il pul sante ON OFF Se l unità genitore e la videocamera sono entrambe accese sul monitor dell unità genitore viene visualizzata automaticamente l immagine trasmessa 7 Funzionamento 7 1 Luce notturna a infrarossi Per poter visualiz...

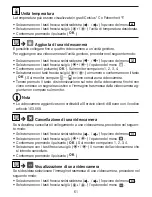
Page 60: ...zoom L unità genitore dispone di una funzione zoom che permette di ingrandire l immagine trasmessa Per attivare la funzione zoom procedere nel seguente modo Selezionare il fattore di ingrandimento desiderato 1x o 2x con i tasti freccia su giù Confermare premendo il pulsante OK Ninnananna Dall unità genitore è possibile attivare una delle cinque ninnenanne che viene poi ripro dotta dalla videocamer...

Page 61: ...l tasto di sintonizzazione sul retro della videocamera finché non viene emesso un segnale acustico e l immagine trasmessa dalla videocamera ag giunta non compare sul monitor Nota Le videocamere aggiuntive sono ordinabili al Servizio clienti di Beurer con il codice articolo 163 569 Cancellazione di una videocamera Se si desidera cancellare il collegamento a una videocamera procedere nel seguen te m...

Page 62: ...egne automaticamente dopo 5 15 o 60 minuti a seconda della preferenza Selezionare con i tasti freccia sinistra destra l opzione del menu Selezionare con le frecce su giù dopo quanto tempo il monitor deve spegnersi automaticamente 5 min 15 min o 60 min Confermare premendo il pulsante OK 8 Informazioni importanti sul babyphone Il funzionamento dell unità genitore con batteria ricaricabile riduce al ...

Page 63: ...oriferi Pulire la videocamera e l unità genitore con un panno asciutto e morbido Non uti lizzare detergenti abrasivi 10 Che cosa fare in caso di problemi L unità genitore Monitor non si accende Verificare se la spina dell alimentatore è inserita correttamente la batteria ricaricabile è inserita correttamente la batteria ricaricabile è carica da caricare o dan neggiata L unità genitore Monitor emet...

Page 64: ...dei due apparecchi pairing 1 Accendere la videocamera e l unità genitore 2 Nel menu dell unità genitore cancellare la videoca mera e riconfigurarla come descritto nella sezione Aggiunta di una videocamera 11 Smaltimento Le batterie ricaricabili devono essere smaltite negli appositi punti di raccolta nei punti di raccolta per rifiuti tossici o presso i negozi di elettronica Lo smaltimento delle bat...

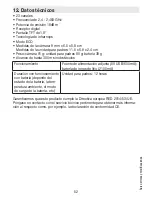
Page 65: ...300 m in campo libero Alimentazione Alimentatore in dotazione 5V USB 600mA batteria agli ioni di litio 2100 mA Durata della batteria ricarica bile dipende dallo stato della batteria dalla temperatura ambiente dalla modalità e frequenza di carica ecc Unità genitore 12 ore Con la presente garantiamo che il prodotto è conforme alla direttiva europea RED 2014 53 UE Per ulteriori informazioni ad esempi...

Page 66: ...ityum iyon şarj edilebilir pil 1 x Bu kullanım kılavuzu 1 Ürün özellikleri 67 2 Şekillerin anlamı 67 3 Amacına uygun kullanım 68 4 Yönergeler 68 5 Cihaz açıklaması 70 6 Çalıştırma 71 7 Kullanım 72 7 1 Kızılötesi gece ışığı 72 7 2 Ses seviyesini ayarlama 72 7 3 Parlaklığı ayarlama 72 7 4 Cevap verme fonksiyonu 72 7 5 Ayarlar menüsü 73 8 Bebek telsizi hakkında önemli bilgiler 75 9 Bakım ve temizleme...

Page 67: ...eri Cihazın işlevleri Bu görüntülü bebek telsizi evin diğer odalarında veya bahçesinde bulunduğunuzda bebeğinizi her zaman kontrol etmenize olanak sağlar 23 kanal maksimum parazitsiz ve güvenli bağlantı olanağı sağlar Cihaz aşağıdaki işlevleri içerir Görüntülü izleme Kızılötesi gece görüş fonksiyonu ECO modu Güç tasarruf modu Sesli sinyal ile çekim mesafesi kontrolü Görüş açık olduğunda 300 m ye k...

Page 68: ...ini kullanmadan önce her zaman cihazların kusursuz çalıştı ğından emin olun ve ebeveyn ünitesi şarj edilebilir pil ile çalıştırıldığında şarj edilebilir pilin yeterli derecede şarj edilmiş olmasına dikkat edin Kamerayı ve ebeveyn ünitesini asla suya daldırmayın Kesinlikle akan suyun altında yıkamayın Kamerayı ve ebeveyn ünitesini asla nemli yerlerde kullanmayın Kameranın veya ebeveyn ünitesinin üs...

Page 69: ...garanti geçerliliğini yitirir Görüntülü bebek telsizimizin kullanımıyla ilgili hala sorularınız varsa satıcınıza veya belirtilen müşteri hizmetleri adresine başvurun UYARI Şarj edilebilir pil kullanımıyla ilgili güvenlik yönergeleri Şarj edilebilir pil aktığında koruyucu eldiven giyin ve pil bölmesini kuru bir bezle te mizleyin Şarj edilebilir pil hücresindeki sıvı cilt veya gözlerle temas ettiğin...

Page 70: ...tirme düğmesi 3 Fonksiyon lambası 7 Fişli adaptörü için bağlantı 4 Mikrofon 8 Sıcaklık sensörü Ebeveyn ünitesi Monitör 1 2 9 3 8 4 7 5 6 1 Ses LED leri 2 Aşağı düğmesi Parlaklığı azaltma 3 Sağ düğmesi Sesi arttırma 4 Cevap verme fonksiyonu 5 OK düğmesi 6 Menü düğmesi 7 AÇMA KAPAMA düğmesi 8 Sol düğmesi Sesi azaltma 9 Yukarı düğmesi Parlaklığı arttırma ...

Page 71: ...nlaştırma menüsü 6 Çalıştırma Kamerayı çalıştırma 1 Kamerayı düz sabit bir zemine koyun ve kamera merceğini izlemek istediğiniz alana doğrultun Yakında başka elektrikli cihaz olmamasına dikkat edin UYARI Kamerayı bebeğin ERİŞEMEYECEĞİ bir yere koyun 2 Kamerasının fişli adaptörünün küçük ucunu kameraya bağlayın 3 Fişli adaptörün diğer ucunu prize takın 4 Kamerayı açmak için AÇMA KAPAMA düğmesini ON...

Page 72: ... Kapatmak için AÇMA KAPAMA düğ mesine basın Ebeveyn ünitesi ve kamera açık olduğunda kameradan aktarılan gö rüntü otomatik olarak ebeveyn ünitesinin ekranında gösterilir 7 Kullanım 7 1 Kızılötesi gece ışığı Karanlıkta da ekranda net görüntüler görebilmek için görüntülü bebek telsizi hava ka rardığında otomatik olarak kızılötesi gece ışığını devreye alır Kızılötesi gece ışığı etkin olduğunda ekrand...

Page 73: ...çin OK düğmesine basarak onaylayın Ninniler Ebeveyn ünitesi üzerinden beş adet ninniden birini açarak kamerada çalmasını sağla yabilirsiniz Ninnilerden birini açmak için yapmanız gerekenler Sol sağ düğmeleriyle menüsünü seçin Yukarı aşağı düğmeleriyle istediğiniz ninniyi 1 2 3 4 veya 5 seçin OK düğmesine basarak onaylayın Alarm Ebeveyn ünitesi üzerinden tercihinize göre 2 4 veya 6 saat sonra ebeve...

Page 74: ...n Yukarı aşağı düğmeleriyle menüsünü seçin OK düğmesine basarak onaylayın Ekranda 1 2 3 4 görünür Yukarı aşağı düğmeleriyle silmek istediğiniz kameranın numarasını seçin OK düğmesine basarak onaylayın Kamera görme Bir kameradan aktarılan görüntüyü seçmek istediğinizde yapmanız gerekenler Sol sağ düğmeleriyle menüsünü seçin Yukarı aşağı düğmeleriyle menüsünü seçin OK düğmesine basarak onaylayın Ekr...

Page 75: ...abiliyetini etkileyebilir veya çekim mesa fesini azaltabilir Mobilyalar duvarlar evler ağaçlar çevre koşulları örn sis yağmur 9 Bakım ve temizleme Kameranın ve ebeveyn ünitesinin kullanım ömrü itinalı kullanıma bağlıdır DİKKAT Görüntülü bebek telsizini uzun bir süre kullanmayacaksanız ebeveyn ünitesinin şarj edilebilir pilini çıkartın En az 6 ayda bir şarj edilebilir pilleri tamamen boşaltırsanız ...

Page 76: ...ilir pilini yeniden şarj edin Ebeveyn ünitesi güç tasarruf modunda olabilir Menüde güç tasarruf modunu seçip seçmediğinizi kontrol edin ve gerekirse kapatın Sinyal zayıf bağlantı tekrar tekrar kopuyor ve arızalar meydana geliyor Kamera ve ebeveyn ünitesi arasında örneğin mikro dalga gibi başka bir teknik cihaz bulunuyorsa cihazı uzaklaştırın veya kapatın Kamera ve ebeveyn ünitesi arasında ağaçlar ...

Page 77: ... yerel makamlara iletebilirsiniz 12 Teknik veriler 23 Kanal Frekans 2 4 2 483 GHz Verici gücü 18dBm dijital alıcı cihaz 1 8 TFT ekran Kızılötesi teknolojisi ECO modu Kamera ölçüleri 9 x 6 5 x 5 8 cm Ebeveyn ünitesi ölçüleri 11 5 x 6 9 x 2 4 cm Ağırlık Kamera 91 g Ebeveyn ünitesi 80 g Şarj edilebilir pil 38 g Açık alanda 300 m ye kadar çekim mesafesi Çalışma Verilen elektrik adaptörü 5V USB 600mA E...

Page 78: ...й 1 x данная инструкция по применению 1 Для ознакомления 79 2 Пояснение символов 79 3 Использование по назначению 80 4 Указания 80 5 Описание прибора 82 6 Подготовка к работе 83 7 Обслуживание 84 7 1 Инфракрасная функция ночного видения 84 7 2 Регулировка громкости 84 7 3 Регулировка яркости 84 7 4 Функция двусторонней связи 84 7 5 Меню настроек 85 8 Полезная информация о видеоняне 88 9 Ремонт и о...

Page 79: ...иями компания Beurer 1 Для ознакомления Функции прибора Благодаря видеоняне Вы сможете следить за своим ребенком одновременно занимаясь своими делами в другой комнате или в саду 23 канала гарантируют надежное соединение без помех Прибор оснащен следующими функциями видеонаблюдением инфракрасной функцией ночного видения режимом ECO режим экономии энергии контролем радиуса действия с акустическим си...

Page 80: ...Следите за тем чтобы провода не находились в зоне досягаемости ребенка Перед началом использования видеоняни убедитесь в том что она исправна а аккумуляторная батарея блока родителей имеет достаточный заряд если блок родителей работает от батареи Ни в коем случае не опускайте видеокамеру и блок родителей в воду Не про мывайте их под проточной водой Не пользуйтесь камерой и блоком родителей вблизи ...

Page 81: ...емонтируйте их самостоятельно поскольку на дежность функционирования в таком случае не гарантируется Несоблюдение этого требования ведет к потере гарантии Если у Вас есть дополнительные вопросы по применению видеоняни обрати тесь к своему торговому представителю или в сервисную службу ПРЕДОСТЕРЕЖЕНИЕ Указания по технике безопасности при обращении с аккумуляторами Если аккумулятор потек очистите от...

Page 82: ... индикатор функционирования 7 Разъем для сетевого адаптера 4 Микрофон 8 Датчик температуры Блок родителей Монитор 1 2 9 3 8 4 7 5 6 1 Светодиодные датчики шумов 2 Кнопка Стрелка вниз уменьшение яркости 3 Кнопка Стрелка вправо увеличение громкости 4 Функция двусторонней связи 5 Кнопка OK 6 Кнопка меню 7 Кнопка ВКЛ ВЫКЛ 8 Кнопка Стрелка влево уменьшение громкости 9 Кнопка Стрелка вверх увеличение яр...

Page 83: ... видеокамеры к работе 1 Поставьте видеокамеру на ровную твердую поверхность и направьте объектив камеры на область которую Вы хотите контролировать Следите за тем чтобы поблизости не было никаких других электроприборов ПРЕДОСТЕРЕЖЕНИЕ Видеокамера должна находиться ВНЕ пределов досягаемости ребенка 2 Вставьте маленький штекер сетевого адаптера видеокамеры в разъем на ви деокамере 3 Вставьте другой ...

Page 84: ...те кнопку ВКЛ ВЫКЛ Если и блок родителей и видеокамера уже включены на дис плее автоматически появится изображение передаваемое с видеокамеры 7 Обслуживание 7 1 Инфракрасная функция ночного видения Для того чтобы и в темноте видеть отчетливое изображение с видеокамеры при наступлении темноты видеоняня автоматически активирует инфракрасную функ цию ночного видения Если инфракрасная функция ночного ...

Page 85: ...ие передаваемое с видеокамеры Чтобы активировать функцию приближе ния выполните следующие действия При помощи кнопок со стрелками вверх вниз выберите коэффи циент изменения масштаба 1х или 2х Подтвердите ввод нажатием кнопки OK Колыбельные Через блок родителей Вы можете включить одну из пяти колыбельных которая будет воспроизводиться через динамик видеокамеры Чтобы включить колы бельную выполните ...

Page 86: ...о четырех видеокамер Чтобы подключить к блоку родителей еще одну видеокамеру выполните сле дующие действия При помощи кнопок со стрелками влево вправо выберите пункт меню При помощи кнопок со стрелками вверх вниз выберите пункт ме ню Подтвердите ввод нажатием кнопки OK На экране появится 1 2 3 4 При помощи кнопок со стрелками вверх вниз выберите номер и подтвердите ввод нажатием кнопки OK На экран...

Page 87: ... При помощи кнопок со стрелками вверх вниз выберите номер ви деокамеры изображение с которой Вы хотите просмотреть Подтвердите ввод нажатием кнопки OK Меняющееся изображение с видеокамер При соединении с несколькими видеокамерами можно включить функцию Ме няющееся изображение с видеокамер При активации данной функции изо бражения с зарегистрированных видеокамер будут транслироваться на экран цикли...

Page 88: ...ащать радиус ее действия мебель стены дома деревья воздействия окружающей среды например туман дождь 9 Ремонт и очистка Срок службы видеокамеры и блока родителей можно продлить при условии аккуратного обращения ВНИМАНИЕ Если видеоняня длительное время не используется выньте аккумуляторную батарею Аккумуляторная батарея работает на полную мощность если разряжать ее не реже одного раза в 6 месяцев Д...

Page 89: ...ителей во время работы нажмите кнопку выбора направления вправо или влево Блок для родителей Мони тор отключается Подзарядите аккумуляторную батарею блока для родителей Возможно блок для родителей работает в энер госберегающем режиме Проверьте не выбрали ли Вы в меню энергосберегающий режим и при необходимости отключите его Сигнал слишком слабый связь постоянно прерыва ется и возникают неисправ но...

Page 90: ...нии срока службы следует утилизировать прибор отдельно от бытового мусора Утилизация должна производиться через соответствующие пункты сбо ра в Вашей стране Прибор следует утилизировать согласно Директиве ЕС по отходам электрического и электронного оборудования WEEE Waste Electrical and Electronic Equipment В случае вопросов обращайтесь в местную коммунальную службу ответствен ную за утилизацию от...

Page 91: ...через розничную сеть Гарантия не распространяется на случаи ущерба вызванного неправильным использованием на быстроизнашивающиеся части батарейки блок питания на дефекты о которых покупатель знал в момент покупки на случаи собственной вины покупателя при отсутствии кассового чека Товар сертифицирован радио и видеоняни ООО Гарант Плюс ТС RU C DE АЛ 16 B 02728 Серия RU 0228621 срок действия с 25 12 ...

Page 92: ...la rodziców 1 x niniejsza instrukcja obsługi 1 Informacje ogólne 93 2 Wyjaśnienie oznaczen 93 3 Użytkowanie zgodne z przeznaczeniem 94 4 Wskazówki 94 5 Opis urządzenia 96 6 Uruchomienie 97 7 Obsługa 98 7 1 Oświetlenie nocne na podczerwień 98 7 2 Ustawianie głośności 98 7 3 Ustawianie jasności 98 7 4 Funkcja interkomu 98 7 5 Menu ustawień 99 8 Co warto wiedzieć o elektronicznej niani 102 9 Czyszcze...

Page 93: ...nformacje ogólne Funkcje urządzenia Urządzenie to pozwala na obserwowanie dziecka przy jednoczesnym wykonywaniu prac w innych pomieszczeniach lub w ogrodzie Zastosowanie 23 kanałów gwarantuje maksymalnie bezpieczne i pozbawione zakłóceń połączenie Urządzenie jest wyposażone w następujące funkcje Monitorowanie wideo Funkcja widoku nocnego wykorzystującej podczerwień Tryb ECO Tryb oszczędzania energ...

Page 94: ...nie wywołane smogiem elektromagnetycz nym oraz hałas należy umieścić kamerę w odległości 2 m od dziecka Należy uważać aby kable nie znajdowały się w zasięgu dziecka Przed przystąpieniem do użytkowania urządzenia należy sprawdzić jego prawidło we działanie oraz stan naładowania akumulatora dla monitora jeśli urządzenie ma być zasilane z akumulatora Nie wolno zanurzać kamery ani jednostki dla rodzic...

Page 95: ...zać naprawy kamery bądź jednostki dla rodziców we własnym zakresie W przeciwnym razie nie można zagwarantować prawidłowego działania urządzenia Nieprzestrzeganie powyższych zasad powo duje utratę gwarancji W razie pytań dotyczących użytkowania elektronicznej niani wideo należy zwrócić się do punktu sprzedaży lub serwisu OSTRZEŻENIE Wskazówki bezpieczeństwa dotyczące korzystania z akumulatorów Jeśl...

Page 96: ...cza 4 Mikrofon 8 Czujnik temperatury Monitor jednostka dla rodziców 1 2 9 3 8 4 7 5 6 1 Diody LED sygnalizujące dźwięk 2 Przycisk kierunkowy w dół do ograniczania jasności 3 Przycisk kierunkowy w prawo Zwiększenie głośności 4 Funkcja interkomu 5 Przycisk OK 6 Przycisk menu 7 Przycisk włączania wyłączania 8 Przycisk kierunkowy w lewo Zmniejszenie głośności 9 Przycisk kierunkowy w górę do zwiększani...

Page 97: ...leży ustawić na równej stabilnej powierzchni i skierować obiektyw kamery na obszar który ma być nadzorowany Należy pamiętać o tym aby w pobliżu nie znajdowały się żadne inne urządzenia elektryczne OSTRZEŻENIE NIE wolno umieszczać kamery w zasięgu ręki dziecka 2 Drobną końcówkę zasilacza kamery należy połączyć z kamerą 3 Drugą końcówkę zasilacza należy podłączyć do gniazdka 4 Aby włączyć urządzenie...

Page 98: ...yć z jednostką dla rodziców 2 Drugą końcówkę zasilacza należy podłączyć do gniazdka 3 Jednostka dla rodziców włączy się automatycznie W celu wyłączenia należy naci snąć przycisk włączania wyłączania Po włączeniu jednostki dla rodziców i kamery na ekranie jednostki dla rodziców pojawia się automatycznie transmitowany obraz z kamery 7 Obsługa 7 1 Oświetlenie nocne na podczerwień Aby móc wyświetlić t...

Page 99: ... wyposażona w funkcje zoomu w celu powiększania trans mitowanego obrazu Aby aktywować funkcję zoomu należy wykonać następujące czynności Za pomocą przycisków kierunkowych góra dół należy wybrać odpo wiedni współczynnik zoomu 1x lub 2x Należy potwierdzić przyciskiem OK Kołysanki Za pomocą jednostki dla rodziców można aktywować jedną z pięciu kołysanek która następnie będzie się rozlegać z kamery Ab...

Page 100: ... pomocą przycisków kierunkowych góra dół należy wybrać opcję menu Należy potwierdzić przyciskiem OK Na ekranie pojawią się numery 1 2 3 4 Za pomocą przycisków kierunkowych góra dół należy wybrać numer i potwierdzić przyciskiem OK Na ekranie pojawi się i rozpocznie się wy szukiwanie kamery Na tylnej stronie kamery należy przytrzymać przycisk parowania tak długo aż roz legnie się sygnał dźwiękowy i ...

Page 101: ... obraz kamery W przypadku włączenia kilku kamer można użyć funkcji Zmienny obraz kamery Po aktywowaniu tej funkcji transmitowany obraz na ekranie pojawi się w formie pętli zmieniającej się co 12 sekund Aby aktywować tę funkcję należy wykonać następu jące czynności Za pomocą przycisków kierunkowych w lewo w prawo należy wybrać opcję menu Za pomocą przycisków kierunkowych góra dół należy wybrać opcj...

Page 102: ...ku W tym celu należy odłączyć jednostkę dla rodziców od sieci i rozładować akumulator podczas normalnego użytkowania Następnie aku mulator należy całkowicie naładować Maksymalna wydajność akumulatora jest osiągana dopiero po kilku cyklach ładowa nia i zależy od wielu czynników stan akumulatora temperatura otoczenia sposób i częstotliwość ładowania itd Należy chronić kamerę oraz jednostkę dla rodzi...

Page 103: ...nalizowała nawiązanie połączenia Należy sprawdzić czy kamera i jednostka dla ro dziców znajdują się w obszarze maksymalnego za sięgu odbioru Jeśli transmisja nie jest w ża den sposób możliwa można ponownie cyfrowo dostroić sygnały urządzeń parowanie 1 Należy włączyć kamerę i jednostkę dla rodziców 2 W menu jednostki dla rodziców należy usunąć kamerę i ponownie ja dodać zgodnie z opisem w punkcie D...

Page 104: ...lator litowo jonowy 2100 mA Czas zasilania przez akumu lator zależy od stanu akumu latora temperatury otoczenia sposobu i częstotliwości ładowania itd Jednostka dla rodziców 12 godzin Gwarantujemy niniejszym że ten produkt jest zgodny z dyrektywą europejską RED 2014 53 UE Aby uzyskać szczegółowe dane np otrzymać certyfikat zgodności CE należy skontaktować się z punktem serwisowym pod podanym adres...

Reviews: