background image

INSTALLATION AND OPERATING INSTRUCTIONS

for all Hydrocarbon

HBF Freezer Models

3779 CHAMPION BLVD, WINSTON-SALEM, NC 27105
Phone: (888) 845-9800   |   Fax: (800) 253-5168   |   Web: beverage-air.com

809-157A 8/9/2020

SEE BACK COVER FOR  

WARRANTY REGISTRATION

Summary of Contents for HBF Series

Page 1: ...PERATING INSTRUCTIONS for all Hydrocarbon HBF Freezer Models 3779 CHAMPION BLVD WINSTON SALEM NC 27105 Phone 888 845 9800 Fax 800 253 5168 Web beverage air com 809 157A 8 9 2020 SEE BACK COVER FOR WAR...

Page 2: ...ED Your warranty registration information is located with this manual Please complete the card and submit it to Beverage Air within TEN days of installation Failure to properly register equipment may...

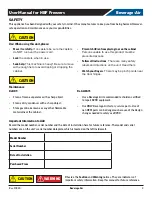
Page 3: ...rs There may be pinch points near the door hinges Maintenance Do NOT Clean a frozen evaporator with a sharp object Clean a dirty condenser with a sharp object Store gasoline kerosene or any other flam...

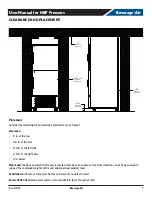
Page 4: ...s necessary to move the Refrigerator after removal from the skid remove all doors and carefully push the unit at a point of no more than 36 from the bottom to avoid damage CAUTION SAFETY Push ONLY bel...

Page 5: ...Alterations or part substitutions will void the warranty Limitations The machine is designed for use indoors in a controlled environment It must be kept dry not overheated or subjected to excessive c...

Page 6: ...1 4 Full 2 Glass 11 5 15P R 290 150 HBF44HC 1 HG 47 x 33 3 4 x 84 1 4 Half 4 Glass 11 5 15P R 290 150 HBF44HC 1 HS 47 x 33 3 4 x 84 1 4 Full 4 Solid 11 5 15P R 290 150 HBF49HC 1 52 x 33 3 4 x 84 1 4 F...

Page 7: ...in below Floor Load the floor on which the freezer is located must be even and level free from vibrations and strong enough to support the combined weights of the unit and maximum product load Ventil...

Page 8: ...or caster stem should be visible once screwed in 3 Tilt the cabinet in one direction approximately 8 and block it securely with pieces of 2x4 lumber or other suitable material 4 Thread the stem caste...

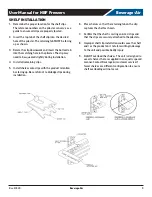
Page 9: ...5 Install shelves onto clips with the product retention bar facing up Be careful not to dislodge clips during installation 6 Place shelves so that the retaining tab on the clip captures the shelf as...

Page 10: ...the factory and should not need adjustment however if it was changed the standard setting is 0 F Cautions Care must be taken whenever moving or servicing the unit The refrigerant is contained in a se...

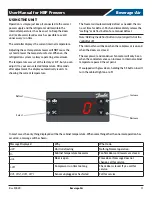
Page 11: ...Push and immediately release the melting or defrost button for a manual defrost Note Holding the defrost button in too long will shut the controller off The internal fan will be on when the compressor...

Page 12: ...rator Fan is wired to the Fan Contact The Evaporator Fan turns off when the Compressor is not running and when door is opened while Compressor is running The Evaporator Fan is wired to the Fan Contact...

Page 13: ...Display Defrost LED Alarm LED On fixed Defrost active On fixed ALARM Present Off Defrost is off Flashing ALARM Silenced Off No Alarm Fan LED Compressor LED On fixed Fan active On fixed Compressor act...

Page 14: ...brightness DOWN Quick press and release Decreases Set Point Long press and release Decreases display brightness DEFROST ESC Quick press and release Activates manual defrost Long press and release Cont...

Page 15: ...ink Con If configured cut in alarm relay beep the buzzer Condenser alarm dor Door open for more than Always Blink dor If configured cut in alarm relay beep the buzzer Door open alarm uHi Line voltage...

Page 16: ...e with clean water 3 Dry with a soft cloth 4 Polish with a soft cloth wiping with the grain 5 Wipe weekly with stainless steel cleaner Weekly Interior Cleaning 1 Remove all food food related items and...

Page 17: ...d damaging the fins Use care to not disturb the wires connected to the controller Note If the coil is greasy the coil will need to be cleaned with coil cleaner and that should be left to an experience...

Page 18: ...ll amount of cleaner Heat tint or discoloration Penny Brite or Copper Brite Past NuSteel DuBois Temp or Tarnite Revere Stainless Steel Cleaner Allen Polish Steel Bright Tenacious Deposits Rusty Discol...

Page 19: ...p control No cooling compressor hums but does not start Low voltage to unit Compressor starting system failure Check voltage correct as needed Check start relay and start capacitor See next step No co...

Page 20: ...n area free from flame or spark It must also be in a well ventilated area with a nearby open window or door A sign noting service of a system containing propane must be attached to the unit during ref...

Page 21: ...FACE HEATER GLASS DOOR HEATER NOT ALL MODELS 1 SEE CONTROLLER DETAIL 2 SEE CONTROLLER DETAIL SEE CONTROLLER DETAIL SEE CONTROLLER DETAIL D I YELLOW RED BALLAST DRAIN TUBE HEATER 6 5 2 2 LED LED PS 4...

Page 22: ...G S L E D O M L L A T O N 4 2 L I A T E D R E L L O R T N O C E E S L I A T E D R E L L O R T N O C E E S L I A T E D R E L L O R T N O C E E S I D W O L L E Y D E R D E R T S A L L A B R E T A E H E...

Page 23: ...E AIR Also this extended compressor part only warranty does NOT apply to any electrical controls condenser evaporator fan motors overload switch starting relay capacitors temperature control filter dr...

Page 24: ...D WE NEITHER ASSUME NOR AUTHORIZE ANY OTHER PERSON TO ASSUME FOR US ANY OBLIGATION OR LIABILITY IN CONNECTION WITH THE SALE OF SAID REFRIGERATION UNITS OR ANY PARTS THERE OF This warranty shall not be...

Page 25: ...___________ Date Of Installation _________________ Cabinet Serial Number _____________________________________________ Location Of Product Business Name _______________________________________________...

Reviews: