background image

Operations (Cont.) 

 
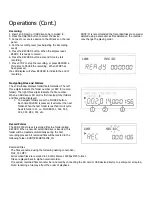
   Deleting Files 


   Files can be deleted directly from an SD card or USB drive.  

     1. Navigate to the file you want to delete. If you are sure 

it is the correct file, push play listen and confirm that it is 

the file you want to delete.  

     2. Press the DELETE button. The word FILE will begin to 

blink in the display.  

3. Press DELETE a second time to confirm and delete the 
file.


NOTE: It is recommended that recorded files are copied or 
deleted using a computer as files deleted on the recorder 
may change the playing order. 


Troubleshooting 

 
Files are being recorded but there is no sound  

Check your input devices and connections. (see Operations section)  
Check the recording level (see Operations section)  

 
Recording level is either too high or low  

Re-adjust the recording level (see Operations section)  

Check the playback level of your source device.  
 

The sound is distorted  

Check the incoming signal from the source device. If this is a mixer, check the outputs and make sure they are 

not too high.  

Check the recording level (see Operations section)  
 

No audio output from the SU-200R  

Check the output connections on the back of the SU-200R and connected devices. (see Operations section)  

Check to make sure the output toggle selector is set correctly. (see Operations section)  


Files are not recording to SD card/USB drive  

Check the SD card or USB device on a computer to ensure it is working correctly. 

Ensure that there is sufficient space on the SD card or USB device. 


Warranty:


The warranty on Beyond Acoustic products is valid only in the country of 

purchase. In the unlikely event of a product fault, please contact your 
supplying dealer. Please retain your proof of purchase to obtain warranty 
service.


Summary of Contents for SU-200R

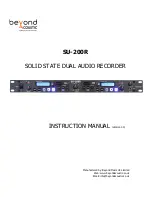
Page 1: ...Manufactured by Beyond Music UK Limited Web www beyondacoustic co uk Email info beyondacoustic co uk SU 200R SOLID STATE DUAL AUDIO RECORDER INSTRUCTION MANUAL Version 1 0 ...

Page 2: ...ge the finish Use only a clean dry cloth 8 Be sure to read the Troubleshooting section on common operating errors before concluding that your unit is faulty 9 This unit consumes power even when the power switch is turned off We recommend that you unplug the power cord from the wall outlet if the unit is not going to be used for a long time This will save electricity and help prevent a fire hazard ...

Page 3: ...he operating instructions or as marked on the appliance 11 Power Cord Protection Power supply cords should be routed so that they are not likely to be walked on or pinched by items placed upon or against them paying particular attention to cords at plugs convenience receptacles and the point where they exit from the appliance 12 Cleaning Unplug this unit from the wall outlet before cleaning Do not...

Page 4: ...rder design allows for independent recording playback on each side x Individual record level controls and record level LEDs for precise level control x Delete recorded files directly from recorder x Full featured playback with single and repeat playback modes x Individual RCA input output jacks x Individual XLR input output jacks x Mixed RCA output jacks with toggle switch x Backlit buttons for us...

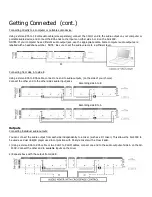
Page 5: ... SU 200R can record any audio signal from a device with RCA outputs or balanced XLR outputs Most commonly users will be running the output from a mixing device Other connections can include direct output from a computer or mp3 player and even making a copy from the other side of the SU 200R Follow the instructions below for making the connections Connecting to a mixing device If using RCA Connect ...

Page 6: ...Connecting from side A to side B Using a stereo RCA to RCA cable connect one end to audio outputs on the side of your choice Connect the other end to the other side s audio input jacks Recording side A to B Recording side B to A Outputs Connecting individual audio outputs You can connect the audio output from each side independently to a mixer such as a DJ mixer This allows the SU 200R to be used ...

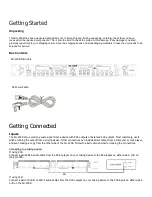
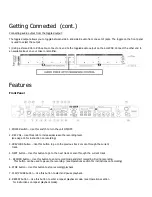
Page 7: ...ease decrease the recording level see page 16 for instruction on recording 3 PREVIOUS button Use this button to go to the previous track or scan through the current track 4 NEXT button Use this button to go to the next track or scan through the current track 5 RECORD button Use this button to enter record mode and start recording During recording This button can be used to pause the recording see ...

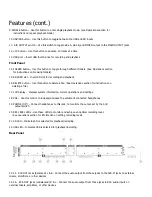
Page 8: ... a file See Operations section for instructions on deleting a file 17 LCD display Displays system information current operations and settings 18 VOL Use this control to increase decrease the volume of connected headphones 19 PHONE 1 4 Connect headphones to this jack to monitors the output set by the A B output switch 20 REC LEVEL LEDs Use these LEDs to monitor and achieve an optimal recording leve...

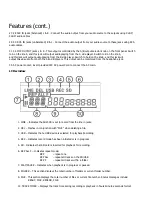
Page 9: ...cket insert provided IEC AC power Cord to connect the AC main LCD window 1 LINE Indicates the SU200R is set to record from the line in jacks 2 DEL Flashes in conjunction with FILE when deleting a file 3 USB Indicates that a USB device is selected for playback recording 4 REC Indicates record mode has been initiated or is in progress 5 SD Indicates that SD card is inserted for playback for recordin...

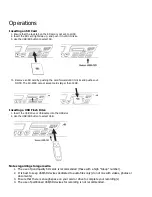
Page 10: ...arger than 32GB Inserting a USB Flash Drive 1 Insert the USB drive or USB cable into the USB slot 2 Use the USB SD button to select USB Notes regarding storage media 1 The use of good quality SD cards is recommended those with a high Group number 2 It is best to keep USB SD devices dedicated to audio files only do not mix with videos photos or documents 3 Ensure that there is enough space on your ...

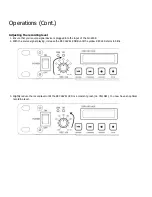
Page 11: ... device is plugged into the input of the SU 200R 2 With the source signal playing increase the REC LEVEL KNOB until the yellow REC LED starts to blink 3 Slightly reduce the record level until the REC LEVEL LED is a constant green no YELLOW You now have an optimal recording level ...

Page 12: ...ber or REC for record folder The right three digits indicate the file number When a USB drive or SD card is first inserted total folders and files will be displayed 1 To navigate folders press the FOLDER button Each time FOLDER is pressed it will enter the next folder When the last folder is reached it will cycle back to folder 001 i e FOLDER 001 002 003 004 005 REC 001 etc Record Folder The SDR 4...

Page 13: ...Re adjust the recording level see Operations section Check the playback level of your source device The sound is distorted Check the incoming signal from the source device If this is a mixer check the outputs and make sure they are not too high Check the recording level see Operations section No audio output from the SU 200R Check the output connections on the back of the SU 200R and connected dev...

Reviews: