background image

GENERAL WARNINGS

WARNING!

 Important safety instructions. Carefully read and comply with the 

Warnings booklet and Instruction booklet that come with the product as incorrect 

installation can cause injury to people and animals and damage to property. They 

contain important information regarding safety, installation, use and maintenance. 

Keep hold of instructions so that you can attach them to the technical file and 

keep them handy for future reference.

1) GENERAL SAFETY

WARNING! An incorrect installation or improper use of the product  can 

cause damage to persons, animals or things.

 Installation must be carried out by a “professional installer”. 

•  Scrap packing materials (plastic, cardboard, polystyrene etc) according to the 

provisions set out by current standards. Keep nylon or polystyrene bags out of 

children’s reach.

•  This product was exclusively designed and manufactured for the use specified 

in the present documentation.

•  The Company declines all responsibility for any consequences resulting from 

improper use of the product, or use which is different from that expected and 

specified in the present documentation.

•  Do not install the product in explosive atmosphere.

•  The units making up the machine and its installation must meet the requirements 

of the following European Directives: 2004/108/EEC, 2006/95/EEC, 98/37/EEC, 

99/05/EEC (and later amendments). For all countries outside the EEC, it is advis

-

able to comply with the above-mentioned standards, in addition to any national 

standards in force, to achieve a good level of safety.

•  The Company declines all responsibility for any consequences resulting from 

failure to observe Good Technical Practice when constructing closing structures 

(door, gates etc.), as well as from any deformation which might occur during 

use.

•  The  installation  must  comply  with  the  provisions  set  out  by  the  following 

European Directives: 2004/108/EEC, 2006/95/EEC, 98/37/EEC, 99/05/EEC and 

subsequent amendments.

•  Disconnect  the  electrical  power  supply  before  carrying  out  any  work  on  the 

installation. Also disconnect any buffer batteries, if fitted.

•  Fit an omnipolar or magnetothermal switch on the mains power supply, having 

a contact opening distance equal to or greater than 3,5 mm.

•  Check that a differential switch with a 0.03A threshold is fitted just before the 

power supply mains.

•  Check that earthing is carried out correctly: connect all metal parts for closure 

(doors, gates etc.) and all system components provided with an earth termi

-

nal.

•  Fit all the safety devices (photocells, electric edges etc.) which are needed to 

protect the area from any danger caused by squashing, conveying and shearing, 

according to and in compliance with the applicable directives and technical 

standards.

•  The Company declines all responsibility with respect to the automation safety and 

correct operation when other manufacturer’s components are used.

•  Only use original parts for any maintenance or repair operation.

•  Do not modify the automation components, unless explicitly authorised by the 

Company.

•  Instruct the product user about the control systems provided and the manual 

opening operation in case of emergency.

•  Do not allow persons or children to remain in the automation operation area.

•  Keep radio control or other control devices out of children’s reach, in order to 

avoid unintentional automation activation.

•  Make sure the stated temperature range is compatible with the site in which 

the automated system is due to be installed.

•  Do not install the product in an explosive atmosphere.

•  The motor cannot be installed on panels incorporating doors (unless the motor 

can be activated when the door is open).

•  If the automated device is installed at a height of less than 2.5 m or is accessible, 

the electrical and mechanical parts must be suitably protected.

•  Any fixed controls must be installed within sight of the door but away from 

moving parts. Unless the control is key operated, it must be installed at a height 

of at least 1.5 m and in a place where it cannot be reached by the public

•  If there are no instructions already, attach a label near the operating device, in a 

permanent fashion, with information on how to operate the manual release.

•  Make sure that nothing can be crushed between the guided part and surroun

-

ding fixed parts during the door’s operation

•  Once installation is complete, make sure the motor has the right settings and 

that the safety and release systems are working properly.

•  Installation must be carried out using the safety devices and controls prescribed 

by the EN 12978 Standard. 

WARNING! For connection to the mains power supply, use a multicore cable 

with a cross-section of at least 3x1.5mm

2

 of the kind provided for by the re-

gulations mentioned above (by way of example, if the cable is not protected, 

it must be rated H07 RN-F or higher, while if it is protected it must be rated 

at least H05 VV-F with a cross-section of 3x1.5mm

2

). 

CHECKING INSTALLATION

Before the system is finally put into operation, perform the following operations 

meticulously and with the utmost care:

•  Put the automated system through its paces, running a few cycles to check 

that the belt is aligned perfectly. If the belt tends to slip off the pulleys, perform 

alignment by loosening the motor brackets and/or driven pulley brackets, tilting 

them suitably to correct the error. Once done, tighten the relevant screws.

•  Check  that  all  safety  devices  (photocells  -  anti-crush  sensor  sensitivity)  are 

working properly.

•  Check opening and closing operations commanded by radar and manually.

•  Check the emergency opening devices applied.

•  Check all operating logics that can be set with the selector.

USE OF AUTOMATION

As automation can be remotely controlled and therefore not within sight, it is es-

sential to frequently check that all safety devices are perfectly efficient.

WARNING! 

In case of any malfunction in the safety devices, take imme-diate 

action and require the assistance of a specialised technician. 

It is recommended to keep children at a safe distance from the automation field 

of action.

CONTROL

The automation system is used to obtain motorised access control. There are 

different types of control (manual, remote, magnetic badge, mass detector  etc.) 

depending on the installation requirements and characteristics. For the various 

control systems, see the relevant instructions.

MAINTENANCE

WARNING:  Before  performing  any  maintenance  work  on  the  system,  cut  off 

mains  power  and  disconnect  the  battery.  Have  work  performed  by  qualified 

personnel only.

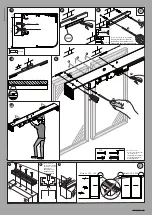
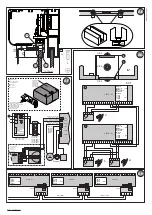
•  For quick checks and maintenance, secure the cover as illustrated in position B 

in Fig. O, turning bracket S outwards. For maintenance requiring full access, on 

the other hand, we recommend - ceiling height permitting - securing the cover 

as illustrated in position C in Fig. O, turning bracket S so that the outermost part 

of the cover rests against it. If this is not possible, we recommend removing the 

cover. Once work is complete, close the automated system up again, attaching 

the front cover as illustrated in position A in Fig. O.

•  Check sliding parts for wear at regular intervals (especially runner wheels and 

door guide slides). 

•  Keep the slideway of the floor track clean. 

•  Make sure, at regular intervals, that the door stops when it encounters obstacles 

that are not detected by the photocells. 

•  Clean the photocells’ optics regularly. 

•  Whenever you encounter a malfunction of any kind that has not been remedied, 

cut off mains power and call in qualified personnel (installer).

NOISE LEVEL

WARNING: Employ the services of qualified personnel only. The airborne noise 

produced by the automated system under normal working conditions is constant 

and does not exceed 70dB(A). If the door is noisy, check sliding parts for wear.

SCRAPPING

Materials must be disposed of in conformity with the current regulations. 

In case of scrapping, the automation devices do not entail any particular risks 

or danger. In case of recovered materials, these should be sorted out by type 

(electrical components, copper, aluminium, plastic etc.).

DISMANTLING

When the automation system is disassembled to be reassembled on another 

site, proceed as follows:

-   Disconnect the power supply and the entire electrical installation.

-   Remove the actuator from its fixing base.

-   Disassemble all the installation components.

-   In the case where some of the components cannot be removed or are dam-

aged, they must be replaced.

ENGLISH

Correct controller operation is only ensured when the data contained in 

the present manual are observed. The Company is not to be held respon-

sible for any damage resulting from failure to observe the installation 

standards


and the instructions contained in the present manual.

The descriptions and illustrations contained in the present manual are 

not binding. The Company reserves the right to make any alterations 

deemed appropriate for the technical, manufacturing and commercial 

improvement of the product, while leaving the essential product fea-

tures unchanged, at any time and without undertaking to update the 

present publication.

D811590 00100_01

VISTA SL


- 19

Summary of Contents for VISTA SL

Page 1: ...ORTE AUTOMATION DOORS AUTOMATIONS POUR PORTES AUTOMATICTUREN AUTOMATIZACIONES PARA PUERTAS Automatiseringssystemen Deuren Attenzione Leggere attentamente le Avvertenze all interno Caution Read Warnings inside carefully Attention Veuillez lire attentivement les Avertissements qui se trouvent à l intérieur Achtung Bitte lesen Sie aufmerksam die Hinweise im Inneren Atención Leer atentamente las Adver...

Page 2: ...D811590 00100_01 2 VISTA SL ...

Page 3: ...TER 3 3 3 2 2 CARTER COVER CARTER VERKLEIDUNG CARCASA CARTER TRAVERSA CROSSPIECE ENTRETOISE QUERSTREBE TRAVESAÑO DWARSDRAGER CERNIERA HINGE CHARNIÈRE SCHARNIER CREMALLERA SCHARNIER 1 2 2 2 3 C 230 V 24 V PASSAGGIO CAVI CABLE ROUTING PASSAGE DES CÂBLES KABELDURCHFÜHRUNG PASO CABLES KABELDOORGANG 1 2 1 1 Aiutarsi con alcool Non usare grassi o altri lubrificanti Insert with the aid of alcohol Do not ...

Page 4: ...RAGER G F H VP 50 PU CA PU S S Pf Am CA VISTA PU CA S 1 2 VP PU CA Pf Am Am Pf CA 1 2 VP 1 2 VISTA 1 2 VISTA PU 2 CA Definizione Definition Définition Definition Definicion Definitie Pf Parte fissa Fixed part Partie fixe Feste Seite Parte fija Vast deel Am Anta mobile Mobile leaf Vantail mobile Beweglicher Flügel Hoja móvil Beweegbare Vleugel VP Vano Passaggio Passage space Baie de passage Durchga...

Page 5: ...se Niet meegeleverd G A E C D B F Max 5mm Non in dotazione Not supplied Ne sont pas fournis Nicht im lieferumfang No asignadas en el equipamiento base Niet meegeleverd Non in dotazione Not supplied Ne sont pas fournis Nicht im lieferumfang No asignadas en el equipamiento base Niet meegeleverd OK 17 5 91 143 5 2 3 1 5 WMP 4 5A TSPEI OK TE NO max M8 D811590 00100_01 VISTA SL 5 ...

Page 6: ...oor height Réglage de la hauteur du vantail Einstellung Höhe Türflügel Regulación altura hoja Afstellingen Vleugels Regolazione trasversale anta Adjusting door crosswise Réglage transversal du vantail Einstellung Türflügel in Querrichtung Regulación transversal hoja Afstellingen Vleugels 1 1 2 3 2 1 2 3 3 5 13 8 20 7 mm 7 mm V1 V2 R1 R2 R1 R2 V1 V2 V2 8 8 4 13 10 13 R1 R2 D811590 00100_01 6 VISTA ...

Page 7: ...st Deel 27 mm 23 5 mm PGI PPR ON OFF ON Ø 7 5 Ø 3 5 90 MAX Ø 3 5 S Spazio di sormonto fra Anta Mobile e Parte Fissa S Overlapping space between Moving Leaf and Fixed Part S Espace de chevauche ment entre le vantail mobile et la partie fixe S Abstand zwischen beweglichem Türflügel und festem Teil S Espacio de sobreposición entre Hoja Móvil y Parte Fija S Overlappingsruimte tussen Beweegbare Vleugel...

Page 8: ...sibile Fuse Fusible Schmelzsicherung Fusible Zekering N L L N 26 0 Trasformatore Transformer Transformateur Transformator Transformador Transformator Filtro Filter Filtre Filter Filtro Filter Encoder M JP2 JP4 JP7 JP8 JP12 JP19 230V 110V T 1 6A T 3 15A 1 2 3 4 5 6 7 8 9 10 11 12 13 14 15 16 17 18 19 20 21 22 23 USCITA STATO PORTA DOOR STATUS OUTPUT SORTIE ÉTAT PORTE AUSGANG STATUS TUR SALIDA ESTAD...

Page 9: ... in serramento Incorporated in door frame Intégrée à l huisserie Eingebaut in den Rahmen Englobado en el cerramiento Installatie opgenomen in stelkozijn Installazione a soffitto Ceiling mounting Fixation au plafond Befestigung an der Decke Fijación en el techo Plafondmontage 40 5 31 44 29 5 4 46 50 SBV D811590 00100_01 VISTA SL 9 ...

Page 10: ...own Marron Braun Maron Bruin Blu Bianco Bleu White Bleu Blanc Blau Weiß Azul Blanco Blauw Wit Blu Bianco Bleu White Bleu Blanc Blau Weiß Azul Blanco Blauw Wit 1 2 3 4 5 6 7 8 9 101112131415 VISTA SL 16171819 20 212223 1 2 3 4 5 6 7 8 9 101112131415 VISTA SL 16171819 20 212223 RIP C RIP A INT EXT RIP B 1 2 2 1 A 1 2 3 4 5 1 2 3 4 5 1 2 3 4 5 ON OFF B C 1 2 3 4 5 6 7 8 9 101112131415 VISTA SL 161718...

Page 11: ... 350 16 5 L L 2 B 25 A A 6 H 330 412 200 60 25 16 5 16 5 B 40 212 1200 2x650 2600 1536 670 213 1300 2x700 2800 1700 752 214 1400 2x750 3000 1800 802 215 1500 2x800 3200 1900 852 216 1600 2x850 3400 2000 902 217 1700 2x900 3600 2100 952 219 1900 2x1000 4000 2300 1052 221 2100 2x1100 4400 2500 1152 223 2300 2x1200 4800 2700 1252 225 2500 2x1300 5200 2900 1352 227 2700 2x1400 5600 3100 1452 229 2900 ...

Page 12: ... sezione minima 3x1 5mm2 e del tipo previsto dalle normative preceden temente citate a titolo di esempio se il cavo non è protetto deve essere almeno pari a H07 RN F mentre se protetto deve essere almeno pari a H05 VV F con sezione 3x1 5 mm2 VERIFICA DELL INSTALLAZIONE Prima di rendere definitivamente operativa l installazione eseguire scrupolosa mente ed in modo accurato le seguenti fasi Verifica...

Page 13: ... 1 amplificatore 2 trasmettitori 2 ricevitori 22 CRTV Carter di chiusura 23 SASAM1 2 Dispositivo ante a sfondamento PPA Pinza per ante in cristallo Fig AE 5 MODALITÀ DI FISSAGGIO Montaggio Carter Fig B Passaggio Cavi Fig C ATTENZIONE Per il fissaggio della traversa usare esclusivamente viticontestasvasatapianacomeevidenziatoinFig IRif 1oviticontestanon più alta di 5 mm Se questa condizione non vie...

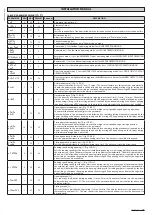
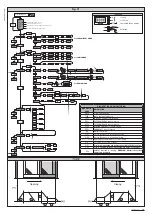
Page 14: ... Allarme 21 NO contatto libero da tensione 22 COM contatto libero da tensione 23 NC contatto libero da tensione 14 PROGRAMMAZIONE CENTRALE Fig C1 14 1 Menu Parametri PARA TABELLA A PARAMETRI 14 2 Menu Logiche logic TABELLA B LOGICHE 14 3 MENU RADIO RADIO Logica Descrizione Agg OPEn Aggiungi Tasto Open associa il tasto desiderato al comando Open Agg ey Aggiungi Tasto Open Key associa il tasto desid...

Page 15: ... senza riaprire la porta In modalità bussola questo funzionamento non è ammesso Modalità 7 Bussola aperta verso l interno Attivo solo in modalità bussola La porta esterna è impostata come chiusa di giorno La porta interna è impostata come aperta totale Modalità 8 Bussola aperta verso l esterno Attivo solo in modalità bussola La porta esterna è impostata come aperta totale La porta interna è impost...

Page 16: ...a funzione autoset imposta automaticamente questo parametro L eventuale modifica di questo parametro sarà seguita da una manovra completa di settaggio identifi cata da un beep continuo del buzzer e dalla scritta SET nel display durante la quale non è attivo il ricono scimento dell ostacolo sp decel ch 10 70 50 Spazio decelerazione chiusura cm Fig C2 Rif D Imposta lo spazio che impiega la porta per...

Page 17: ...i è appena transitati Radar C porta interna 2 A porte chiuse attiva l apertura della porta interna e consente l accesso alla bussola dall interno dell edificio Se la porta esterna è aperta questa viene prima chiusa e poi si apre la porta interna In caso di manovre simultanee la precedenza è data alla porta esterna MANUALE PER L INSTALLAZIONE TABELLA B MENU LOGICHE logic LOGICA DEFAULT Barrare il s...

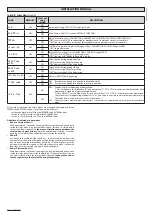
Page 18: ... CHIUSURA e er attivazione ingresso EMERGENZA a p rilevamento ostacolo Er01 errore di verifica dispositivi di sicurezza in apertura Er02 errore verifica dispositivi di sicurezza in chiusura Er11 er19 rilevati problemi al circuito comando del motore Er21 encoder staccato o guasto Er51 errore comunicazione con dispositivi collegati alla seriale RS485 Er53 errore comunicazione tra porte automatiche n...

Page 19: ...onmustbecarriedoutusingthesafetydevicesandcontrolsprescribed by the EN 12978 Standard WARNING Forconnectiontothemainspowersupply useamulticorecable with a cross section of at least 3x1 5mm2 of the kind provided for by the re gulationsmentionedabove bywayofexample ifthecableisnotprotected it must be rated H07 RN F or higher while if it is protected it must be rated at least H05 VV F with a cross se...

Page 20: ... AE 5 FASTENING METHOD Assembling the Cover Fig B Cable routing Fig C WARNING When fastening the header only use flat countersunk screws as shown in Fig I Rif 1 or screws with heads no more than 5 mm high If this condition is not met collisions may occur with the runners 6 DETERMINING HEADER FASTENING HEIGHT Fig E ThefasteningheightHFToftheVISTASLheadermustbemeasuredwherethefloor is at its highest...

Page 21: ...1 T2 T3 or T4 erase 64 Erase List WARNING Erases all memorized remote controls from the receiver s memory cod RX Read receiver code Displays receiver code required for cloning remote controls k ON Enablesremoteprogrammingofcardsviaapreviouslyme morizedWLINKtransmitter Itremainsenabledfor3minutes from the time theW LINK remote control is last pressed OFF W LINK programming disabled IMPORTANT NOTE T...

Page 22: ...nt is reversed Mode 3 The buzzer sounds for the full duration of operation 15 4 LOCKING DEVICE OPERATION MODE Mode 0 Motor always free lock always powered Mode 1 Motor locked on closing position Mode 2 Motor locked every time it is stopped Mode 3 Motor locked every time it is stopped for more than 20 sec Mode 4 Motor reacts with 10N to forced opening Mode 5 Motor reacts with maximum force to force...

Page 23: ...s parameter will be followed by a complete setting manoeuvre reported by the buzzer emitting a continuous beeping sound and the message SET appearing on the display during which obstacle recognition is not active cl dist decel 10 70 50 Closing deceleration space cm Fig C2 Rif D Sets the distance needed for the door to move from high to low speed during a closing operation The autoset function auto...

Page 24: ...d Clear Time OFF antipanic OFF ON Panic Feature ON OFF Section ANTI PANIC FUNCTION OFF ASTER OFF ON Master Slave door Sect CONNECTING A NUMBER OF DOORS WITH CENTRAL CONTROL PANELS ON Door set as MASTER in connection for management of commands via central controllers OFF Door set as SLAVE in connection for management of commands via central controllers OFF revolving OFF ON ON Revolving mode Single ...

Page 25: ...ng DIAGNOSTICS AND MONITORING DIAGNOSTICS CODE DESCRIPTION stop STOP input activated ey Open key input activated intr INTERNAL RADAR input activated extr EXTERNAL RADAR input activated opph EXTERNAL RADAR input activated clph CLOSING PHOTOCELL input activated e er EMERGENCY input activated a p Obstacle detected Er01 Error in safety device test during opening Er02 Error in safety device test during...

Page 26: ... systèmes de protection et de déverrouillage fonctionnement correc tement L installation doit être faite en utilisant des dispositifs de sécurité et des com mandes conformes à la norme EN 12978 AVERTISSEMENTS Pour le branchement sur le secteur utilisez un câble multipolaire de 3x1 5 mm2 de section minimum et du type prévu par les normes citées plus haut à titre d exemple si le câble n est pas prot...

Page 27: ...llules 1 amplificateur 2 émetteurs 2 récepteurs 22 CRTV Carter de fermeture 23 SASAM1 2 Dispositif vantail à défoncement 24 PPA Pince pour vantail vitré Fig AE 5 MODE DE FIXATION Montage du carter Fig B Passage des câbles Fig C ATTENTION Pour fixer l entretoise n utilisez que des vis à tête évasée plate comme le montre la Fig I Rif 1 ou des vis à tête de 5 mm de hauteur maximum En cas contraire de...

Page 28: ... de touche T1 T2 T3 T4 effacer 64 Eliminer Liste ATTENTION Elimine complètement de la mémoire du récepteur toutes les radiocommandes mémorisées cod RX Lecture code récepteur Affiche le code récepteur nécessaire pour la radiocommande k ON Activelaprogrammationàdistancedesfichesàtravers un transmetteur W LINK précédemment mémorisé Cette activation reste active 3 minutes à compter de la dernière pres...

Page 29: ...ode Tambour seul le radar à l intérieur de l édifice est activé Mode 2 Radar externe radar externe seulement activé en mode Tambour seul le radar à l extérieur de l édifice est activé 15 3 MODE FONCTIONNEMENT BUZZER Mode 0 Le buzzer n émet aucun son pendant la manœuvre N intervient qu en cas d ur gence pour signaler d éventuels mauvais fonctionnements Mode 1 Le buzzer retentit au début de toutes l...

Page 30: ...onfiguration automatique configure automatiquement ce paramètre En mo difiant ce paramètre on déclenche une manœuvre complète de configuration reconnaissable au bip continue de la sonnerie e tau mot SET qui apparaît sur l afficheur au cours de laquelle la reconnaissan ce de l obstacle n est pas active esp decel fer 10 70 50 Espace ralentissement fermeture cm Fig C2 Rif D Configure l espace utilisé...

Page 31: ...e commande OFF Désactive la mémorisation via radio des émetteurs Les émetteurs ne sont mémorisés qu à l aide du menu Radio prévu à cet effet OFF Le numéro de zone est configuré sur chaque carte à l aide du programmateur palmaire universel ou de l ÉCRAN La zone 0 est réservée aux commandes vers tout le réseau ou si un tableau Master a la zone 0 ses commandes sont accom plies par toutes les zones 15...

Page 32: ...TIONS CODE DE DIAGNOSTIC DESCRIPTION arret Activation entrée STOP ey Activation entrée Open key intr Activation entrée RADAR INTERNE extr Activation entrée RADAR EXTERNE opph Activation entrée Photocellule ouverture clph Activation entrée Photocellule FERMeture e er Activation entrée URGENCE a p Détection obstacle Er01 Erreur vérification dispositifs de sécurité en ouverture Er02 Erreur vérificati...

Page 33: ...978 entsprechen ACHTUNG Verwenden Sie für den Netzanschluss ein mehradriges Kabel mit einem Mindestquerschnitt von 3 x 1 5 mm2 wie von den vorgenannten Normen vorgeschrieben zum Beispiel muss das Kabel zumindest dem Typ H05 VV F entsprechen und einen Querschnitt von 3 x 1 5 mm aufweisen wenn es nicht geschützt ist ÜBERPRÜFUNG DER INSTALLATION Vor der endgültigen Inbetriebnahme der Installation die...

Page 34: ...urchführung Fig C ACHTUNG erwendenSiefürdieBefestigungderQuerstrebeausschließlich flache Senkkopfschrauben wie auf Fig I Rif 1 gezeigt oder Schrauben mit einem Kopf der nicht höher als 5 mm ist Falls dies nicht beachtet wird kann es zu Kollisionen zwischen den Gleitwagen kommen 6 BESTIMMUNG DER BEFESTIGUNGSHÖHE DER QUERSTREBE Fig E DieBefestigungshöheHFTderQuerstrebeVISTASLmussvomhöchstenPunktdes ...

Page 35: ... Kontakt 21 22 23 Ausgang Alarm 21 NO spannungsfreier Kontakt 22 COM spannungsfreier Kontakt 23 NC spannungsfreier Kontakt 14 PROGRAMMIERUNG ZENTRALE Fig C1 14 1 MENÜ PARAMETER PARA TABLE A PARAMETER 14 2 MENÜ LOGIKEN logic TABLE B LOGIKEN 14 3 MENÜ FUNK RADIO Logik Beschreibung zufueg open Hinzufügen Taste Open Ordnet die gewünschte Taste dem Befehl Open zu zufueg ey Hinzufügen Taste Open Key Ord...

Page 36: ...s vollständig offen eingestellt Modalität8 Schleuseoffennachaußen AktivnurinModalitätSchleuse Die externeTür ist als vollständig offen eingestellt Die interneTür ist als tags geschlossen eingestellt 15 2 MODALITÄT FUNKTIONSWEISE RADAR Modalität 0 Radar Standardfunktionsweise Interner Radar aktiviert Externer Radar aktiviertd Modalität 1 Interner Radar Nur interner Radar aktiviert in der Modalität ...

Page 37: ...rung dieses Parameters wird nach einem vollständigen Einstellmanöver ausgeführt angezeigt von einem ununterbrochenen Beepton des Summers und der Anzeige SET auf dem Display während dessen die Hinderniserkennung nicht aktiv ist verlangsa ungsstrecke in zu 10 70 50 Abbremsungsraum Schließung cm Fig C2 Rif D Eingabe des Raums den die Tür während der Schließung für den Übergang von der hohen Geschwind...

Page 38: ...Schleuse Falls die externe Tür geöffnet ist wird sie zuerst geschlossen und dann öffnet sich die interne Tür Bei gleichzeitigen Manövern hat die externe Tür Vorrang TABLE B MENÜ LOGIKEN logic LOGIK DEFAULT Dievorge nommene Einstellung markieren BESCHREIBUNG TCA OFF ON Aktivierung Deaktivierung automatische Schließungen TCA und Räumungszeit OFF Antipani OFF ON Aktivierung Deaktivierung der Funktion...

Page 39: ... ÜBERWACHUNG DIAGNOSTICS CODE BESCHREIBUNG stop Aktivierung Eingang STOP ey Aktivierung Eingang Open key intr Activation entrée RADAR extr Aktivierung Eingang RADAR INTERNER opph Aktivierung Eingang FOTOZELLE BEI ÖFFNUNG clph Aktivierung Eingang FOTOZELLE BEI SCHLIESSUNG e er Aktivierung Eingang NOTFALL a p Erfassung Hindernisses Er01 Fehler aufgetreten in Sicherheitsvorrichtung bei der Öffnung Er...

Page 40: ...N 12978 ADVERTENCIAS Paralaconexiónalaredeléctrica utilizarcablemultipolardesecciónmínima 3x1 5mm2 y de tipo previsto por las normas vigentes antes citadas a modo de ejemplo si el cable no está protegido debe ser al menos equivalente a H07 RN F mientras que si está protegido debe ser al menos equivalente a H05 VV F con una sección 3x1 5 mm2 17 CONTROL DE LA INSTALACION Antes de hacer definitivamen...

Page 41: ...legado de las hojas PPA Pinza para hojas de cristal Fig AE 5 MODOS DE FIJACIÓN Montaje Cárter Fig B Paso Cables Fig C ATENCION Para fijar el travesaño usar exclusivamente tornillos de cabeza avellanada como se ilustra en la Fig I Rif 1 ó tornillos con cabeza de no más de 5 mm de alto Si esta condición no se cumple se pueden producir choques con los carros de desplazamiento 6 DETERMINACIÓN DE LA AL...

Page 42: ...de tensión 23 NC contacto libre de tensión 14 CENTRAL PROGRAMMING Fig C1 14 1 Menu PARÁMETRO PARA TABLA A MENÚ PARÁMETROS 14 2 LÓGICAS MENU logic TABLA B MENÚ LÓGICA 14 3 MENU RADIO RADIO Lógica Descripción anad open Añadir Tecla Open asocia la tecla deseada al mando Open anad ey Añadir Tecla Open Key asocia la tecla deseada al mando Open Key leer Leer Realiza un control de una tecla de un recepto...

Page 43: ...nto estándar Lapuertaseabreysecierraavelocidadlentaysedetienealvalorconfigurado en apertura farmacia Resulta activado únicamente el comando Open key No resultan activados los cierres automáticos Enfasedecierre lasfotocélulasbloqueanelmovimientomientraspermanecen interceptadas sin abrir la puerta En la modalidad esclusa este funcionamiento no se admite Modalidad 7 Esclusa abierta hacia dentro Activ...

Page 44: ...tarda la puerta en pasar de velocidad alta a velocidad baja durante una ma niobra de apertura La función de Autoset configura automáticamente este parámetro La eventual modificación de este parámetro será seguida de una maniobra completa de configuración identificada por un pitido continuo del zumbador y por el mensaje SET en la pantalla durante la cual no resulta activado el reconocimiento del ob...

Page 45: ...e DISPLAY o programador portátil universal Los mandos centralizados son a Open key mediante botón Todas las puertas de la misma zona se abren se cierran después del tiempo de evacuación configurado y se restablece el funcionamiento configurado por el selector de funciones de la master Este impulso es útil para la entrada de la mañana y la salida después de haber configurado la función cerrada de n...

Page 46: ... Activación de la entrada STOP ey Activación de la entrada Open key intr Activación de la entrada RADAR INTERNO extr Activación de la entrada RADAR EXTERNO opph Activación de la entrada FOTOCELULA DE APERTURA clph Activación de la entrada FOTOCELULA DE CIERRE e er Activación de la entrada EMERGENCIA a p Detección obstáculo Er01 Error en el control de los dispositivos de seguridad en fase de apertu...

Page 47: ...l bijvoorbeeld niet beschermd is moet deze tenminste gelijk zijn aan H07 RN F terwijl deze met bescher ming tenminste gelijk moet zijn aan H05 VV F met doorsnede 3x1 5mm2 CONTROLE VAN DE INSTALLATIE Alvorens de installatie definitief in werking te stellen nauwgezet en nauwkeurig de volgende fases uitvoeren De perfecte uitlijning van de riem controleren door enkele manoeuvres uit te voeren met het ...

Page 48: ...in nauw veld 21 FPA1 Fotocellen 1 versterker 1 zender 1 ontvanger FPA2 Fotocellen 1 versterker 2 zenders 2 ontvangers 22 CRTV Sluitingscarter 23 SASAM1 2 Inrichting vandaalbestendige vleugels 24 PPA Klem voor glazen vleugels Fig AE 5 BEVESTIGINGSWIJZEN Montage Carter Fig B Kabeldoorgang Fig C OPGELET Voordebevestigingvandedwarsdrageruitsluitendschroeven met platte verzonken kop gebruiken zoals aan...

Page 49: ...ontact vrij van spanning 20 NC contact vrij van spanning 21 22 23 Uitgang Alarm 21 NO contact vrij van spanning 22 COM contact vrij van spanning 23 NC contact vrij van spanning 14 CENTRALE PROGRAMMERING Fig C1 14 1 MENU PARAMETERS PARA TABEL A PARAMETERS 14 2 Menu Logica s LOGIC TABELLA B LOGICA S 14 3 MENU RADIO RADIO Logica Beschrijving Agg open Voeg Toets Open bij Koppelt de gewenste toets aan ...

Page 50: ...ning Modus 6 Opening apotheek Verschillen vergeleken met de standaard werking de deur opent en sluit bij lage snelheid en stopt bij de waarde ingesteld op opening apotheek activeert alleen het commando Open key de automatische sluitingen zijn niet actief tijdens de sluiting blokkeren de fotocellen de beweging tot ze bezet zijn zonder de deur opnieuw te openen In kooi modus is deze werking niet toe...

Page 51: ...g Met de functie autoset wordt deze parameter automatisch ingesteld De eventuele wijziging van deze parameter wordt uitgevoerd door een complete instellingsmanoeuvre geïdentificeerd door een continu geluidssignaal van de zoemer en door de tekst SET op het display tijdens welke de obstakelherkenning niet actief is cl dist decel 10 70 50 Ruimte vertraging sluiting cm Fig C2 Ref D Voor het instellen ...

Page 52: ...e Deur Par AANSLUITING VAN 2 DEUREN IN KOOI MODUS ON Deur ingesteld als EXTERN in de werking Kooi OFF Deur ingesteld als INTERN in de werking Kooi OFF TEST PHOT open OFF ON Test veiligheidsinrichtingen bij opening ON Test van de inrichtingen geactiveerd bij opening OFF Test van de inrichtingen gedeactiveerd bij opening OFF TEST PHOT close OFF ON Test veiligheidsinrichtingen bij sluiting ON Test va...

Page 53: ...pening DIAGNOSE en SIGNALERINGEN CODE DIAGNOSE BESCHRIJVING stop Activering ingang STOP ey Activering ingang Open Key intr Activering ingang INTERNE RADAR extr Activering uitgang EXTERNE RADAR opph Activering ingang FOTOCEL BIJ OPENING clph Activering ingang FOTOCEL BIJ SLUITING e er Activering ingang NOODSITUATIE a p Detectie obstakel Er01 Fout controle veiligheidsinrichtingen bij opening Er02 Fo...

Page 54: ... meno che non siano sotto supervisione o abbiano ricevuto istruzioni d uso da persone responsabili della loro sicurezza I bambini devono essere controllati affinché non giochino con l applicazione Non lasciare radiocomandi o altri dispositivi di comando alla portata dei bambini onde evitare azionamenti involontari dell automazione L attivazionedellosbloccomanualepotrebbecausaremovimentiincontrolla...

Page 55: ...installtheSASAMdevice à du personnel qualifié Effectuer une révision périodique de la motorisation tous les 6 mois ou en tous les cas après 1 000 000 de manœuvres 3 ManoEUvrE D URGENCE 3 1 Sans dispositifs de blocage ou batteries de secours Fig 1 Les portes s ouvrent en poussant manuellement les vantaux dans le sens de cou lissement d ouverture Si le dispositif à défoncement SASAM 1 2 est installé...

Page 56: ...en Alvorens het automatiseringssysteem te gebruiken de gebruiksaanwijzingen aandachtig lezen en deze bewaren voor toekom stige raadpleging Kinderen personen en voorwerpen buiten de actieradius van het automatiseringssy steem houden met name tijdens de werking Dit apparaat is niet bestemd voor gebruik door personen inclusief kinderen met beperkte mentale fysieke en sensorische capaciteiten of perso...

Reviews: