background image

BGS technic KG

Bandwirkerstr. 3

42929 Wermelskirchen

Tel.: 02196 720480

Fax.: 02196 7204820

mail@bgs-technic.de

www.bgstechnic.com

© BGS technic KG, Vervielfältigung und Weiterverwendung verboten

Art. 8890 

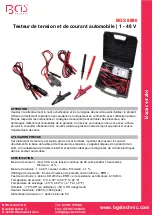
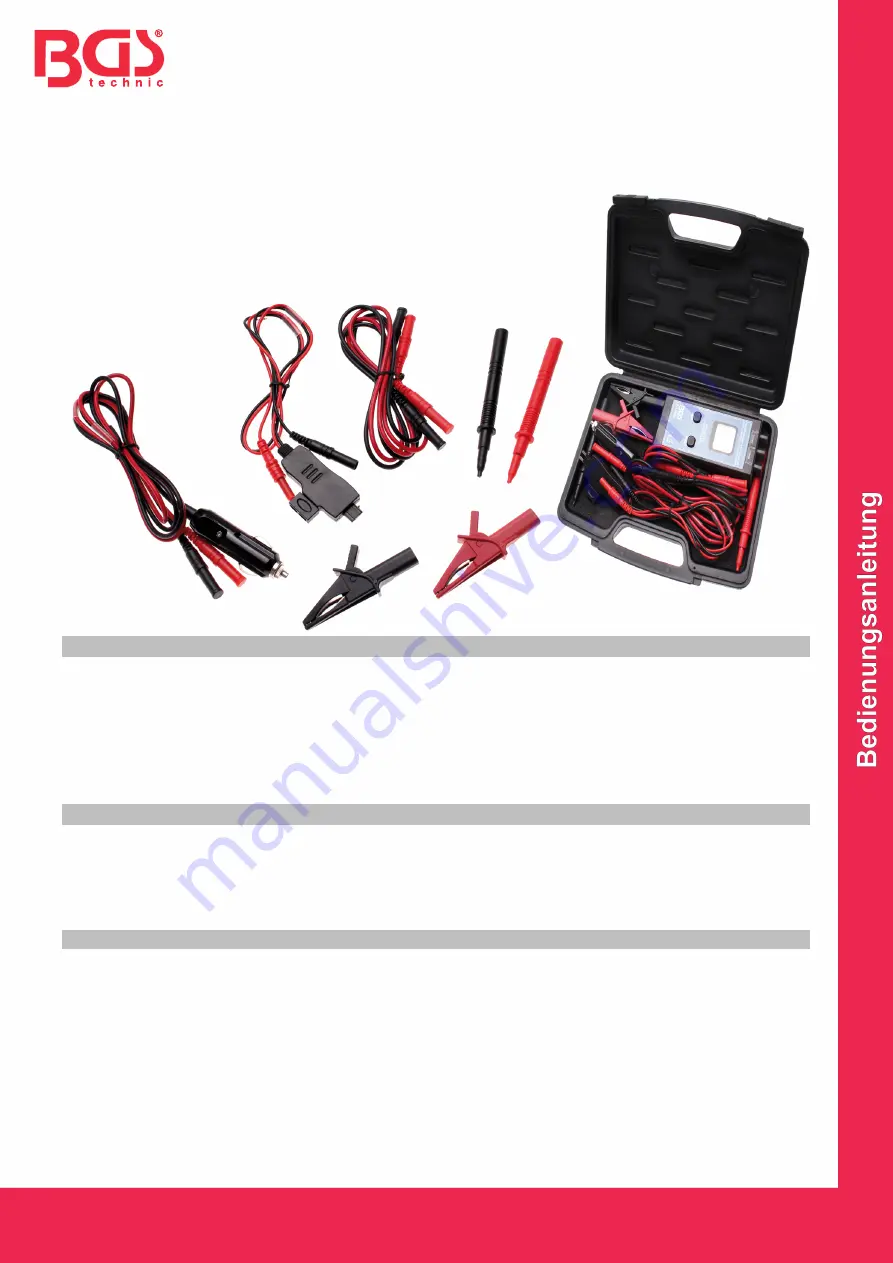
KFZ Spannungs- und Stromprüfer | 1 - 48 V 


ACHTUNG 

Lesen Sie die Bedienungsanleitung und die enthaltenen Sicherheitshinweise aufmerksam durch, 

bevor Sie das Produkt verwenden. Benutzen Sie das Produkt korrekt, mit Vorsicht und nur dem 

Verwendungszweck entsprechend. Nichtbeachtung der Sicherheitshinweise kann zu Schäden, 

Verletzungen und Erlöschen der Gewährleistung führen. Bewahren Sie diese Anleitungen für 

späteres Nachlesen an einem sicheren und trockenen Ort auf. Legen Sie die Bedienungsanleitung 

bei, wenn Sie das Produkt an Dritte weitergeben.


VERWENDUNGSZWECK 

Dieses Messgerät ist schnell, präzise und sicher in der Anwendung, es dient zur Messung von Strom 

direkt am Sicherungssockel und zur Messung von Spannungen. Das Gerät verfügt über ein großes 

LCD-Display, mini / ATO Sicherungsadapter und ist somit ideal für die Diagnose an elektrischen 

Schaltungen im KFZ-Bereich. 

SPEZIFIKATION 

Strommessung: max. 30 Ampere bei 48 Volt Gleichspannung für 10 Sekunden, Genauigkeit: ±1% 

Spannungsmessung: 1 - 48 V Gleichspannung, Genauigkeit: ± 1% 

Polaritätsanzeige: Bei falscher Polarität zeigt das Display "ERR". 

Durchgangsprüfung: LCD-Anzeige zeigt "ERR" wenn Widerstand kleiner als 1 KOhm 

Arbeitstemperatur: 0°C bis 50°C (32°F bis 122°F) 

Lagertemperatur: -20°C bis 60°C (-4°F bis 140°F) 

Feuchtigkeit: <70% RH (bei Verwendung); <80% RH (bei Lagerung) 

Maximale Höhe: 2000 m (7000 ft) 

Spannungsversorgung: 1x 9V Block-Batterie 

Summary of Contents for 8890

Page 1: ...nleitung bei wenn Sie das Produkt an Dritte weitergeben VERWENDUNGSZWECK Dieses Messgerät ist schnell präzise und sicher in der Anwendung es dient zur Messung von Strom direkt am Sicherungssockel und zur Messung von Spannungen Das Gerät verfügt über ein großes LCD Display mini ATO Sicherungsadapter und ist somit ideal für die Diagnose an elektrischen Schaltungen im KFZ Bereich SPEZIFIKATION Stromm...

Page 2: ...Krokodilklemmen oder des Sicherungsadapters Verwenden Sie den Tester nicht wenn dieser beschädigt ist Diese Sicherheitshinweise können nicht auf alle möglicherweise auftretenden Bedingungen und Situationen eingehen Der Betreiber muss immer Vorsicht walten lassen besonders bei ungewöhnlichen Bedingungen oder Situationen Gehen Sie immer mit gesundem Menschenverstand und der nötigen Vorsicht an die A...

Page 3: ...ssung zu wechseln Der Buchstabe A erscheint auf der LCD Anzeige 6 Der gemessene Wert kann auf dem Display abgelesen werden GLEICHSPANNUNGS MESSUNG 1 Schalten Sie die Zündung am Fahrzeug aus 2 Verbinden Sie das rote Messkabel mit dem Tester und mit der Prüfspitze 6 3 Verbinden Sie das schwarze Messkabel mit dem Tester und der Krokodilklemme 4 Klemmen Sie die Krokodilklemme an einen geeigneten Masse...

Page 4: ...TTERIE ERSETZEN Erscheint auf dem LCD Display das Batterie Symbol deutet dies auf eine verbrauchte Batterie hin die ersetzt werden muss Entfernen Sie alle Messkabel bevor Sie die Batterie austauschen oder das Batteriefach öffnen Achten Sie beim Anschließen der Batterie auf richtige Polarität Bitte verwenden Sie eine neue 9V Batterie und nehmen Sie den Batteriewechsel vor wie in den Abbildungen zu ...

Page 5: ...he operating instructions when handing over the product to third parties INTENDED USE This meter is fast accurate and safe to use and is used to measure current directly to the fuse socket and voltage measurement The unit features a large LCD display and mini ATO fuse probe making it ideal for the diagnosis of electrical circuits in the automotive sector SPECIFICATIONS Current measurement max 30 A...

Page 6: ...Do not use the tester if it is damaged These safety instructions cannot address all conditions and situations that may arise The operator must always exercise caution especially in unusual conditions or situations Always use common sense and caution when you work ENVIRONMENTAL PROTECTION Recycle unwanted materials instead of disposing of them as waste All tools accessories and packaging should be ...

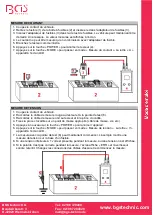
Page 7: ... letter A will appear on the LCD 7 The measured value can be read on the display DC VOLTAGE MEASUREMENT 1 Switch off the ignition of the vehicle 2 Connect the red measuring cable to the tester and to the test probe 6 3 Connect the black measuring cable to the tester and the alligator clip 4 Clamp the alligator clip to a suitable ground point ground cable screw etc 5 Press the POWER button to switc...

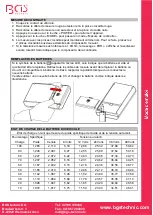
Page 8: ...ates that the component has continuity REPLACING BATTERY When appear on the LCD It means that battery needs to be replace Remove all the connection before replacing the battery or removing the battery compartment Pay attention to correct polarity when connecting the battery Use a new 9V battery and change the battery as shown in the pictures VEHICLE BATTERY CHARGE STATUS State of charge as a measu...

Page 9: ...smettez à des tiers UTILISATION PRÉVUE Cet instrument de mesure est rapide précis et sûr à utiliser il permet de mesurer le courant directement à la base du fusible et de mesurer des tensions L appareil dispose d un grand écran LCD d un adaptateur de fusible mini ATO et est donc idéal pour le diagnostic de circuits électriques dans le secteur automobile SPÉCIFICATION Mesure de courant maxi 30 A à ...

Page 10: ...as le testeur s il est endommagé Ces consignes de sécurité ne peuvent couvrir toutes les conditions et situations pouvant se présenter L exploitant doit toujours faire preuve de prudence en particulier dans des conditions ou des situations inhabituelles Travaillez toujours avec bon sens et prudence UTILISATION Après des mesures prolongées le fusible peut devenir très chaud Veuillez le laisser se r...

Page 11: ...La lettre A apparaît à l écran LCD MESURE DE TENSION 1 Coupez le contact du véhicule 2 Raccordez le câble de mesure rouge au testeur et à la pointe de test 6 3 Raccordez le câble de mesure noir au testeur et à la pince crocodile 4 Fixez la pince crocodile sur un point de masse approprié câble de masse vis etc 5 Appuyez à nouveau sur la touche POWER pour allumer l appareil 6 Appuyez sur la touche M...

Page 12: ...écran LCD cela indique que la batterie est vide et qu elle doit être remplacée Retirez tous les câbles de mesure avant de remplacer la batterie ou d ouvrir le compartiment à batterie Veillez à respecter la polarité lorsque vous connectez la nouvelle batterie Veuillez utiliser une nouvelle batterie de 9 V et changer la batterie comme indiqué dans les illustrations ÉTAT DE CHARGE DE LA BATTERIE DU V...

Page 13: ...futuras consultas Incluya el manual de instrucciones si entrega el producto a un tercero USO PREVISTO Este instrumento de medición es rápido preciso y seguro de usar se utiliza para medir la corriente directamente en la base de los fusibles y para medir las tensiones El dispositivo cuenta con una gran pantalla LCD adaptador de fusibles mini ATO y por tanto es ideal para el diagnóstico de los circu...

Page 14: ...ctar las pinzas cocodrilo o el adaptador de fusibles No utilice el dispositivo de medición cuando esté añado Estas instrucciones de seguridad no pueden contemplar todas las condiciones y situaciones que puedan surgir El operador debe tener siempre precaución especialmente en condiciones o situaciones inusuales Utilice siempre el sentido común y tenga la debida precaución APLICACIÓN Después de real...

Page 15: ... el botón POWER para encender el dispositivo 4 7 Pulse el botón MODE para pasar al modo Medición de la corriente La letra A aparecerá en la pantalla LCD MEDICIÓN DE LA TENSIÓN 1 Desconecte el encendido del vehículo 2 Conecte el cable rojo de medición al dispositivo de medición y a la punta de prueba 6 3 Conecte el cable negro de medición al dispositivo de medición y a la pinza de cocodrilo 4 Conec...

Page 16: ...bador Esto indica que el componente tiene continuidad SUSTITUCIÓN DE LA BATERÍA Si aparece el símbolo de batería en la pantalla LCD esto indica que la batería está agotada y debe ser sustituida Desconecte todos los cables de medición antes de sustituir la batería o abrir el compartimento de la misma Asegúrese de la polaridad correcta al conectar la batería Por favor utilice una batería nueva de 9V...

Page 17: ... que ce produit Declaramos bajo nuestra sola responsabilidad que este producto folgenden einschlägigen Bestimmungen entspricht complies with the requirements of the est en conformité avec les réglementations ci dessous esta conforme a las normas Angewandte Normen GHQWL FDWLRQ RI UHJXODWLRQV VWDQGDUGV Norme appliquée Normas aplicadas ppa Frank Schottke Prokurist BGS technic KG Bandwirkerstrasse 3 D...

Page 18: ...0 F 5 6 e s s a r t S r e s u k r e v e L ax 49 0 2191 46438 40 e d l h a t s w s o f n i l i a M E d i e h c s m e R 7 9 8 2 4 D BGS technic KG Bandwirkerstr 3 D 42929 Wermelskirchen Tel 02196 720480 Fax 02196 7204820 mail bgs technic de www bgstechnic com ...

Page 19: ...0 F 5 6 e s s a r t S r e s u k r e v e L ax 49 0 2191 46438 40 e d l h a t s w s o f n i l i a M E d i e h c s m e R 7 9 8 2 4 D BGS technic KG Bandwirkerstr 3 D 42929 Wermelskirchen Tel 02196 720480 Fax 02196 7204820 mail bgs technic de www bgstechnic com ...

Page 20: ...0 F 5 6 e s s a r t S r e s u k r e v e L ax 49 0 2191 46438 40 e d l h a t s w s o f n i l i a M E d i e h c s m e R 7 9 8 2 4 D BGS technic KG Bandwirkerstr 3 D 42929 Wermelskirchen Tel 02196 720480 Fax 02196 7204820 mail bgs technic de www bgstechnic com ...

Reviews: