background image

BGS technic KG

Bandwirkerstr. 3

D-42929 Wermelskirchen

Tel.: 02196 720480

Fax.: 02196 7204820

mail@bgs-technic.de

www.bgstechnic.com

© BGS technic KG, Copying and further use not allowed


CORRECT GRINDING, CAUSES OF FAULTS AND CORRECTION 

  Despite machine assistance using the pre-set grinding angles and movements, the correct grinding 

of a drill bit requires some experience, and in-particular, care during the handling of the drill bit. 

  Below you will be provided with several hints about the correct grinding of the drill bit and how to 

avoid faults. However, this information cannot guarantee the correct grinding of the drill bit – in the 
end, your own skill, adherence to the operating instructions, the state of the drill bit and the 
grinding disc will determine the result  


DEFINITIONS 


  Do not touch the drill bit tip after grinding! There is a danger of burns! 

  Before carrying out any work on the device, switch off the grinding machine and pull out the mains 

plug from the socket. Do not carry out any work while the machine is running! 

  Do not grind for too long. Check the grinding process at regular intervals! Reduce the pressure on 

the drill bit during grinding. 

  Drill bits with a large diameter must be ground for longer until they are sharp again. Grind both 

sides alternately in several short sessions. 

  Allow the drill bit to cool down between sessions, or cool it in water. 

  If the tip has turned blue, it has been overheated during grinding. Cool the tip in water. 

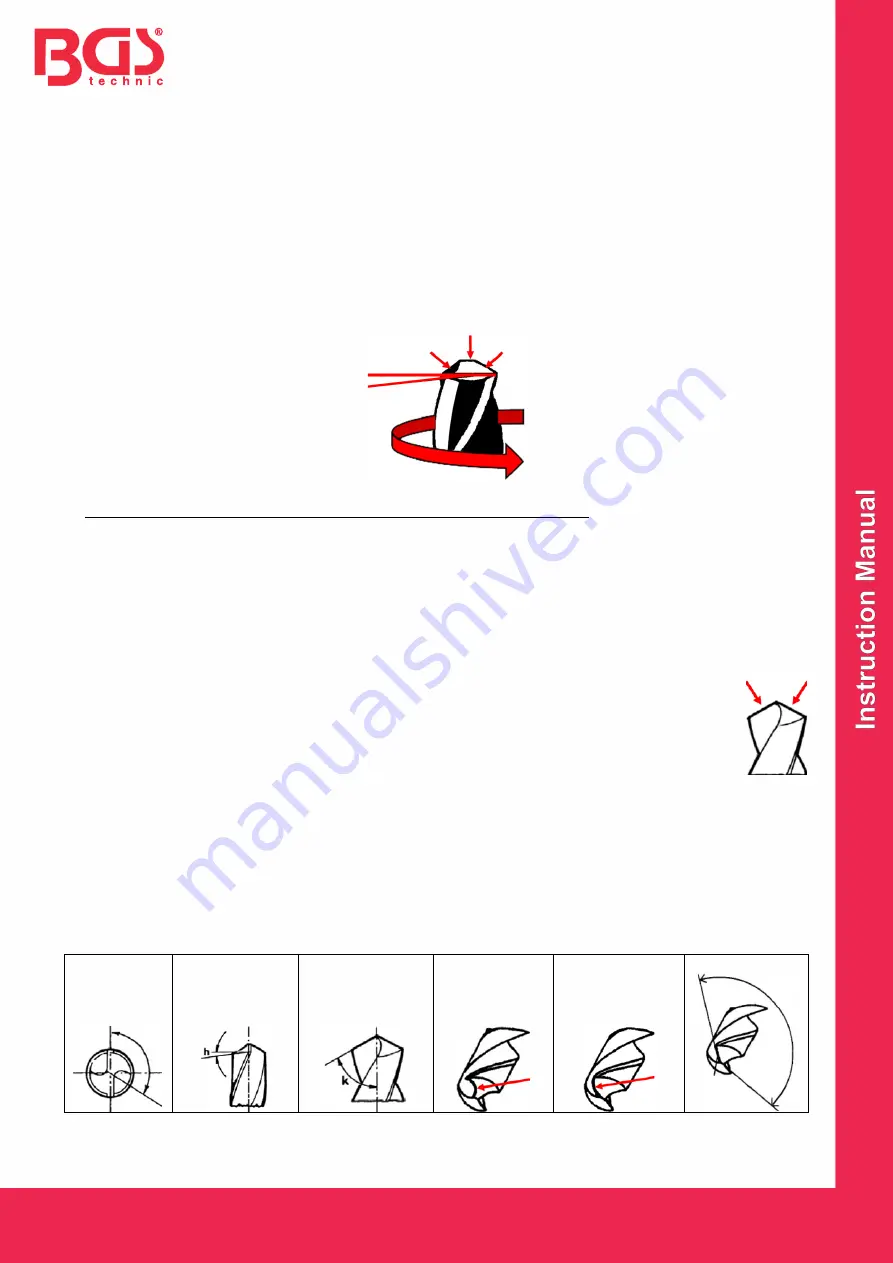
  If the tip is not in the centre (one flank is sharp, the other is not), regrind the shorter 

flank. This fault is avoided by uniform pressure on the drill bit during grinding on both 
flanks as well as identical grinding times for both flanks. 

  In particular for drill bits with large diameters and major wear, grinding with the drill bit 

sharpener may, under certain circumstances, not lead to a satisfactory result. Observe 
that the attachment is mainly intended for periodical re-sharpening but not designed for 
the complete re-working of much worn thicker drill bits.  

The angle of the tip is adjusted by the predefined grinding angle and the swivelling range when 
grinding. 
The tip angle may deviate depending on the material.  
Aluminium: 130 - 140° 
Copper, brass: 120 - 130° 
Steel, cast iron: 110 -120° 
Plastics: 50 - 90° 


Tip angle 

125 – 135° 

Grinding angle 

h 8 – 12° 

Grinding angle 

k


Adjustable with 

the 

thumbscrew (12) 

Incorrect 

Edge curving 

backwards 

Incorrect 

Edge curving 

forwards 

Correct 


Cutting 

edge


Cutting 

edge


Tip 

Grinding angle 

Summary of Contents for BGS 3200

Page 1: ...ifen Halten Sie den Bohrer stets fest und benutzen Sie zum Schutz gegen Verletzungen Arbeitshandschuhe Prüfen Sie den Zustand und die Befestigung der Schutzvorrichtungen und entfernen Sie keine mechanischen oder elektrischen Schutzvorrichtungen Arbeiten Sie nicht mit einem beschädigten Schleifstein Es besteht Verletzungsgefahr Tauschen Sie einen defekten Schleifstein umgehend Beachten Sie bei der ...

Page 2: ...er Schleifmaschine genügend Platz bleiben muss Evtl muss die Schleifscheibenschutzvorrichtung so verstellt werden dass der freie Bereich der Schleifscheibe gegenüber der Anschleifvorrichtung steht Der Bohrer sollte von einem Bereich der Schleifscheibe angeschliffen werden der links von der Antriebsnabe der Maschine liegt und nach Möglichkeit in gleicher Höhe oder etwas tiefer als die Antriebsnabe ...

Page 3: ...Sie die Schleifmaschine ein und schieben Sie durch Drehen der Vorschubschraube 4 den Bohrer vor bis er den Schleifstein berührt Schwenken Sie die gesamte Vorrichtung am Vorschubschlitten erfassen nach rechts Damit wird automatisch der richtige Anschliff hergestellt Ansicht von oben Dadurch dass die Schwenkachse 11 nicht genau durch die Mitte der Bohrerwanne 2 geht bewirkt diese Ungenauigkeit den r...

Page 4: ...änger geschliffen werden bis sie wieder scharf sind Schleifen Sie in mehreren kurzen Durchgängen beide Flanken wechselseitig Lassen Sie den Bohrer zwischen den Schleifdurchgängen abkühlen bzw kühlen Sie ihn in Wasser ab Ist die Spitze blau angelaufen so ist sie beim Schleifen überhitzt worden Kühlen Sie die Spitze in Wasser ab Ist die Spitze nicht in der Mitte eine Flanke ist scharf die andere nic...

Page 5: ...g caught by moving parts Always wear safety glasses when grinding Always hold the drill bit tight and wear work gloves to protect against injury Check the state and fixing of the protective equipment and never remove any mechanical or electrical protective equipment Do not work with a damaged grinding stone There is a risk of injury Replace a damaged grinding stone immediately Also observe these s...

Page 6: ... grinding attachment In addition the grinding disc protective cover disc must be adjusted to enable the free area of the grinding disc to be opposite the drill grinding attachment The drill bit should be sharpened by an area of the grinding disc that is on the left of the drive hub of the machine and which is preferably at the same level or slightly lower than the drive hub of the grinding machine...

Page 7: ... gants de travail afin de vous protéger contre les blessures Vérifiez l état et la fixation des dispositifs de sécurité et ne retirez aucun dispositif de sécurité mécanique ou électrique Ne travaillez jamais avec une pierre à affûter endommagée il y a un risque de graves blessures Remplacez immédiatement la pierre à affûter si elle est endommagée Veuillez également respecter ces consignes de sécur...

Page 8: ...ôté de la machine de meulage pour le montage du dispositif d affûtage Il peut être nécessaire d ajuster le dispositif de protection de la meule de manière à ce que la zone d accès à la meule soit opposée au dispositif d affûtage Le foret doit être affûté à partir d une zone de la meule située à gauche et si possible à la même hauteur ou légèrement plus basse que le moyeu d entraînement de la machi...

Page 9: ...a machine à meuler et faites avancer le foret en tournant la vis d avance 4 jusqu à ce qu il touche la meule Faites pivoter l ensemble du dispositif prise au niveau du coulisseau d avance vers la droite Cela permet d obtenir automatiquement l affûtage correct Vue de dessus Comme l axe de pivotement 11 ne passe pas exactement par le centre du porteur de forets 2 cette imprécision entraîne un affûta...

Page 10: ...rée d affûtage plus longue pour atteindre l affûtage correct Rectifiez les deux flancs en alternance et en plusieurs passes courtes Laissez se refroidir le foret entre les passes d affûtage ou refroidissez le dans de l eau Si la pointe est bleue c est qu elle a été surchauffée pendant le meulage Refroidissez la pointe dans de l eau Si la pointe n est pas centrée un flanc est tranchant l autre ne l...

Page 11: ... and push the drill bit forward by turning the adjustment screw 4 until the drill bit touches the grinding disc Then swing the entire attachment hold at the feed slide to the right This will automatically create the correct cut View from above As the swing axis 11 is not exactly situated in the centre of the bit tray 2 This inaccuracy effects right edge grinding and relief grinding Therefore you h...

Page 12: ...ll bit during grinding Drill bits with a large diameter must be ground for longer until they are sharp again Grind both sides alternately in several short sessions Allow the drill bit to cool down between sessions or cool it in water If the tip has turned blue it has been overheated during grinding Cool the tip in water If the tip is not in the centre one flank is sharp the other is not regrind th...

Page 13: ...de afilado Siempre sujete la broca con firmeza y utilice guantes de trabajo para protegerse contra posibles lesiones Compruebe el estado y la fijación de los dispositivos de seguridad y no retire ningún dispositivo de seguridad mecánico o eléctrico No trabaje con una piedra de afilar dañada hay riesgo de lesiones Sustituya inmediatamente una piedra de afilar que esté defectuosa Por favor observe t...

Page 14: ...iciente espacio en el lateral de la rectificadora para el montaje del soporte de afilado Puede ser necesario ajustar el protector de la muela abrasiva para que el área libre de la muela abrasiva esté enfrente del soporte de afilado La broca debe ser afilada desde un área del disco abrasivo ubicada a la izquierda del cubo de accionamiento de la máquina y si es posible a la misma altura o ligerament...

Page 15: ...e ligeramente el tornillo de bloqueo 5 encienda la rectificadora y haga avanzar la broca girando el tornillo de alimentación 4 hasta que toque la piedra de afilar Gire todo el soporte agárrelo en el carro de avance hacia la derecha De este modo se consigue automáticamente el afilado correcto Vista desde arriba Como el eje giratorio 11 no pasa exactamente por el centro de la bandeja de la broca 2 e...

Page 16: ...r afiladas por más tiempo hasta que vuelvan a estar afiladas Afile ambos flancos alternándolos en varias pasadas cortas Deje que la broca se enfríe entre las pasadas de afilado o enfríela con agua Si la punta se ha puesto azul se ha sobrecalentado durante el afilado Enfríe la punta en agua Si la punta no está en el centro un flanco está afilado el otro no lo está vuelva a afilar el flanco más cort...

Reviews: