background image


22 


LOCALIZAÇÃO DE FALHAS OU DE AVARIAS 

SINTOMAS 

COMPROVAÇÕES 

SOLUÇÕES 

1. 

monitor 

não 

acende. 

1) Verifique se a máquina está 

ligada    à  rede, se  o interruptor 
geral está na posição 1 e se a 

chave  de  segurança  está 

posta.  

1)  Ligue  o  cabo  à  rede. 

Coloque  o  interruptor  na 
posição 1 e ponha a chave de 

segurança. 

2. O monitor acendese e 

não funciona o motor.  

2) Comprove que o limitador de 

corrente está para dentro. 

2)  Desligar  a  máquina  e 

apertar  o limitador de corrente. 
Lubrificar a banda. 

3.  Puxões  ao  andar  em 

cima da banda. 

3.a)  Comprove  lubrificação 

banda. 

3.b)  Comprove  tensão  banda 

deslizamento.  
3.c)  Comprove  tensão  correia 

de transmissão. 

3.a)  Lubrifique  a  banda  de 

deslizamento.  

3.b)  Deixe  a  banda  de 

deslizamento tensa. 
3.c)  Deixe  a  banda  correia  de 

transmissão tensa. 

4. A máquina pára (salta 

o limitador de corrente).  

4) 

Comprove 

lubrificação 

banda. 

4)  Apertar  o  limitador  de 

corrente com o interruptor em 0 

e  lubrifique  a  banda  de 
deslizamento. 

5. 

corrimão 

dá 

choques nas mãos. 

5) Comprove se a tomada onde 

está ligada tem ligação à terra. 

5) Ligar a máquina numa ficha 

com ligação à terra. 

6. 

banda 

fica 

descentrada. 

6.a)  Comprove  nivelamento  do 

chão. 
6.b)  Comprove  a  distorção  da 

máqunia.  


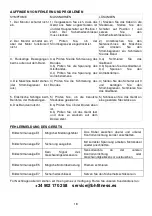
ERROS DA MÁQUINA 

Ecrã do monitor E1


Possível mensagem de falha. 

Conecte  o  cabo  correctamente  entre  o 

controlador superior e o controlador inferior 

Ecrã do monitor E2 

Apagado 

Funcionamento com uma voltagem correcta; 

conecte de novo o cabo do motor. 

Ecrã do monitor E3 

Sem  sinal  do  sensor  de 

velocidade 

Substitua  a  luz  do  sensor  do  controlador 

inferior ou o sensor de velocidade. 

Ecrã do monitor E5 

Possível 

sobrecarga 

do 

motor 

Lubrifique a faixa. 

Ecrã do monitor E7 

Chave de segurança


Ponha a chave de segurança. 


Para qualquer consulta, não duvide em pôr-se em contacto, chamando ao número de telefone: 

+34 902 170 258   service@bhfitness.es


Summary of Contents for G6431

Page 1: ...1 G6431 UNIDAD ELECTRÓNICA ELECTRONIC MONITOR UNITÉ ÉLECTRONIQUE ELEKTRONIKEINHEIT UNIDADE ELECTRÓNICA IMPIANTO ELETTRONICO ELEKTRONISCHER MONITOR ...

Page 2: ...2 Fig 1 Fig 2 Fig 3 Fig 4 ...

Page 3: ... un enchufe provisto de terminal TIERRA ponga el interruptor L en posición 1 Fig 1 La llave de seguridad g deberá estar colocada en su alojamiento E Fig 2 En caso contrario la máquina no se pondrá en marcha Al colocar la llave de seguridad g en su lugar E sonará un pitido y todos los displays mostrarán el valor 00 00 lo que significa que la maquina esta en posición de marcha READY CAMBIO DE KILÓME...

Page 4: ...Estando la máquina preparada pulse la tecla PROGRAM y le aparecerá en el display P01 pulsando la tecla PROGRAM accede a los programas del P1 al P12 BODY FAT una vez haya elegido su programa pulse la tecla MODE y le parpadeará el display de TIME Tiempo Para programar la duración del tiempo en el programa elegido pulse las teclas SPEED SPEED 5 99 minutos El monitor tiene un tiempo predefinido de 30 ...

Page 5: ...ar máxima seguridad al usuario esta unidad dispone de una llave de seguridad g y de un botón de STOP La llave de seguridad g deberá estar colocada en su alojamiento E ver Fig 2 En caso contrario la máquina no se pondrá en marcha Cuando haga uso de la máquina fije la llave de seguridad a la ropa mediante el clip Con un tirón la llave de seguridad saldrá de su alojamiento y la máquina se parará de f...

Page 6: ...ón banda 4 Pulsar el limitador de corriente con el interruptor en 0 y lubricar la banda de deslizamiento 5 La barandilla da calambres en las manos 5 Comprobar que el enchufe donde está conectada tiene toma tierra 5 Enchufar la máquina en enchufe con toma de tierra 6 La banda se descentra 6 a Comprobar nivelación del suelo 6 b Comprobar la cojera de la máquina ERRORES DE LA MÁQUINA Pantalla de moni...

Page 7: ...ig 1 The safety key g must be inserted into its spot E Fig 2 otherwise the machine will not operate As soon as the safety key g is in place the machine will beep and all of the displays will show a 00 00 value indicating that the machine is READY to be used CHANGING FROM KILOMETRES TO MILES This machine has the option to display speed in km h or mph The factory setting for the machine is km h To c...

Page 8: ...to flash Use the SPEED SPEED keys to specify the duration of the program 5 99 minutes The monitor has a default program setting of 30 minutes Press the START PAUSE key and the machine will start to operate after 3 seconds shown by the countdown on the central display based on the values it has been given You can change the speed settings at any time during the exercise by pressing the SPEED SPEED ...

Page 9: ...g the machine always clip the cord on the safety key to your clothing Tugging on the cord will pull the safety key out of its slot and the machine will stop immediately To restart the machine simply put the key back into the key slot Remove the safety key g whenever the machine is not being used and keep it out of children s reach Pressing the red button marked STOP will also stop the unit immedia...

Page 10: ...that the band is lubricated 4 Reset the overload button with the On Off switch at 0 and lubricate the treadmill band 5 Electrical shocks through the handrail 5 Check that the machine is plugged into an earthed mains socket 5 Plug the machine into an earthed mains socket 6 The treadmill belt skews off centre 6 a Check that the machine is level on the floor 6 b Check that the machine does not wobble...

Page 11: ...RE Placez l interrupteur L sur la position 1 Fig 1 La clé de sécurité g doit être introduite dans son logement E Fig 2 faute de quoi la machine ne se mettra pas en marche Dès que la clé de sécurité g sera située à sa place E un signal sonore retentira et tous les écrans afficheront la valeur 00 00 ce qui voudra dire que lamachine se trouve sur la position marche READY PASSER DES KILOMÈTRES AUX MIL...

Page 12: ...P01 s affichera au display En appuyant sur la touche PROGRAM vous pourrez accéder aux programmes P1 à P12 BODY FAT Après avoir sélectionné votre programme appuyer sur la touche MODE et le display TIME Durée clignotera Pour programmer la durée dans le programme choisi appuyer sur les touches SPEED SPEED 5 99 minutes Le temps prédéfini dans le moniteur pour la durée du programme est de 30 minutes Ap...

Page 13: ...ose d une clé de sécurité g et d un bouton STOP La clé de sécurité g doit être placée dans son logement E voir Fig 2 faute de quoi la machine ne se mettra pas en marche Durant les exercices effectués sur cette machine l utilisateur doit attacher la clé de sécurité à l un des vêtements qu il porte par l intermédiaire d un clip Toute secousse fera sortir la clé de son logement et la machine s arrête...

Page 14: ...ourant saute 4 Vérifiez la lubrification du tapis 4 Placez le limiteur de courant avec l interrupteur sur 0 et graissez la bande de glissement 5 Coups de bourre sur les mains quand elles touchent la main courrante 5 Vérifiez si la prise de courant dispose d une mise à la terre 5 Branchez la machine à une prise dotée d une mise à la terre 6 Le tapis se décentre 6 a Vérifiez le nivellement du sol 6 ...

Page 15: ... Sie das Gerät an einen GEERDETEN Stecker Stellen Sie den Schalter L auf Position 1 Fig 1 Der Sicherheitsschlüssel g muss in seiner Aufnahme E Fig 2 stecken damit das Gerät gestartet werden kann Beim Einstecken des Sicherheitsschlüssels e ertönt ein akustisches Signal und alle Displays zeigen den Wert 00 00 dies bedeutet dass sich die Maschine in betriebsbereitem Zustand READY befindet WECHSEL VON...

Page 16: ...nuten die Entfernung zwischen 0 5 und 99 9 Grafiken der Programme P2 bis P10 Siehe letzte Seiten Ist die Maschine vorbereitet drücken Sie die Taste PROGRAM und auf dem Display erscheint P01 Drücken Sie PROGRAM um Zugriff auf die Programme von P1 bis P12 BODY FAT zu haben Wenn Sie das Programm gewählt haben drücken Sie die Taste MODE und die Anzeige TIME blinkt Um die Dauer im gewählten Programm zu...

Page 17: ...n Pulssensoren R Fig 4 NOTAUS Zur optimalen Sicherheit des Benutzers verfügt dieses Gerät über einen Sicherheitsschlüssel g und eine STOP Taste Der Sicherheitsschlüssel g muss in seine Aufna hme E gesteckt werden Fig 2 Anderenfalls kann das Gerät nicht gestartet werden Wenn Sie das Gerät benutzen befestigen Sie den Sicherheitsschlüssel mit einem Clip an Ihrer Kleidung Durch kräftiges Ziehen kann d...

Page 18: ...zer löst aus 4 Prüfen Sie die Schmierung des Bandes 4 Stellen Sie den Schalter auf 0 und betätigen Sie den Strombegrenzer Schmieren Sie das Gleitband 5 Elektrische Schläge beim Berühren der Haltestangen 5 Prüfen Sie ob die benutzte Steckdose geerdet ist 5 Schliessen Sie das Gerät an eine geerdete Steckdose an 6 Das Band verrutscht 6 a Prüfen Sie ob der Boden eben ist 6 b Prüfen Sie ob das Gerät fe...

Page 19: ...à terra Coloque o interruptor L na posição 1 Fig 1 A chave de segurança g deverá estar introduzida no seu alojamento E Fig 2 Caso contrário a máquina não entrará em funcionamento Ao colocar a chave de segurança g no seu lugar E ouvir se á um sinal sonoro e todos os displays mostrarão o valor 00 00 o que significa que a máquina está na posição de colocação em funcionamento READY MUDANÇA DE QUILÓMET...

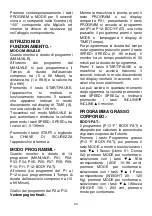
Page 20: ...uina preparada prima a tecla PROGRAM e aparecerá no ecrã P01 premindo a tecla PROGRAM acede aos programas de P1 a P12 BODY FAT quando tiver escolhido o seu programa prima a tecla MODE e o ecrã de TIME Tempo ficará a piscar Para programar a duração do tempo no programa escolhido prima as teclas SPEED SPEED 5 99 minutos O monitor tem um tempo pré definido de 30 minutos para a duração do programa Pre...

Page 21: ...o usuário a maior segurança possível esta unidade possui uma chave de segurança g e um botão de STOP A chave de segurança g deverá estar colocada no seu alojamento E ver Fig 2 Caso contrário a máquina não poderá funcionar Ao usar a máquina segure a corda da chave de segurança á sua roupa através do clipe Com um puxão a chave de segurança sairá do seu alojamento e a máquina parará de forma instantâ...

Page 22: ...nte 4 Comprove lubrificação banda 4 Apertar o limitador de corrente com o interruptor em 0 e lubrifique a banda de deslizamento 5 O corrimão dá choques nas mãos 5 Comprove se a tomada onde está ligada tem ligação à terra 5 Ligar a máquina numa ficha com ligação à terra 6 A banda fica descentrada 6 a Comprove nivelamento do chão 6 b Comprove a distorção da máqunia ERROS DA MÁQUINA Ecrã do monitor E...

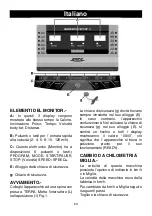
Page 23: ...resa a TERRA Metta l interruttore L nella posizione 1 Fig 1 La chiave di sicurezza g dovrà trovarsi sempre introdotta nel suo alloggio E In caso contrario l apparecchio nonfunzionerà Nel collocare la chiave di sicurezza g nel suo alloggio E si sentirà un fischio e tutti i display mostreranno il valore 00 00 ciò significa che l apparecchio si trova in posizione pronto per il suo funzionamento READY...

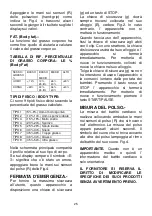
Page 24: ...al P10 Vedere pagine finali Mentre la macchina è pronta premi il tasto PROGRAM e sul display comparirà P01 presentando il tasto PROGRAM si accede ai programmi dal P1 al P12 BODY FAT una volta prescelto il programma premi il tasto MODE e lampeggerà il display di TIME Tempo Per programmare la durata del tempo nel programma prescelto premi il tasto SPEED SPEED 5 99 minuti Il monitor ha un tempo prede...

Page 25: ...sizione una chiave di sicurezza g ed un tasto di STOP La chiave di sicurezza g dovrà sempre trovarsi collocata nel suo alloggio E vedere Fig 2 In caso contrario l apparecchio non si metterà in funzionamento Quando faccia uso dell apparecchio fissi la chiave di sicurezza agli abiti con il clip Con uno strattone la chiave di sicurezza uscirà dal suo alloggio e l apparecchio si fermerà inmediatamente...

Page 26: ...erificare la lubrificazione del nastro 4 Premere il limitatore di corrente con l interruttore a 0 e lubrificare il nastro di scorrimento 5 Il corrimano provoca scosse nelle mani 5 Verificare che la presa dove è stata collegata abbia presa a terra 5 Collegare l apparecchio ad una spina con presa a terra 6 Il nastro si sposta e non è centrato 6 a Verificare la livellazione del pavimento 6 b Verifica...

Page 27: ...AARD stop contact Plaats de schakelaar L op de stand 1 Fig 1 De veiligheidssleutel dient op de daarvoor bes temde plaats te zitten E Fig 2 Wanneer de sleutel niet op zijn plaats zit treedt het apparaat niet in werking Wanneer u de veiligheidssleutel g plaatst klinkt er een piep en alle displays tonen de waarde 00 00 wat betekent dat het apparaat gereed is voor gebruik READY OVERGAAN VAN KILOMETERS...

Page 28: ... P01 op het uitleesvenster verschijnt Door op PROGRAM te drukken kunt u toegang verkrijgen tot de programma s P1 t m P12 BODY FAT Zodra u een programma hebt gekozen druk op MODE waarna het woord TIME begint te knipperen Gebruik de toetsen SPEED SPEED om de duur van het programma te bepalen 5 99 minuten De monitor heeft een standaard programma instelling van 30 minuten Druk op START PAUSE waarna he...

Page 29: ... apparaat over een veiligheidssleutel g en een STOP knop De veiligheidssleutel g dient op zijn plaats te zitten E Fig 2 Indien dit niet het geval is zal het apparaat niet inschakelen Wanneer u het apparaat gebruikt dient u de veiligheidssleutel door middel van de klip aan uw kleding te bevestigen De veiligheidssleutel kan dan via een ruk verwijderd worden en het apparaat stopt meteen Om het appara...

Page 30: ... de band 4 Druk op de stroombegrenzer met de schakelaar in positie 0 en smeer de band 5 Het frame geeft elektrische schokken in de handen 5 Controleer of het apparaat is aangesloten op een geaard stopcontact 5 Sluit het apparaat aan op een geaard stopcontact 6 De band loopt niet central 6 a Controleer of de ondergrond waterpas is 6 b Controleer of het apparaat stevig op de grond staat FOUTMELDINGE...

Page 31: ...31 E PERFILES DE LOS PROGRAMAS GB PROGRAM PROFILES F PROFILS DES PROGRAMMES D PROGRAMMPROFILE P PERFIS DOS PROGRAMAS I PROFILI DEI PROGRAMMI NL PROGRAMMAPROFIELEN ...

Page 32: ...32 ...
Page 33: ... FITNESS NORTH AMERICA 20155 Ellipse Foothill Ranch CA 92610 Tel 1 949 206 0330 Fax 1 949 206 0350 fitness bhnorthamerica com www bhnorthamerica com BH FITNESS CHINA BH China Co Ltd Block A NO 68 Branch Lane 455 Lane 822 Zhen Nan RD Li Zi Yuan Putuo Shanghai 200331 P R C Tel 86 021 5284 6694 Fax 86 021 5284 6814 BH SE RESERVA EL DERECHO A MODIFICAR LAS ESPECIFICACIONES DE SUS PRODUCTOS SIN PREVIO ...

Reviews: