background image


12 

English 


IMPORTANT SAFETY ADVICE 


PRECAUTIONS


This  bicycle  has  been  designed  and 

constructed  to  provide  maximum 

safety. 

Nevertheless, 

certain 

precautions  should  be  taken  when 

using  exercise  equipment.  Read  the 

whole  manual  before  assembling  and 

using the bicycle. The following safety 

precautions should also be observed: 

1


Keep  children  away  from  this 

equipment at all times. DO NOT leave 

them unsupervised in the room where 

this bicycle is kept. 

2


It can only be used by one person at 

a time.  

3


If you experience dizziness, nausea, 

chest  pains  or  any  other  symptom 

while  using  this  appliance  STOP  the 

exercise. 

SEEK 

MEDICAL 

ATTENTION IMMEDIATELY 

4


Use  the  appliance  on  a  level,  solid 

surface.  DO  NOT  use  the  bicycle 

outdoors or close to water. 

5


Keep your hands well away from any 

of the moving parts. 

6


Wear  clothing  suitable  for  doing 

exercise.  Do  not  use  baggy  clothing 

that might get caught up in the bicycle. 

Always wear running shoes or trainers 

when  using  the  machine.  Make  sure 

all laces/cords are tied correctly. 

7


This appliance must only be used for 

the purposes described in this manual. 

DO NOT use accessories that are not 

recommended by the manufacturer. 

8


Do not place sharp objects near the 

machine. 

9


Disabled  people  should  not  use  the 

machine  without  the  assistance  of  a 

qualified person or a doctor. 

10


Do  warm  up  stretching  exercises 

before using the equipment. 

11


Do  not  use  the  bicycle  if  it  is  not 

working correctly. 


Caution:  Consult  your  doctor 

before beginning to use the bicycle. 
This  advice  is  especially  important 
for  those  over  35  or  suffering  from 
health problems.  
Keep  these  instructions  safe  for 
future use. 


GENERAL INSTRUCTIONS


Carefully read through the instructions 

contained  in  this  manual.  It  provides 

you  with  important  information  about 

assembly,  safety  and  use  of  the 

machine.  

1


This  unit  has  been  designed  for 

home  use.  The  weight  of  the  user 

must not exceed 130 kg. 

2


Parents  and/or those responsible for 

children  should  always  take  their 

curious  nature  into  account  and  how 

this  can  often  lead  to  hazardous 

situations  and  behaviour  resulting  in 

accidents.  Under  no  circumstances 

should this appliance be used as a toy. 

3


The  owner  is  responsible  for 

ensuring  that  anyone  who  uses  the 

machine  is  duly  informed  about  the 

necessary precautions. 

ASSEMBLY INSTRUCTIONS


For  the  assembly  of  this  unit,  we 

recommend  the  help  of  a  second 
person. 

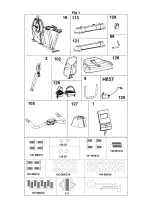
Take the unit out of its box and make 

sure  that  all  of  the  pieces  are  there 

(Fig. 1) 


Summary of Contents for H852

Page 1: ...de montaje y utilización Instructions for assembly and use Instructions de montage et utilisation Montage und gebrauchsanleitung Instruções de montagem e utilização Istruzioni di montaggio e uso Montage en gebruiksinstrukties ...

Page 2: ...Fig 1 ...

Page 3: ...Fig 2 Fig 3a ...

Page 4: ...Fig 3b Fig 4 ...

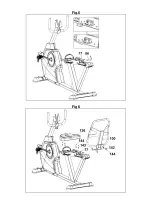
Page 5: ...Fig 5 Fig 6 ...

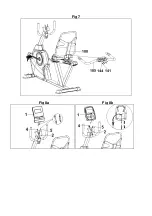
Page 6: ...Fig 7 Fig 8a Fig 8b ...

Page 7: ...7 Fig 9 Fig 10 ...

Page 8: ...amente 7 Utilice este aparato sólo para los fines descritos en este manual NO utilice accesorios no recomendados por el fabricante 8 No coloque objetos cortantes alrededor de la máquina 9 Las personas discapacitadas no deberán utilizar la máquina sin la asistencia de una persona cualificada o un médico 10 Antes de utilizar este aparato realice un calentamiento con ejercicios de estiramiento 11 No ...

Page 9: ...ucciones de montaje de los pedales una colocación incorrecta podría dañar la rosca del pedal o de la biela Las posiciones derecha e izquierda habrán de tomarse montado el usuario en el sillín en posición de hacer ejercicio El pedal derecho 129 marcado con la letra R se enroscara en sentido de giro agujas del reloj en la biela derecha marcada con la letra R Apriete fuertemente fig 2 El pedal izquie...

Page 10: ... y apriete fuertemente 9 MONTAJE MONITOR A continuación conexione los terminales que salen del tubo manillar 4 y 5 y los terminales que sale del monitor 1 Fig 8 a b Coloque el monitor 1 sobre la chapa en el tubo manillar 3 como indica la Fig 8 a b teniendo cuidado de no pillar los cables Sujete el monitor con los tornillos suministrados 2 10 NIVELACIÓN Una vez colocada la unidad en su lugar defini...

Page 11: ...n ponerse en contacto con el S A T Servicio de Asistencia Técnica llamando al teléfono de atención al cliente ver página final del presente manual BH SE RESERVA EL DERECHO A MODIFICAR LAS ESPECIFICACIONES DE SUS PRODUCTOS SIN PREVIO AVISO ...

Page 12: ...re not recommended by the manufacturer 8 Do not place sharp objects near the machine 9 Disabled people should not use the machine without the assistance of a qualified person or a doctor 10 Do warm up stretching exercises before using the equipment 11 Do not use the bicycle if it is not working correctly Caution Consult your doctor before beginning to use the bicycle This advice is especially impo...

Page 13: ...d with an R in a clockwise direction Tighten securely Fig 2 The left hand pedal 129 marked with the letter L screws onto the left hand crank also marked with an L in an anti clockwise direction Tighten securely fig 2 Once the pedals have been fitted insert the end of the pedal clip into the slot on the pedal adjusting it to your footwear on the ledge of the pedal 4 FITTING THE MAIN POST Take the m...

Page 14: ...screws 2 to hold the monitor in place Fig 8 10 LEVELLING Once the unit has been placed into its final position make sure that it sits flat on the floor and that it is level This can be achieved by screwing the adjustable feet 125 up or down as shown in Fig 9 11 MOVEMENT STORAGE The unit is equipped with wheels 116 to make it easier to move The wheels located at the front of your unit make it easie...

Page 15: ...ssures de sport appropriées pour ce faire Nouez bien vos lacets de chaussures 7 Cet appareil ne doit être utilisé qu aux fins indiquées dans cette notice NE pas utiliser d accessoires autres que ceux recommandés par le fabricant 8 Ne pas poser d objets coupants aux abords de la machine 9 Les personnes handicapées ne pourront utiliser la machine que si elles sont accompagnées par une personne quali...

Page 16: ... de la machine 16 comme indiqué dans la fig 2 puis introduire les vis 135 placez les rondelles 136 et vissez très fort 3 MONTAGE DES PÉDALES Suivre très attentivement les instructions de montage des pédales car un montage défectueux risque d endommager le filetage de la pédale ou celui de la bielle La position droite et la position gauche sont les positions prises alors que l utilisateur est assis...

Page 17: ...olidement 8 MONTAGE DU DOSSIER Réglez le dossier 102 comme illustré à la Fig 8 fixer les vis 142 avec les rondelles 144 et serrer solidement Positionner le guidon 105 dans le tube de dossier 102 Placer les vis 141 et les rondelles 144 fig 8 et serrer solidement 9 MONTAGE MONITEUR À présent connectez les connecteurs qui dépassent du tube guidon 4 et 5 et le connecteur qui dépasse du moniteur 1 Fig ...

Page 18: ...rmateur de courant à la ligne de 230 V fig 10 Pour toute information complémentaire et en cas de doute sur le bon état de l une quelconque partie de la machine l hésitez pas à appeler le Service d Assistance Technique SAT au numéro de téléphone d Assistance Clientèle qui figure à la dernière page de cette notice BH SE RÉSERVE LE DROIT DE MODIFIER LES CARACTÉRISTIQUES DE SES PRODUITS SANS PRÉAVIS ...

Page 19: ...hten Sie darauf dass die Schnürsenkel fest gebunden sind 7 Benutzen Sie dieses Gerät nur zu den in diesem Handbuch aufgeführten Zwecke Verwenden Sie nur Zubehörteile die vom Hersteller des Geräts empfohlen werden 8 Achten Sie darauf dass sich in der Nähe des Gerätes keine scharfen Gegenstände befinden 9 Behinderte Personen dürfen das Gerät nur mit Unterstützung durch qualifiziertes oder medizinisc...

Page 20: ...teren Ständers 121 in den hinteren Ständer des Geräts 16 Abb 2 Setzen Sie die Schrauben 135 flachen Unterlegscheiben 136 ein und ziehen Sie sie gut fest 3 MONTAGE DER PEDALE Befolgen Sie diese Hinweise zur Montage der Pedale genau ein falsche Montage kann das Gewinde der Pedale oder der Kurbelstange beschädigen Die Definitionen rechts und links gehen von der Sichtweise des auf dem Sattel in Übungs...

Page 21: ... 8 MONTAGE DES SITZES Schieben Sie die Rückenlehne 102 wie in Fig 8 Setzen Sie die Schrauben 142 und die Unterlegscheiben 144 ein und ziehen Sie sie gut fest Fig 8 Positionieren Sie den Lenker 105 in der Rückenrohr 102 Bringen Sie die Schrauben 141 und Scheiben 144 Bild 8 und fest anziehen 9 MONTAGE DES MONITORS Verbinden Sie die aus dem Lenkerrohr 4 und 5 kommenden Klemmen mit den Klemmen des Mon...

Page 22: ...Sie den Transformator an das 230 V Netz Abb 10 Sollten über den Zustand einer Komponente Zweifel bestehen setzen Sie sich bitte mit dem TKD Technischen Kundendienst in Verbindung indem Sie das Servicetelefon anrufen siehe letzte Seite des Handbuchs BH BEWAHRT SICH DAS RECHT ZU ÄNDERUNGEN SEINER PRODUKTSPEZIFIZIERUNGEN OHNE VORHERIGE ANKÜNDIGUNG VOR ...

Page 23: ...erá utilizar este aparelho para os fins descritos neste manual NÃO utilize acessórios que não sejam recomendados pelo fabricante 8 Não coloque objectos cortantes á volta da máquina 9 As pessoas com alguma incapacidade não deverão utilizar a máquina sem a assistência de uma pessoa qualificado ou de um médico 10 Antes de utilizar este aparelho realize um aquecimento com exercícios de estiramento 11 ...

Page 24: ...te as instruções de montagem dos pedais uma colocação incorrecta poderia danificar a rosca do pedal ou da biela As posições de direita e esquerda deverão ser escolhidas estando o usuário montado no selim na posição de fazer exercício O pedal direito marcado com a letra R deverá enroscar se na biela direita marcada com a letra R no sentido dos ponteiros do relógio Aperte com força fig 2 O pedal esq...

Page 25: ...te com força 9 MONTAGEM DO MONITOR De seguida ligue os terminais que saem do tubo volante 4 e 5 e o terminal que sai do monitor 1 Fig 8 a b Coloque o monitor 1 sobre a chapa no tubo volante 3 Fig 8 a b tendo o cuidado de não prender os cabos Prenda o monitor com os parafusos 2 10 NIVELAMENTO Depois de ter colocado a unidade no seu lugar definitivo para a realização do exercício comprove se a sua c...

Page 26: ...ite em contactar com o S A T Serviço de Assistência Técnica telefonando para o serviço de apoio ao cliente ver página final do presente manual BH RESERVA O DIREITO DE PODER MODIFICAR AS ESPECIFICAÇÕES DOS SEUS PRODUTOS SEM PRÉVIO AVISO ...

Page 27: ... scarpe correttamente 7 Usi questo apparecchio sono per gli scopi descritti in questo manuale NON usi accessori non consigliati dal fabbricante 8 Non collochi oggetti taglienti attorno alla bicicletta 9 Le persone handicappate non dovranno usare l apparecchio senza l assistenza di una persona qualificata o un medico 10 Prima di usare questo apparecchio realizzi un riscaldamento con esercizi di sti...

Page 28: ...el cavalletto posteriore dell apparecchio 1 come mostra la Fig 3 ed introduca le viti 64 collochi le rondelle 5 e stringa con forza 3 MONTAGGIO DEI PEDALI Segua con attenzione le istruzioni di montaggio dei pedali una collocazione scorretta potrebbe danneggiare il filetto del pedale o della biella Le posizioni destra e sinistra si dovranno prendere con l utente montato sul sellino in posizione pro...

Page 29: ...saldamente 8 MONTAGGIO DELLA SPALLIERA Collochi la spalliera del sellino 102 come mostra la Fig 8 collochi le viti allentate anteriormente 142 e rondelle 144 e stringa con forza Posizionare il manubrio 105 nel tubo della spalliera 102 Collochi le viti 141 e le rondelle 144 Fig 8 e stringere saldamente 9 MONTAGGIO DEL MONITOR Poi collegare i terminali che fuoriescono dal tubo manubrio 4 e 5 ed i te...

Page 30: ...olleghi il trasformatore di corrente alla rete elettrica da 220 V fig 10 Per qualsiasi domanda non esitate a mettervi in contatto con il Servizio di Assistenza Tecnica chiamando al telefono di attenzione al cliente consultare l ultima pagina del presente manuale BH SI RISERVA IL DIRITTO DI MODIFICARE LE SPECIFICHE TECNICHE DEI SUOI PRODOTTI SENZA AVVERTIMENTO PREVIO ...

Page 31: ...eningen Gebruik geen wijde kledingsstukken die zouden kunnen blijven haken in de fiets Gebruik altijd sportschoenen loopschoenen of aerobic wanneer u het apparaat gebruikt Strik uw veters goed 7 Gebruik dit apparaat uitsluitend voor de gebruiksdoeleinden zoals beschreven in deze handleiding Gebruik GEEN accessoires die niet worden aanbevolen door de fabrikant 8 Plaats geen scherpe voorwerpen in de...

Page 32: ...es 113 waarbij u er rekening mee dient te houden de twee rode stippen te plaatsen zoals wordt getoond in Fig 2 plaats de schroeven 135 Plaats de platten ringen 136 en draai stevig aan Plaats het voetstuk achter 73 en plaats dit op de steun van het voetstuk achter van het apparaat 1 zoals wordt getoond in Fig 3 plaats de schroeven 64 plaats de platten ringen 5 en draai stevig aan 3 MONTAGE VAN DE P...

Page 33: ...s de handgreep 86 de botellin houder 60 voor het vervoer buis 77 55 en schroeven zoals getoond in figuur 5 7 MONTAGE ZADEL Plaats de zitting 126 op de hoofdframe 77 zoals in Fig 6 Vervang de schroeven 143 met ringen 144 en draai deze stevig vast 8 MONTAGE VAN DE RUGSTEUN plaats de rugsteun voor het zadel 102 zoals wordt getoond in Fig 8 draai de eerder losgedraaide schroeven 142 ringen 144 weer va...

Page 34: ...op waar zo min mogelijk temperatuursschommelingen plaats vinden 12 AANSLUITING OP HET ELEKTICITEITSNET H857 Steek de verbindingsstekker g van de transformator 116 in het aansluitpunt h van het centrale frame 1 achterkant onder en sluit de transformator op een elektriciteitsnet van 220 Volt aan fig 10 Als u twijfels hebt over enig onderdeel van dit toestel aarzel dan niet contact op te nemen met de...

Page 35: ...H852 ...

Page 36: ...ode Nº Code Nº Code 1 H852001 49 H852049 105 H852105 3 H852003 50 H852050 106 H852106 4 H852004 52 H852052 107 H852107 5 H852005 59 H852059 109 H852109 9 H852009 60 H852060 111 H852111 10 H852010 61 H852061 112 H852112 11 H852011 62 H852062 113 H852113 12 H852012 63 H852063 114 H852114 15 H852015 65 H852065 116 H852116 17 H852017 67 H852067 119 H852119 20 H852020 68 H852068 122 H852122 21 H852021 ...

Page 37: ...H857 ...
Page 38: ... Nº Code 1 H857001 49 H852049 106 H852106 3 H857003 50 H852050 107 H852107 4 H857004 52 H852052 109 H852109 5 H857005 59 H852059 111 H852111 9 H852009 60 H852060 112 H852112 10 H852010 61 H852061 113 H852113 11 H852011 62 H852062 114 H852114 12 H852012 63 H852063 116 H852116 15 H852015 65 H852065 119 H852119 17 H852017 67 H852067 122 H852122 20 H852020 68 H852068 123 H852123 21 H857021 69 H852069 ...

Page 39: ...6 95 CE Deutsch Hiermit erklärt Exercycle S L dass sich das Gerät in Übereinstimmung mit den grundlegenden Anforderungen und den übrigen einschlägigen Bestimmungen der Richtlinien 2009 125 EG 2011 65 EG 2004 108 EG und 2006 95 EG befindet Português Exercycle S L declara que este producto está conforme com os requisitos essenciais e outras disposições das Directivas 2009 125 CE 2011 65 CE 2004 108 ...

Page 40: ...na Co Ltd Block A NO 68 Branch Lane 455 Lane 822 Zhen Nan RD Li Zi Yuan Putuo Shanghai 200331 P R C Tel 86 021 5284 6694 Fax 86 021 5284 6814 e mail info i bh cn BH Germany GmbH Altendorfer Str 526 45355 Essen Tel 49 201 450910 0 e mail info bhgermany com Kostenfreie Telefonnummer 0800 0996655 Ersatzteile www bhfitness com BH FITNESS UK Tel 02037347554 e mail sales uk bhfitness com AFTER SALES UK ...

Reviews: