MOD. BU1000BM
14
English
IMPORTANT SAFETY ADVICE.-
PRECAUTIONS.
This bicycle has been designed and constructed to
provide maximum safety. Nevertheless, certain
precautions should be taken when using exercise
equipment. Read the whole manual before
assembling and using the bicycle. The following safety
precautions should also be observed:
1
Keep children away from this equipment at all times.
DO NOT leave them unsupervised in the room where
this bicycle is kept.
2
It can only be used by one person at a time.
3
If you experience dizziness, nausea, chest pains or
any other symptom while using this appliance STOP
the
exercise.
SEEK
MEDICAL
ATTENTION
IMMEDIATELY
4
Use the appliance on a level, solid surface. DO NOT
use the bicycle outdoors or close to water.
5
Keep your hands well away from any of the moving
parts.
6
Wear clothing suitable for doing exercise. Do not
use baggy clothing that might get caught up in the
bicycle. Always wear running shoes or trainers when
using the machine. Make sure all laces/cords are tied
correctly.
7
This appliance must only be used for the purposes
described in this manual. DO NOT use accessories
that are not recommended by the manufacturer.
8
Do not place sharp objects near the machine.
9
Disabled people should not use the machine without
the assistance of a qualified person or a doctor.
10
Do warm up stretching exercises before using the
equipment.
11
Do not use the bicycle if it is not working correctly.
Caution: Consult your doctor before beginning to
use the bicycle. This advice is especially
important for those over 35 or suffering from
health problems. Read all of the instructions
before using any exercise equipment.
Keep these instructions safe for future use.
GENERAL INSTRUCTIONS.-
Carefully read through the instructions contained in
this manual. It provides you with important information
about assembly, safety and use of the machine.
1
This appliance has been tested and it complies with
standard EN957, suitable for professional use User
maximum weight 190kg. Braking is independent of
speed.
2
Parents and/or those responsible for children should
always take their curious nature into account and how
this can often lead to hazardous situations and
behaviour resulting in accidents. Under no
circumstances should this appliance be used as a toy.
3
The owner is responsible for ensuring that anyone
who uses the machine is duly informed about the
necessary precautions.
1. ASSEMBLY INSTRUCTIONS.-
Take the unit out of its box and make sure that all of
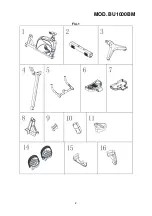
the pieces are there Fig.1:
The assistance of a second person is advisable
for the assembly work.
(1) Main body; (2) Front stabilizer; (3) Rear stabilizer;
(4) Front post; (5) Handlebar; (6) Upper tray; (7)
Lower tray; (8) Post tube cover; (9) Front cover of
console bracket; (10) Rear cover of console bracket;
(11) Saddle; (14) Pedals; (15) Saddle right cover; (16)
Saddle left cover; Console; Mains transformer.
Bag of screws containing:
(18-1) Screw M8x82; (18-2)
Washer D8; (18-3) Washer D8.5xD16xT1.5; (18-4)
Screw M8x55; (18-5) Screw M8x25; (18-6) Screw
M5x12; (18-7) Screw D5x12; (18-9) Joint; Wrenches.
2. FITTING THE STABILIZER BARS.-
Take hold of the front stabilizer bar fitted with wheels
(2), Fig.2, insert the screws (18-1), washers (18-2),
(18-3). Tighten securely.
Take the rear stabilizer (3), Fig.3, insert the screws
(18-4), washers (18-2), (18-3), tighten securely.
3. FITTING THE FRONT POST.-
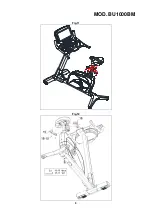
Take hold of the front post (4) and fit the lower tray (7)
and the cover (8) as shown in Fig.4. Connect the
wires of the main body with the wires of the front post,
Fig.4.
Insert the front post (4) onto the boss on the main
body.
Insert the screws (18-5), washers (18-2), (18-3), Fig.4,
and tighten securely.
Lower the cover (8) and inser the screws (18-6), Fig.5.
4. FITTING THE HANDLEBAR.-
Connect the wires, Fig.6, fit the handlebar (5) onto the
front post using the screws (18-5), washers (18-2),
(18-3), Fig.6.
5. FITTING THE MONITOR.-
Remove the back monitor cover. Remove the screws
of the back plate of the monitor.
Place the monitor onto the front post plate (4) as
shown in Fig. 7 and refit the screws.
Connect the terminals coming out of the front post (4)
and of the monitor, Fig.8.
Refit the back monitor cover with the screws, Fig.8.
Attach the front (9) and back (10) covers using the
screws (18-6), (18-7), Fig.9.
Summary of Contents for SmartFocus BU1000
Page 2: ...MOD BU1000BM 2 Fig 1...
Page 3: ...MOD BU1000BM 3...
Page 4: ...MOD BU1000BM 4 Fig 2 Fig 3...
Page 5: ...MOD BU1000BM 5 Fig 4 Fig 5...
Page 6: ...MOD BU1000BM 6 Fig 6 Fig 7 Fig 8...
Page 7: ...MOD BU1000BM 7 Fig 9 Fig 10...
Page 8: ...MOD BU1000BM 8 Fig 11 Fig 12...
Page 9: ...MOD BU1000BM 9 Fig 13 Fig 14...
Page 10: ...MOD BU1000BM 10 Fig 15 Fig 16 Fig 17 Fig 18...
Page 11: ...MOD BU1000BM 11 Fig 19...


