background image


SK

SK

SK

SK


LINE         

G790TV / G795 TV


sportkoncept


12 


ENGLISH 


SAFETY INSTRUCTIONS.- 

PRECAUTIONS. 

This bicycle has been designed and constructed to 

provide  maximum  safety.  Nevertheless,  certain 

precautions  should  be  taken  when  using  exercise 

equipment. Read through the whole manual before 

assembling and using the exercise machine. 

The  following  safety  instructions  should  also  be 

taken into consideration: 

Always  observe  basic  safety  precautions  when 

using the SK treadmill, including the following:  


1

-  To  guarantee  your  safety  and  that  of  the 

equipment read through these instructions carefully 

before installing and/or using the machine. 


2

-  To  ensure  correct  and  safe  use  of  the 

equipment,  make  sure  that  all  those  who  use  the 

machine have read this manual or are aware of its 

content.  The  contents  of  this  manual  should  form 

part  of  your  centre’s  training  program.  Remind 

users that they should  have passed a full medical 

examination before they  embark upon any type of 

exercise program. 


3

-

  To  reduce  the  risk  of  electric  shock,  always 

unplug  the  unit  before  proceeding  to  carry  out 

cleaning and/or maintenance tasks. 


4-

  To


reduce  the  risk  of  burns,  fire,  electrical 

shocks  or  personal  injuries,  observe  the  following 

precautions: 


5

-  Do  not  allow  children  or  people  who  are 

unfamiliar  with  the  operation  of  the  appliance  get 

too  near  and/or  on  the  unit.  Under  no 

circumstances  must  this  appliance  be  used  as  a 

toy  


6

-  Do  not  leave  the  treadmill  operating 

unsupervised.  Unplug  the  unit  from  the  mains 

supply  when  not  in  use  and  before  cleaning  it  or 

removing any of its component parts.  Never adjust 

the drive belt while the treadmill is being used. 


7

- Install and use the SK on a flat, stable surface. 

Do not place it alongside walls or furniture. Check 

the  unit  before  each  use  and  make  sure  that  the 

band in good


condition.  


8

Keep the appliance in good working order. 


9

- The SK must only be used as described in this 

manual.  Do  not  use  accessories  that  are  not 

recommended by the manufacturer, as these may 

cause injuries. 


10

-The  SK  can  only  be  used  by  one  person  at  a 

time. 


Safeguard these instructions 


GENERAL INSTRUCTIONS.- 

Carefully read through the instructions contained in 

this manual. 

It  provides  you  with  important  information  about 

assembly, safety and use of the machine.  


1

-  This  unit  has  been  designed  for  professional 

use.  The  weight  of  the  user  must  not  exceed 

150kg. 


2

-  Keep  your  hands  well  away  from  any  of  the 

moving parts.  


3

-  The  owner  is  responsible  for  ensuring  that 

anyone  who  uses  the  machine  is  duly  informed 

about all of the necessary precautions. 


4

- Be careful when stepping on or off the SK. Use 

the  side  supports  whenever  necessary.  Start  the 

exer-cise  on  the  treadmill  belt  at  a  speed  of  less 

than 3 km/h.  


5

Do not step off the belt while it is still in motion.  


6- 

Keep your body and head facing forwards.  


7- 

Never  try  to  turn  around  while  using  the 

equipment. 


8

- Do not start the machine while there is someone 

on it. 


9

- Wear appropriate clothing and footwear for the 

exercise. Do not wear baggy clothing. Tie your hair 

up if it is long. 


10

-  Do  not  exert  too  much  force  on  the  frame  of 

the  machine.  Do  not  lean  against  the  electronic 

monitor console or the machine casing. 


11

-  Do  not  drop  or  insert  objects  into  any  of  the 

openings on the machine. Keep hands and towels 

well away from moving parts. 


12

-  Do  not  overexert  yourself  or  exercise  beyond 

your  capabilities.  Stop  exercising  immediately  if 

you  are  in  pain  or  feel  strange,  and  seek 

professional medical advice. 


13

-  Do  not  use  the  equipment  in  areas  where 

aerosol sprays are used. 


Summary of Contents for G790TV

Page 1: ...pt Instrucciones de montaje y utilización Instructions for assembly and use Instructions de montage et utilisation Montage und gebrauchsanleitung Instruções de montagem e utilização Istruzioni di montaggio e uso Montage en gebruiksinstrukties ...

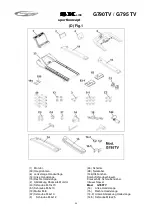
Page 2: ... Tapa trasera Monitor 40 Tornillo de M 10x70 5 1 Tornillo de M 5x10 13 Tuerca de M 8 37 Tornillo de M 4x10 3 Tornillo de M 4x12 34 Interruptor 38 Cable electrico de red 144 Bote de lubricante Llave combinada Llave punta en cruz Llave de allen Mod G795TV 14 Barandilla Izquierda 15 Barandilla Derecha 14 3 Tapa inferior barandilla 14 5 Tornillo de M 8x25 ...

Page 3: ...SK SK SK SKLINE G790TV G795 TV sportkoncept Fig 2 Fig 3 Fig 4 Fig 5 ...

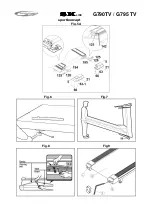
Page 4: ...SK SK SK SKLINE G790TV G795 TV sportkoncept Fig 5A Fig 6 Fig 7 Fig 8 Fig 9 ...

Page 5: ...ndo la cinta 7 Instale y utilice el modelo SK en una superficie lisa y estable No lo ubique al lado de una pared o de mobiliario Verifique la unidad antes de cada uso y asegúrese de que la banda está en buen estado 8 Mantenga el aparato en óptimas condiciones de utilización 9 Utilice el modelo SK únicamente de la forma indicada en este manual No utilice accesorios anexos que no estén recomendados ...

Page 6: ...ndo aerosoles 21 No utilizar la máquina al aire libre 22 No realice tareas de mantenimiento y o reparación más allá de las indicadas en este manual Para tareas más complejas póngase en contacto con el servicio técnico PROTECCIÓN Este modelo está dotado de una protección electrónica de parada automática para una óptima conservación de los circuitos tanto electrónicos como eléctricos Esta protección...

Page 7: ... chapa de sujeción monitor Fig 5 e introduzca los tornillos 5 1 teniendo cuidado de no pillar los cables y atornille 7 COLOCACIÓN CHAPA TRASERA DEL MONITOR Coja la tapa trasera del monitor 2 Fig 5 y posicionela Coja los tornillos 3 y atornille 8 COLOCACIÓN TACOS TRASEROS Coloque los soportes 194 195 y atorníllelos con los tornillos 125 y las arandelas 126 Coloque los tacos traseros 63 y 63 1 como ...

Page 8: ...ICIÓN FÍSICA Estar en forma física significa vivir plenamente En la sociedad moderna se sufre de una gran tensión El tipo de vida en las grandes ciudades es básicamente sedentario Nuestro régimen se ha vuelto demasiado rico en calorías y grasas Los médicos son unánimes en recomendar la práctica regular de ejercicio para controlar mejor nuestro peso mejorar nuestra forma física y relajarnos VENTAJA...

Page 9: ...ecte la unidad y desenchufe el cable de la red Limpie el polvo de las superficies de la cinta de andar especialmente las barandillas y la consola electrónica con un paño o una toalla húmeda No utilice disolventes Utilice un aspirador para aspirar cuidadosamente alrededor de todos los componentes visibles cinta estructura etc Apoyando la unidad sobre uno de los laterales también se puede aspirar la...

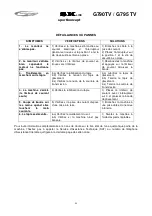
Page 10: ...a deslizamiento 3 c Comprobar tensión correa de transmisión 3 a Lubricar la banda de deslizamiento 3 b Tensar la banda de deslizamiento 3 c Tensar la correa de transmisión 4 La máquina se para salta el limitador de corriente 4 Comprobar lubricación banda 4 Pulsar el limitador de corriente con el interruptor en 0 y lubricar la banda de deslizamiento 5 La barandilla da calambres en las manos 5 Compr...

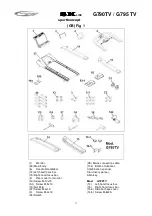
Page 11: ...ght hand focus bar 2 Rear cover for monitor 40 Screw M 10x70 5 1 Screw M 5x10 13 Nut M 8 37 Screw M 4x10 3 Screw M 4x12 34 Switch 38 Mains connection cable 144 Bottle of lubricant Combination spanner Star driver spanner Allen key Mod G795TV 14 Left hand focus bar 15 Right hand focus bar 14 3 Side bar base cover 14 5 Screw M 8x25 ...

Page 12: ... a flat stable surface Do not place it alongside walls or furniture Check the unit before each use and make sure that the band in good condition 8 Keep the appliance in good working order 9 The SK must only be used as described in this manual Do not use accessories that are not recommended by the manufacturer as these may cause injuries 10 The SK can only be used by one person at a time Safeguard ...

Page 13: ...cated on the casing to the 0 OFF position Fig B 2 Press the circuit button C to reset the unit 3 Next set switch L to the I ON position and the unit will be ready for use again Should the circuit breaker trip repeatedly then the most probable causes are Abnormal working conditions Treadmill belt in need of lubricant Solvent based lubricants used use BH type Belt is too tight Plug the unit into a w...

Page 14: ...The unit is equipped with wheels 88 Fig 7 to make it easier to move Make sure that the mains cable is unplugged from the wall socket If you wish to move the treadmill tilt the treadmill Fig 7 so that the wheels 88 rest on the floor NOTE To prevent accidents DO NOT move the treadmill across uneven floors MAINTENANCE Use the bottle of lubricant 144 to lubricate the inside of the belt Fig 8 in order ...

Page 15: ...r weight or for physiotherapy always remember that your exercise should be gradual planned varied and not too demanding We recommend that you should exercise 3 to 5 times per week Before beginning a session it is important to do a warm up for 2 3 minutes at low speed This will help protect your muscles and prepare your cardiorespiratory system The next stage will last 15 20 minutes at a pulse rate...

Page 16: ... Check the tension on the sliding belt 3 c Check the tension on the drive belt 3 a Lubricate the sliding belt 3 b Adjust the belt tension 3 c Adjust the drive belt tension 4 The machine stops the breaker trips 4 Check that the band is lubricated 1 Reset the overload button with the On Off switch at 0 and lubricate the treadmill band 5 Electrical shocks through the handrail 5 Check that the machine...

Page 17: ...roite 2 Couvercle arrière moniteur 40 Vis de M 10x70 5 1 Vis de M 5x10 13 Écrou de M 8 37 Vis de M 4x10 3 Vis de M 4x12 34 Interrupteur 38 Câble électrique de branchement 144 Pot de lubrifiant Clé combinée Clé pointe en étoile Clé Allen Mod G795TV 14 Main courante gauche 15 Main courante droite 14 3 Couvercle inférieur main courante 14 5 Vis M 8x25 ...

Page 18: ...ité du courant électrique Ne pas poser la ceinture si une autre personne est en train d utiliser le tapis de course 7 Installez et utilisez le modèle SK sur une surface lisse et stable Ne le placez pas près d un mur ni d un meuble Vérifiez l appareil avant chaque utilisation et assurez vous que la selle est en bon état 8 L appareil doit être conservé dans d excellentes conditions d utilisation 9 L...

Page 19: ... pour débrancher l appareil 19 Tenir le cordon de branchement à l écart des surfaces chaudes 20 Ne pas utiliser l appareil dans des lieux où sont employés des aérosols 21 Ne pas utiliser le tapis en plein air 22 Ne pas effectuer des opérations d entretien et ou des réparations autres que celles indiquées dans cette notice En ce qui concerne des opérations plus compliquées adressez vous au service ...

Page 20: ... ensuite introduire les connecteurs dans le trou percé dans la tôle de fixation du moniteur Fig 5 et introduisez les vis 5 1 en veillant à ne pas pincer les câbles puis vissez 7 MISE EN PLACE DE LA PLAQUE ARRIÈRE DU MONITEUR Prenez la plaque arrière du moniteur 2 Fig 5 et posez la à sa place Prenez les vis 3 et vissez les 8 MISE EN PLACE DE LES CAPUCHONS D EXTREMITÉ ARRIÈRE Placez les supports 194...

Page 21: ... montre de la vis gauche L En cas de déplacements excessifs il est possible d intervenir simultanément sur l une ou l autre vis pour éviter des tensions trop importantes du tapis MODE D EMPLOI CONDITION PHYSIQUE Se trouver en excellente forme physique équivaut à vivre pleinement La société moderne nous fait vivre complètement stressés Dans les grandes villes le type de vie est majoritairement séde...

Page 22: ...sion Vous pourrez constater vous même qu il est intéressant de rester en forme avec BH INSPECTIONS ET ENTRETIEN Déconnectez l appareil et débranchez le câble de la ligne de courant Époussetez à l aide d un chiffon ou d une serviette humide les surfaces du tapis de course en insistant sur les mains courantes et sur la console électronique Ne pas utiliser de solvants Passez avec précaution l aspirat...

Page 23: ...ifiez la tension de la courroie de transmission 3 a Lubrifiez le tapis de glissement 3 b Tendre le tapis de glissement 3 c Tendre la courroie de transmission 4 La machine s arrête le limiteur de courant saute 4 Vérifiez la lubrification du tapis 1 Placez le limiteur de courant avec l interrupteur sur 0 et graissez la bande de glissement 5 Coups de bourre sur les mains quand elles touchent la main ...

Page 24: ...stange 2 Abdeckung Rückseite Monitor 40 Schraube M 10x70 5 1 Schraube M 5x10 13 Mutter M 8 37 Schraube M 4x10 3 Schraube M 4x12 34 Schalter 38 Netzkabel 144 Ölkännchen Kombi Schraubschlüssel Kreuzschlitz Schraubenzieher Inbusschlüssel Mod G795TV 14 Linke Handstange 15 Rechte Handstange 14 3 Untere Abdeckung Haltestange 14 5 Schraube M 8x25 ...

Page 25: ... sich jemand auf dem Band befindet 7 Das Modell SK muss auf einer ebenen und stabilen Fläche installiert und benutzt werden Stellen Sie es nicht neben einer Wand oder einem Möbel auf Vor jeder Benutzung ist das Gerät zu überprüfen und sicherzustellen dass das Band in einwandfreiem Zustand sind 8 Sorgen Sie dafür dass sich das Gerät stets in optimalen Nutzungsbedingungen befindet 9 Benutzen Sie das...

Page 26: ...ät nicht benutzt werden 21 Benutzen Sie das Gerät nicht im Freien 22 Beschränken Sie Instandhaltungsmaßnahmen und oder Reparaturen auf die in diesem Handbuch angegebenen Bei komplexeren Arbeiten setzen Sie sich bitte mit dem technischen Kundendienst in Kontakt SICHERUNGEN Dieses Modell verfügt über eine elektronische Schutzvorrichtung die das Gerät automatisch anhält um den optimalen Zustand der e...

Page 27: ...lterungsblech des Monitors Fig 5 Setzen Sie die Schrauben 5 1 ein und ziehen Sie sie fest Achten Sie dabei darauf dass die Kabel nicht eingeklemmt werden 7 ANBRINGEN DER ABDECKUNG AUF DER RÜCKSEITE DES MONITORS Positionieren Sie die Abdeckung 2 Fig 5 auf der Rückseite des Monitors Ziehen Sie die Schrauben 3 fest 8 ANBRINGEN HINTEREN ENDKAPPEN Legen Sie die Klammern 194 195 und ziehen Sie sie mit S...

Page 28: ...e Wirkung hat wie eine Drehung der linken Schraube L gegen den Uhrzeigersinn Bei übermäßigen Verschiebungen des Bandes können Sie daher alternativ die eine oder andere Schraube betätigen um ein übermäßiges Spannen der Bahn zu vermeiden BENUTZUNGSHINWEISE PHYSISCHE KONDITION In guter Form zu sein bedeutet voll das Leben zu genießen In der modernen Gesellschaft ist man großer Anspannung ausgesetzt D...

Page 29: ...t Mit einem geplanten Übungsprogramm werden Sie schnell die Vorteile feststellen sich besser kräftiger fühlen und Spannungssituation besser ertragen Sehen Sie selbst Es lohnt sich sich mit BH in Form zu halten INSPEKTIONEN UND WARTUNG Schalten Sie das Gerät ab und unterbrechen Sie den Netzanschluss Entfernen Sie den Staub von dem Laufband insbesondere von den Haltestangen und der Elektronikeinheit...

Page 30: ...Bandes 3 b Prüfen Sie die Spannung des Gleitbandes 3 c Prüfen Sie die Spannung des Antriebsriemens 3 a Schmieren Sie das Gleitband 3 b Spannen Sie das Gleitband 3 c Spannen Sie den Antriebsriemen 4 Die Maschine bleibt stehen der Strombegrenzer löst aus 4 Prüfen Sie die Schmierung des Bandes 1 Stellen Sie den Schalter auf 0 und betätigen Sie den Strombegrenzer Schmieren Sie das Gleitband 5 Elektris...

Page 31: ...a traseira Monitor 40 Parafuso de M 10x70 5 1 Parafuso de M 5x10 13 Porca de M 8 37 Parafuso de M 4x10 3 Parafuso de M 4x12 34 Interruptor 38 Cabo eléctrico de electricidade 144 Recipiente de lubrificante Chave ponta em cruz Chave combinada Chave de Allen Mod G795TV 14 Grade Esquerda 15 Grade Direita 14 3 Tampa inferior corrimão 14 5 Parafuso de M 8x25 ...

Page 32: ... a passadeira 7 Instale e utilize o modelo SK numa superfície lisa e estável Não o coloque ao lado de uma parede ou de mobiliário 8 Verifique a unidade antes de cada uso e certifique se que o selim está em bom estado Mantenha o aparelho em óptimas condições de utilização 9 Só deverá utilizar o modelo SK segundo a forma indicada neste manual Não utilize acessórios anexos que não tenham sido recomen...

Page 33: ...ado de superfícies quentes 20 Não deverá utilizar o equipamento em lugares que se estejam a usar aerossóis 21 Não deverá utilizar a máquina ao ar livre 22 Não realize tarefas de manutenção e ou reparação para além das indicadas neste manual Para tarefas mais complexas ponha se em contacto com o serviço técnico PROTECÇÃO Este modelo possui uma protecção electrónica de paragem automática para uma óp...

Page 34: ...uidado de não apanhar os cabos e aparafuse 7 COLOCAÇÃO CHAPA TRASEIRA DO MONITOR Posicione a tampa traseira do monitor 2 Fig 5 Aperte os parafusos 3 8 COLOCAÇÃO DAS TAMPAS DE EXTREMIDADE TRASEIRAS Coloque os suportes 194 195 e aperte os com parafusos 125 e porcas 126 Coloque as tampas de extremidade traseira 63 e 63 1 como mostrado na Figura 5A e fixá los com os parafusos 5 66 21 NIVELAÇÃO Uma vez...

Page 35: ...as e gorduras Os médicos são unânimes em recomendar a prática regular de exercício para controlar o nosso peso melhorar o nosso peso melhorar a nossa forma física e relaxar nos VANTAGENS DE PRATICAR EXERCÍCIO Um exercício regular por baixo de um certo nível e de uma duração de 15 20 minutos é aeróbio O exercício aeróbio é o exercício que fundamentalmente utiliza oxigénio Normalmente tratase de um ...

Page 36: ...la electrónica com um pano ou com uma toalha húmida Não utilize dissolventes Utilize um aspirador para aspirar cuidadosamente á volta de todos os componentes visíveis faixa estrutura etc Apoiando a unidade sobre um dos laterais também poderá aspirar a parte inferior Aspire também o interior da caixa do motor soltando a tampa que protege o motor tenha cuidado com os cabos Comprove periodicamente se...

Page 37: ...ão banda deslizamento 3 c Comprove tensão correia de transmissão 3 a Lubrifique a banda de deslizamento 3 b Deixe a banda de deslizamento tensa 3 c Deixe a correia de transmissão tensa 4 A máquina pára salta o limitador de corrente 4 Comprove lubrificação banda 1 Apertar o limitador de corrente com o interruptor em 0 e lubrifique a banda de deslizamento 5 O corrimão dá choques nas mãos 5 Comprove ...

Page 38: ...rchio posteriore Monitor 40 Vite di M 10x70 5 1 Vite di M 5x10 13 Dado di M 8 37 Vite di M 10x70 3 Vite di M 4x12 34 Interruttore 38 Cavo elettrico per la rete di alimentazione 144 Contenitore lubrificante Chiave a croce Chiave combinata Chiave allen Mod G795TV 14 Corrimano Sinistro 15 Corrimano Destra 14 3 Protezione inferiore appoggio 14 5 Vite di M 8x25 ...

Page 39: ...e se non è in uso prima di pulire o smontare qualsiasi pezzo Non regolare la fascia se si sta utilizzando la cinta 7 Installi ed usi il modello SK in una superficie piana e stabile Non collocarlo accanto ad un muro o ad un mobile Controlli l apparecchio prima di ogni uso e si assicuri che il nastro è in buono stato 8 Mantenga l apparecchio in ottime condizioni d uso 9 Usi il modello SK solamente c...

Page 40: ...arecchio 19 Mantenga il cordone della spina lontano da superfici calde 20 Non utilizzare la macchina in luoghi in cui si fa uso di aerosoli 21 Non utilizzare la macchina all aria aperta 22 Non realizzi lavori di manutenzione ed o riparazione diversi da quelli indicati in questo manuale Per lavori più complicati si metta in contatto con il servizio tecnico PROTEZIONE Questo modello ha una protezion...

Page 41: ... il foro O della lamiera che sorregge lo schermo Fig 5 ed introdurre le viti 5 1 facendo attenzione a non prendere i cavi ed avvitare 7 MONTAGGIO LAMIERA POSTERIORE DEL MONITOR Prendere il coperchio posteriore del monitor 2 Fig 5 e posizionarlo Prendere le viti 3 ed avvitarle 8 MONTAGGIO DI TAPPI POSTERIORI Posizionare le staffe 194 195 e serrare con le viti 125 ei dadi 126 Posizionare i tappi pos...

Page 42: ...ssivi potrebbe procedere alternativamente con una vite o l altra per evitare di tesare troppo il nastro ISTRUZIONI D USO CONDIZIONE FISICA Essere in una buona forma fisica significa vivere pienamente Nella società moderna si soffre una gran tensione Il tipo di vita delle grandi città è principalmente sedentario La nostra dieta è diventata troppo ricca in calorie e grassi I medici sono unanimi nel ...

Page 43: ...a alla tensione Giudicherà lei stesso che vale la pena mantenersi in forma con BH ISPEZIONI E MANUTENZIONE Spenga l apparecchio e stacchi il cavo dalla rete elettrica Pulisca la polvere dalle superfici del tapis roulant con un panno od un asciugamano umido specialmente gli appoggi i corrimano e l elettro nico Non usi dissolventi Usi un aspirapolvere per aspirare con attenzione attorno a tutti i co...

Page 44: ... nastro di slittamento 3 c Verificare la tensione della cinghia di trasmissione 3 a Lubrificare il nastro di slittamento 3 b Tesare il nastro di slittamento 3 c Tesare la cinghia di trasmissione 4 L apparecchio si ferma salta il limitatore di corrente 4 Verificare la lubrificazione del nastro 1 Premere il limitatore di corrente con l interruttore a 0 e lubrificare il nastro di scorrimento 5 Il cor...

Page 45: ... 2 Achterkantbedekking van monitor 40 Schroef M 10x70 5 1 Schroef M 5x10 13 Moer M 8 37 Schroef M 4x10 3 Schroef M 4x12 34 Schakelaar 38 Verbindingssnoer lichtnet 144 Fles smeermiddel Combinatiesteeksleutel Kruiskopsteeksleutel Stiftsleutel Mod G795TV 14 Linkerfocusbalk 15 Rechterfocusbalk 14 3 Afdekdeel frame onder 14 5 Schroef M 8x25 ...

Page 46: ...het niet in gebruik is en alvorens het schoon te maken of enig onderdeel ervan te verwijderen Pas de aandrijfband nooit aan terwijl de tredmolen in gebruik is 7 Installeer en gebruik de SK op een effen en stabiel oppervlak Plaats het toestel niet in de buurt van muren of meubilair Controleer het apparaat voor elk gebruik en ga na of de band in goede staat is 8 Hou het apparaat in optimale gebruiks...

Page 47: ...sen waar er spuitbussen worden gebruikt 21 Het apparaat niet in open lucht gebruiken 22 Voer geen andere onderhouds en of herstellingswerken uit dan degene die in deze handleiding worden uitgelegd Voor ingewikkelde taken neem contact met de technische dienst op BESCHERMING Dit model is uitgerust met een elektronische automatische stop beveiliging die voor een optimaal behoud van zowel de elektroni...

Page 48: ...indingen van de aansluits tukken door het gat in de ondersteuningsplaat van de monitor Fig 5 bevestig schroeven 5 1 controlerend dat geen van de kabels in de knel komt en maak alles goed vast 7 DE ONDERSTEUNING VAN DE ACHTERKANT VAN DE MONITOR BEVESTIGEN Neem de achterkantbedekking van de monitor 2 Fig 5 en plaats die in positie Gebruik schroeven 3 om hem goed vast te maken 8 DE ACHTER EINDCAPPEN ...

Page 49: ... van de klok in van de linkerschroef L Bij geval van grote afwijkingen kunt u beurtelings de linker en rechterschroef gebruiken om een te grote spanning van de band te voorkomen GEBRUIKSAANWIJZINGEN LICHAMELIJKE CONDITIE Over een goede lichamelijke conditie beschikken is voluit leven In de huidige maatschappij heerst veel stress In de grote steden leidt men grotendeels een zittend bestaan Onze eet...

Page 50: ...e men niet mag overschrijden overeenkomstig de leeftijd Aan het einde van iedere oefening is het belangrijk de spieren tot rust te laten komen Hiervoor kunt u volstaan door gedurende 2 3 minuten met een lichte snelheid te blijven lopen totdat uw hartslag beneden de 65 daalt Dit voorkomt spierpijn in het bijzonder na een intensieve training Het verdient ook aanbeveling het programma af te sluiten m...

Page 51: ...roleer de spanning van de band 3 c Controleer spanning van de overbrengingsriem 3 b Smeer de band 3 b Span de band 3 c Span de overbrengingsriem 4 Het apparaat slaat af de stroombegrenzer slaat af 4 Controleer de smering van de band 1 Druk op de stroombegrenzer met de schakelaar in positie 0 en smeer de band 5 Het frame geeft elektrische schokken in de handen 5 Controleer of het apparaat is aanges...

Page 52: ...SK SK SK SKLINE G790TV G795 TV sportkoncept 52 G790TV ...

Page 53: ...90 G690090 134 G690134 8 G690008 54 G690054 91 G690091 135 G690135 12 G690012 55 G690055 92 G690092 136 G690136 13 G690013 56 G690056 93 G690093 137 G690137 14 G790014 57 G690057 94 G690094 138 G690138 15 G790015 58 G690058 95 G690TV095 139 G690139 16 G690016 59 G690059 97 G690TV097 140 G690140 17 G690017 60 G690060 98 G790098 141 G690141 18 G690018 60 1 G690060 1 99 G690099 142 G690142 19 G690019...

Page 54: ...t 54 35 G690035 76 G690076 122 G690122 C21 G790TVC21 36 G690036 77 G690077 123 G690123 E1 G790E1 37 G690037 78 G790078 124 G690124 E11 G790E9 38 G690038 79 G690079 125 G690125 39 G690039 80 G690080 126 G690126 40 G690040 81 G690081 127 G690127 ...

Page 55: ...SK SK SK SKLINE G790TV G795 TV sportkoncept 55 G795TV ...

Page 56: ...132 8 G690008 53 G690053 91 G795TV091 133 G690133 12 G690012 54 G690054 92 G790TV092 134 G690134 13 G690013 55 G690055 93 G790TV093 135 G690135 14 G795014 56 G690056 94 G790TV094 136 G690136 14 1 G795014 1 57 G690057 95 G790TV095 137 G690137 14 2 G795014 2 58 G690058 97 G790TV097 138 G790TV138 14 3 G795014 3 59 G690059 98 G790098 139 G690139 15 G795015 60 G690060 99 G690099 140 G690140 15 1 G79501...

Page 57: ...795033 76 G690076 119 G690119 C17 G790C17 34 G690034 77 G690077 120 G690120 C20 G790TVC20 35 G690035 78 G790078 121 G690121 C21 G790TVC21 36 G690036 79 G690079 122 G790TV122 E1 G790E1 37 G690037 80 G690080 123 G790TV123 E11 G790E9 38 G690038 81 G690081 124 G690124 39 G690039 82 G795082 125 G690125 ...

Page 58: ...n Übereinstimmung mit den grundlegenden Anforderungen und den übrigen einschlägigen Bestimmungen der Richtlinien 2004 108 EG 2006 95 EG und 2006 42 EG befindet Português Exercycle S L declara que este producto está conforme com os requisitos essenciais e outras disposições das Directivas 2004 108 CE 2006 95 CE e 2006 42 CE Italiano Con la presente Exercycle S L dichiara che questo prodotto è confo...

Page 59: ...6 021 5284 6694 Fax 86 021 5284 6814 e mail info i bh cn BH HIPOWER UK Unit 12 Arlington Court Newcastle Staffs ST5 6SS UK 0844 3353988 International 00441782634703 AFTER SALES UK e mail service bh uk co uk BH HIPOWER FRANCE SAV FRANCE Tel 33 0810 000 301 Fax 33 0810 000 290 savfrance bhfitness com BH Germany GmbH Altendorfer Str 526 45355 Essen Tel 49 201 450910 0 e mail germany bhfitness com Kos...

Reviews: