Assembly
7.
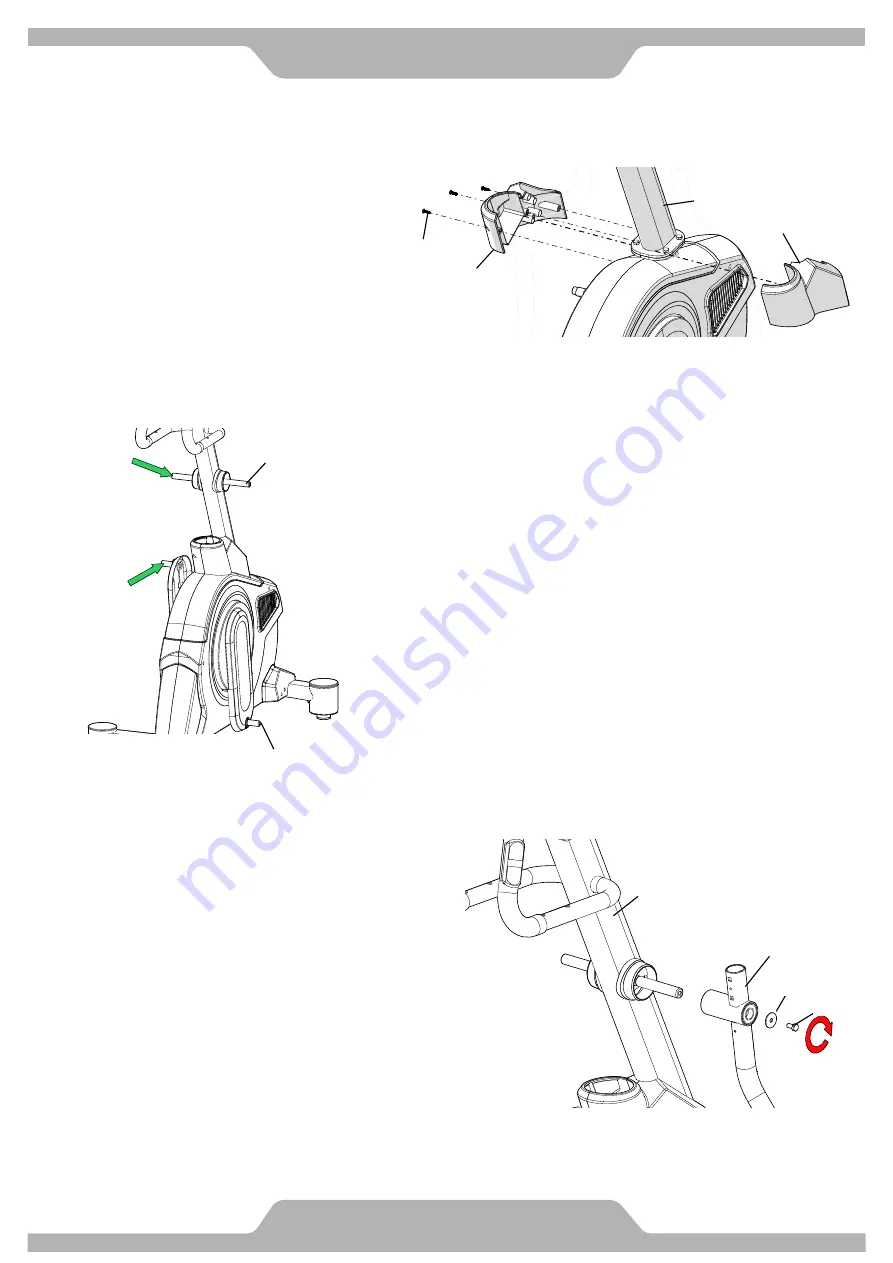
DECORATIVE COVER INSTALLATION
7. 1
Assemble 1 set of UPRIGHT POST DECORATIVE COVERS
[C07/C08] to the UPRIGHT POST [A02] with 3 M5 screws [B21].
[Tighten screws with the Hex Tool with Phillips Screwdriver provided.]
8.
LUBRICATING OIL
8. 1
Apply some lubricants onto both horizontal axles of the UPRIGHT POST [A02]
and both axles of the CRANK [A12].
Remark:
Gently apply lubricant evenly on UPRIGHT POST [A02].
Brush tool is recommended.
9.
FOOT BAR ASSY INSTALLATION
9. 1
Insert the HANDRAIL ARM [A04] all the way onto the
horizontal axle of UPRIGHT POST [A02] and secure the
HANDRAIL ARM [A04] in position with 1 M8 bolt [B32] and
1 5/16” Washer [B33]
.
9. 2
Repeat above steps to install the left side parts
[Tighten screws with the Hex Tool with Phillips Screwdriver provided.]
A02
A12
A02
B21
C07
A02
C08
A04
B33
B32
G863
T
Elliptical User Manual
Summary of Contents for G863T
Page 1: ...EllipticalUserManual G863T G863T G863T Version 1 00...
Page 20: ...G863T Elliptical User Manual III Bluetooth connection Computer...
Page 21: ...G863T Elliptical User Manual Computer...
Page 24: ...1 2 3 4 5 6 7 8 9 10 11 360 160 35 G863T...
Page 33: ...G863T...
Page 34: ...G863T...
Page 40: ...APP Store 2 IPOD Touch Bluetooth ID 3 HOME Pedal Monitor BT IPOD G863T...
Page 41: ...G863T...
Page 42: ...15 15 15 15 G863T...
Page 43: ...1 2 3 4 5 6 7 8 9 10 11 360 160 35 G863T...
Page 52: ...G863T...
Page 53: ...G863T...
Page 59: ...APP Store 2 IPOD Touch Bluetooth ID 4 HOME Pedal Monitor BT IPOD G863T...
Page 60: ...G863T...
Page 61: ...15 15 15 15 G863T...
Page 62: ...Memo...
Page 63: ...Memo...


