Assembly
11.
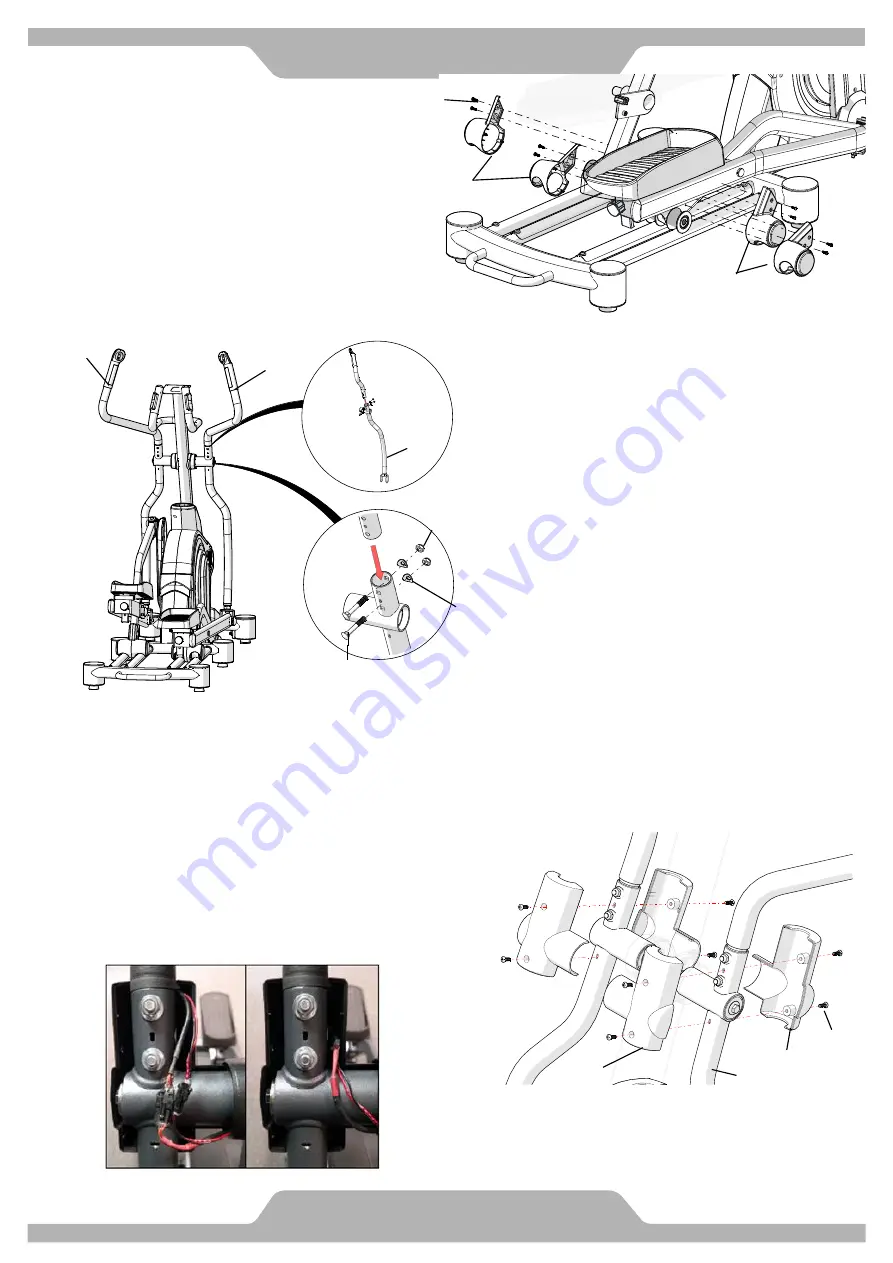
Wheel Cap Covers Installation
11. 1
Assemble 2 sets of Wheel Caps [C27/C28] to
the wheel of the Left/Right Rotate Tube
[A07/A08] with 8 Screws
M5 [B21]
[Tighten nylon nuts with the Hex Tool with Phillips Screwdriver provided.]
12.
HANDRAIL INSTALLATION
12. 1
Assemble HANDRAIL [A14] to HANDRAIL ARM [A04]
with 2 M8 bolts [B28], 2 M8 curve washers [B30] and 2
M8 nylon nuts [B29].
12. 2
Refer above step to assemble left side part.
[Tighten nylon nuts with the Hex Tool with Phillips
Screwdriver provided.]
13.
DECORATIVE COVER INSTALLATION
13. 1
Assemble 1 set of HANDRAIL ARM DECORATIVE COVER -A/B
[C17/C18] to the HANDRAIL ARM [A04] with 4 M5 screws [B21].
13. 2
Refer to FIG. 13.2a and 13.2b To ensure the wires do not get
pinched 13.2 Connect the matching connectors as shown in Fig.
13.2a. Carefully insert the connectors and excess wire into the
opening in the C17 cap as shown in Fig. 13.2b.
13. 3
Refer above step to assemble left side parts.
[Tighten screws with the Hex Tool with Phillips Screwdriver provided.]
C18
B21
C17
A04
A14
A13
A04
B29
B30
B28
B21
C27
C28
FIG. 13.2a
FIG. 13.2b
G863
T
Elliptical User Manual
Summary of Contents for G863T
Page 1: ...EllipticalUserManual G863T G863T G863T Version 1 00...
Page 20: ...G863T Elliptical User Manual III Bluetooth connection Computer...
Page 21: ...G863T Elliptical User Manual Computer...
Page 24: ...1 2 3 4 5 6 7 8 9 10 11 360 160 35 G863T...
Page 33: ...G863T...
Page 34: ...G863T...
Page 40: ...APP Store 2 IPOD Touch Bluetooth ID 3 HOME Pedal Monitor BT IPOD G863T...
Page 41: ...G863T...
Page 42: ...15 15 15 15 G863T...
Page 43: ...1 2 3 4 5 6 7 8 9 10 11 360 160 35 G863T...
Page 52: ...G863T...
Page 53: ...G863T...
Page 59: ...APP Store 2 IPOD Touch Bluetooth ID 4 HOME Pedal Monitor BT IPOD G863T...
Page 60: ...G863T...
Page 61: ...15 15 15 15 G863T...
Page 62: ...Memo...
Page 63: ...Memo...


