


Operating the Ministand
16
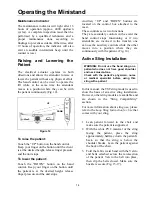
5.
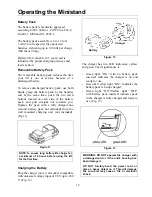
Place the sling loops on the Ministand™
arm hooks according to the sling’s
instructions. The patient's arms must be
over the sling, and the patient must hold
onto the arms of the Ministand™.
6.
Press the “UP” button to raise the patient
slightly. Check to make sure that there are
no obstacles in the way. If you find that
the sling has loosened a bit around the
waist of the patient, tighten the belts
around the patient’s waist. Once the
patient is secure, continue to raise the
patient until he/she is above the chair or
toilet before moving to the next transfer
point.
NOTE: For increased comfort, instruct the
patient to let himself/herself lie back in the
sling during the transfer.
7.
Move the patient directly over the point of
transfer and lock the wheels on the
wheelchair or bed. When the patient is
positioned against the chair or bed, lock
the rear wheels on the Ministand™.
8.
Slowly lower the patient by pressing the
“DOWN” button. As you lower the
patient, use the handles on the back of the
sling to position the patient in the chair.
9.
Lower the arms of the Ministand™ to its
lowest point.
10.
Remove the sling straps from the arms of
the Ministand™.
11.
Lift the patient's feet off the foot rest and
move the lift a few inches away from the
patient. Sling may be removed from
around the patient.
Main Actuator Failure
In case of a main actuator failure, position the
lift where the patient may be lowered and
with the help of a second attendant, support
the patient, detach the sling and set the patient
down on a bed or chair.


