Disinfection, Cleaning and Maintenance
18
Maintenance Schedule
The Ministand™ is subject to wear and tear, and the following actions must be performed when specified
to ensure that the product remains within its original manufacturing specifications.
WARNING: The points on this checklist are the minimum the manufacturer recommends. In some cases
more frequent inspections should be carried out. Continuing to use this equipment without conducting
regular inspections or continuing to use this equipment when a fault is found will seriously compromise
the safety of both the user and the patient. Local regulations and standards may be higher than those of
the manufacturer. Preventive maintenance specified in this manual can prevent accidents.
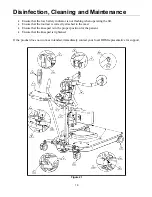
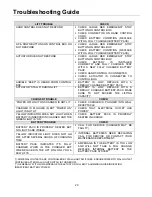
Refer to diagram on the following page for the location of each inspection area.
These procedures are supplied as a guideline for personnel who are responsible for the maintenance and
safety inspections of patient handling devices. The manufacturer accepts no responsibility for ongoing
inspections and checks. These are guidelines only and are not intended as a substitute for a regular,
thorough equipment maintenance program.
The first inspection must be carried out initially a first time using the lift and then every month.
Note: if during your inspection any bolt, nut or structural fastener is removed, it is imperative that you
reinstall all associated safety devices such as cotter pins, split rings and lock nuts. If one of these devices
is defective, you must replace it with an original new component.
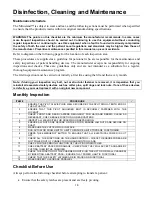
Monthly Inspection
ITEM #
PROCEDURE
√
1
ENSURE THE PIVOT CLEVIS PIN IS WELL SECURED BY THE SPLIT RING AT BOTH END OF
THE ACTUATOR.
2
ENSURE THAT THIS PIVOT SHOULDER BOLT IS SECURELY FASTENED WITH THE
LOCKNUT.
3
CHECK FRONT AND REAR CASTERS REGULARLY FOR HAIR AND DEBRIS, CLEAN AS
NECESSARY, CHECK BRAKE FUNCTION ON REAR CASTERS.
4
INSPECT ALL WELD SITES FOR CRACKING OR SEPARATION.
5
ENSURE ALL NUTS ARE SECURE ON THE STUDS, ENSURE JAM NUTS ARE SECURE ON
SHAFT
6
MAKE SURE THE COTTER PIN IS IN PLACE
7
RUN ACTUATOR FROM LIMIT TO LIMIT TO ENSURE LIMIT STOPS ARE FUNCTIONING.
8
PRESS THE EMERGENCY BUTTON TO ENSURE THAT ALL ELECTRICAL POWER IS CUT
OFF.
9
CHECK ALL THE FUNCTIONS ON THE HAND CONTROL – CHECK TO ENSURE WIRES ARE
NOT PULLED OUT OF CONNECTOR ON HAND CONTROL CASE.
10
CHECK FOR THE SMOOTH FUNCTION OF THE UP/DOWN SWITCHES.
11
CHECK BATTERY PACKS FOR DAMAGE – CHECK THAT THEY WILL ACCEPT A CHARGE BY
PUTTING THEM IN THE CHARGER.
12
CHECK THE FUNCTION OF THE CHARGER LIGHTS (ON THE LIFT OR ON WALL CHARGER)
BY INSERTING A BATTERY PACK – ENSURE THAT POWER LIGHT IS FUNCTIONAL.
13
CHECK THAT THE SAFETY LATCHES ARE IN PLACE AND FUNCTIONAL.
14
MAKE SURE BOTH LEGS ARE PARALLEL
Checklist Before Use
Always perform the following checklist before attempting to transfer a patient:
Ensure that the safety latches are present and are freely pivoting.

