- 73 -
MAINTENANCE
MAINTENANCE
•
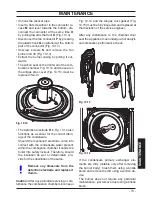
Unhook the silencer pipe.
•
Insert a flat screwdriver in the connector re
-
cess
M
and lever towards the bottom, dis
-
connect the connector at the same time
O
by pulling towards the front
O
(Fig. 10.13).
• Disconnect the fan connector
P
by pressing
the plastic hook
Q
positioned at the bottom
part of the connector (Fig. 10.13).
•
Unscrew screws
N
and remove the fan
burner unit
39 (Fig. 10.13)
•
Extract the burner casing by pulling it out
-
wards.
•
The silicon seal on the front wall of the com
-
bustion chamber Fig. 10.14 and the seal on
the air/gas pipe cover (Fig. 10.15) must be
replaced if worn.
Fig. 10.14
R
• The detection electrode
R
in Fig. 10.14 also
functions as a sensor for the correct drain-
age of the condensate.
Should the mentioned electrode come into
contact with the condensate water present
within the combustion chamber it sends the
boiler into safety lockout. Therefore, should
the insulation be wet or deteriorated, pro
-
vide for the substitution of the same.
Remove any limescale from the
detection electrode and replace it
if worn.
Caution:
After any periodical servicing or dis
-
turbance the combustion chamber silicon seal
Fig. 10.14 and the Air-gas duct gasket (Fig.
10.15) must be fully inspected and replaced at
the discretion of the service engineer.
After any disturbance to the chamber door
seal the
appliance must undergo a full analyti
-
cal combustion performance check.
Fig. 10.15
Fig. 10.16
If the condensate primary exchanger ele
-
ments are dirty (notable only after removing
the burner body), brush them using a bristle
brush and remove the dirt using a suction de
-
vice.
The burner does not require any particular
maintenance, just remove dust using a bristle
brush.


