- 19 -
Three way diverTer valve
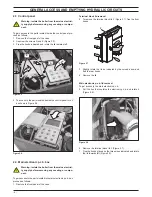
figure 8 .4
c
d
e
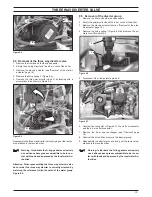
8 .4 removal of the three way diverter valve
1 Remove the front and both side case panels.
2 Empty the primary circuit and the d.h.w circuit of the boiler.
3 Remove the electric actuator (see "Removal of the electric
actuator" page 18).
4
Remove the fixing spring F (Figure 8.5)
5
Remove the three way diverter valve G by levering with a
screwdriver in as shown in Figure 8.5.
figure 8 .5
f
G
h
Reassemble the three way diverter valve carrying out the remov-
al operations in the reverse order.
warning: to lubricate the O-ring gaskets exclusively
use a silicone base grease compatible to be in con-
tact with foods and approved by the local water au-
thorities .
attention . when reassembling the three way diverter valve
be sure that the three way diverter is correctly oriented by
matching the reference h with the notch of the water group
figure 8 .5 .
8 .5 removal of the diverter group
1 Remove the front and both side case panels.
2 Empty the primary circuit and the d.h.w circuit of the boiler.
3 Remove the electric actuator (section "Removal of the elec-
tric actuator" page 18).
4
Remove the fixing spring I (Figure 8.6) and remove the pri
-
mary circuit flow switch J.
figure 8 .6
i
J
5 Disconnect d.h.w. temperature probe K.
figure 8 .7
K
l
m
6
Unscrew the connector L (Figure 8.7), the c.h. flow connector
and the d.h.w. outlet connector.
7 Remove the d.h.w. heat exchanger (see "Removal" page
16).
8 Unscrew the screw M and remove the diverter group.
9 Reassemble the diverter group carrying out the removal op-
erations in the reverse order.
warning: to lubricate the O-ring gaskets exclusively
use a silicone base grease compatible to be in con-
tact with foods and approved by the local water au-
thorities .
Summary of Contents for Inovia 25C ERP
Page 2: ......


