Instructions for use
8
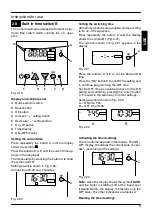
A
B
Fig. 2.15
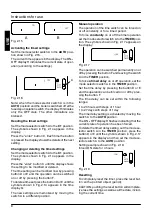
Activating the timed settings
Set the mode selector switch A to the
AUTO
posi-
tion shown in Fig. 2.16.
The current time appears in the display. The ON---
OFF display H indicates the current state of oper-
ation (according to the settings).
A
Fig. 2.16
Note: when the mode selector switch A is in the
AUTO
position and the boiler is switched off at the
fused spur isolation switch, the display H indicates
only the OFF state. The other indications are
blanked.
Reading the timed settings
Set the mode selector switch A to the
C1
position.
The symbols shown in Fig. 2.14 appears in the
display.
Press the “enter” button C. Each time the button
is pressed the display shows the details of the next
setting.
Changing or deleting the timed settings
Set the mode selector switch A to the
C1
position.
The symbols shown in Fig. 2.14 appears in the
display.
Press the “enter” button C until the display shows
the setting to be modified or deleted.
The time setting can be modified now by pressing
button D or E and the operation can be switched
on or off by pressing the button F.
To delete a time set press the button D or E until the
symbols shown in Fig. 2.14 appears in the time
display G.
The new settings are memorized by moving the
switch A to a different position.
Manual operation
The operation of the time switch can be forced on
or off constantly or for a timed period.
To force
constantly
on or off the timer operation
set the mode selector switch A to the
TIMER
posi-
tion. The symbols shown in Fig. 2.17 appears on
the display.
Fig. 2.17
The operation can be switched permanently on or
off by pressing the button F and leaving the switch
A in the
TIMER
position.
To force
a timed delay
on or off operation, set the
mode selector switch A in the
TIMER
position.
Set the time delay by pressing the button D or E
and the operation can be forced on or off by pres-
sing the button F.
The time delay can be set within the following
ranges:
1 to 23 hours with steps of 1 hour
1 to 27 days with steps of 1 day
The time delay setting is activated by moving the
switch A to the
AUTO
position.
The ON---OFF display H flashes indicating that the
current state of operation has been forced.
To delete the timed delay setting, set the mode se-
lector switch A in the
TIMER
position, press the
button D or E until the symbols shown in Fig. 2.17
appears in the display and then set the mode se-
lector switch A to the
AUTO
position
Setting example shown in Fig. 2.18:
forced ON state for 4 hours.
Fig. 2.18
Resetting
To completely reset the timer, press the reset but-
ton with a pointed object (pencil).
CAUTION: pushing the reset button will complete-
ly erase the settings as well as all the data, includ-
ing the current time.
USE


