27
RIVA ADVANCE COMBI MANUAL
9. Venting Cont.
K
P
ODVWLF
separate vent kit
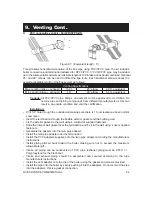
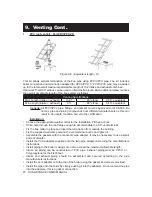
Figure 9.10
This kit allows horizontal termination of the flue pipe using 3” P
lastic pipe
. The kit includes
PVC/CPVC boiler adapters. PVC pipe may be added up to the total overall maximum permis
-
sible length. Optional 45° and 90° elbows can be used to offset the flue route. Each additional
elbow reduces the overall acceptable length of the flue system as follows:
Venting Specifications
Max Length ( exhaust)
1
32 f
t. 4
5° elbo
w
5.4
ft. equivalent
Min Length ( exhaust)
3 ft.
90° elbow
2.9
ft. equivalent
Canada:
All PVC/CPVC pipe, fittings, and cement must be approved to ULC S636. Do not
mix pipe and joining compounds from different manufacturers as this can result in an
unsafe condition and void the certification.
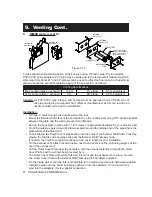
Installation:
•
Dr
ill two 4” holes through the outside wall or the roof.
•
Mount the Exterior Wall Plate of the Termination on the outside wall, using RTV silicone sealant
between the plate and the wall to prevent rain infiltraton.
•
Secure the back plate in place with 1 1/2" screws or appropriate hardware for your exterior wall.
•
From the outside, apply a bead of silicone sealant around the female end of the pipe where the
plate will meet the flared end.
•
Then slide the two PolyPro vent pipe section into the holes of the Exterior Wall Plate. Twist the
pipe so the female end's keyway slide past the Exterior Wall Plate as shown.
•
If needed, the PolyPro vent pipe sections can be cut to length for your installation.
•
On the exhaust vent, attach the termination nozzle and orient it so the protruding edge is at the
top of the exhaust vent.
•
Put the Outer Cover Plate over the vent pipe, with the exhaust extending through the Outer
Cover Plate, and the air inlet being covered by it.
•
The Outer Cover Plate will hold both the air inlet vent and the exhaust ven in place. Secure
the Outer Cover Plate to the Exterior Wall Plate using the hardware supplied.
•
On the inside wall, mount the Interior Wall Plate to the wall and secure with hardware supplied.
• Install the pipe onto the boiler by simply pushing it into the adapters. Do not cement the
pipe into the adapters, this is a gasket connection.
POSITIONED
HORIZONTALLY
POSITIONED
VERTICALLY
INTERIOR
WALL PLATE
EXTERIOR
WALL PLATE
EXHAUST PIPE
AIR INLET PIPE
OUTER COVER
PLATE
APPLY BEAD OF SILICON
SEALANT AROUND FEMALE
END TO SEAL AGAINST
EXTERIOR WALL PLATE


