Installation
22
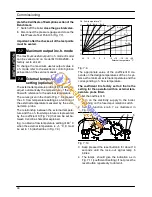
1 Remove the front panel of the case (see the
section 9.2 in this manual).
F
G
G
H
Fig. 6.9
2 Remove the screws F and G (Fig. 6.9).
3 Loosen the screws
H.
Fig. 6.10
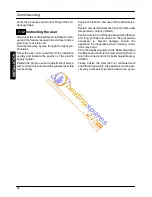
4 Remove the side panels or move the lower part
of the side panels as indicated in Fig. 6.10 and
pull the control panel.
When completely pulled out, the panel can ro-
tate 45
˚
downwards to facilitate the operations
on the internal parts.
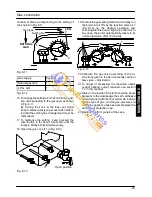
5 Loosen the screws I and remove the service
panel (Fig. 6.11).
I
Fig. 6.11
For the electrical connection to the boiler use elec-
tric wires which conform to the current regulations,
with flexible cord, each core having a cross sec-
tion area
not less than 0,75 mm
2
.
6 Connect the electrical supply flexible cord
coming from the fused spur isolation switch to
the power supply terminal block of the boiler
(Fig. 6.12) keeping the same connections for
the live (brown wire) and the neutral (blue
wire). External 3 A fuse or fused plug with same
current rating is recommended.
Do not connect live wires to terminals to
which the room thermostat must be con-
nected.
7
Connect the earth wire (yellow/green).
Connection of a room thermostat
The room thermostat must be connected to the
terminal block situated next to the control panel.
Any external controls and connection lines
must be rated at 230 V but under no circum-
stances should external live voltage be con-
nected to the room thermostat link on the
boiler.
Do not connect live wires to terminals to which
the room thermostat must be connected.
When connecting any type of external control,
the link J in Fig. 6.12 must be removed.
IN
S
TA
LLA
TI
O
N

