- 14 -
CoNdENSiNG HEAT ExCHANGER
6.3 Cleaning
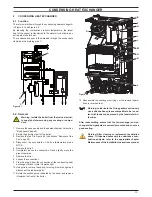
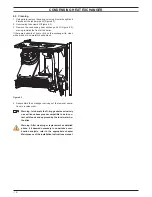
1 Using pliers, remove the spring L moving it to wards right and
disconnect the rubber pipe M (Figure 6.3).
2 Unscrewing the screws N (Figure 6.3).
3 Remove the condensing heat exchange lid O (Figure 6.3)
moving towards the front of the boiler.
If there are deposits of soot or dirt on the exchanger lid, clean
with a brush or non-metallic bristle brush.
figure 6.3
N
o
l
M
4 Reassemble the exchanger carrying out the removal opera-
tions in reverse order.
Warning: to lubricate the o-ring gaskets exclusively
use a silicone base grease compatible to be in con-
tact with foods and approved by the local water Au-
thorities.
Warning: After cleaning or replacement as detailed
above, if it deemed necessary to undertake a com-
bustion analysis, refer to the appropriate chapter
Maintenance of the installation instructions manual.

