background image

Page 12 

Biasi SG Series 


4.2 Installation of Boiler Door Hinge 

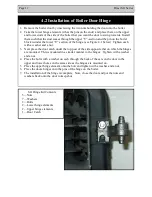
1.  Remove the boiler door by unscrewing the two nuts holding the door onto the boiler 
2.  Take the lower hinge elements (it has the pins on the ends) and place them on the upper 

and lower studs of the side of the boiler that you want the door to swing towards.  Install 
them such that the stud comes through the upper “U”-section and the pin on the boiler 
block is under the lower “U” section of the hinge. (see Figure 4.1 below)  Tighten each 
with a washer and a nut. 

3.  Next place the door catch under the top post of the side opposite that on which the hinges 

are mounted.  This is mounted in a similar manner to the hinges.  Tighten with a washer 
and a nut. 

4.  Place the bolts with a washer on each through the back of the ears on the door in the 

upper and lower holes on the same side as the hinges are mounted on. 

5.  Place the upper hinge element onto the bolt and tighten with a washer and a nut. 
6.  Place the doors hinges onto the pins of the hinge on the boiler. 
7.  The installation of the hinge is complete.  Now, close the door and put the nuts and 

washers back onto the door to keep shut 

SG Hinge Kit Contents: 

5—Nuts 
7—Washers 
2—Bolts 
2—Lower hinge elements 
2—Upper hinge elements 
1—Door Catch 

Summary of Contents for SG 2

Page 1: ...Y HYDRONIC TECH QUINCY HYDRONIC TECH QUINCY HYDRONIC TECH QUINCY HYDRONIC TECHNOLOGIES INC NOLOGIES INC NOLOGIES INC NOLOGIES INC 3560 LAFAYETTE RD 3560 LAFAYETTE RD 3560 LAFAYETTE RD 3560 LAFAYETTE R...

Page 2: ...Page 2 Biasi SG Series...

Page 3: ...be used as successfully as those we specify The installing contractor is the best judge of a system s specific requirements as well as the local availability of certain makes and models of controls an...

Page 4: ...r Block Assembly Explosion Diagram 2 8 Boiler Location 3 9 Installation of Boiler Trim Kit Components 4 10 12 Piping the Boiler 5 13 Intake Venting 6 14 15 Exhaust Venting 7 16 Common Exhaust Venting...

Page 5: ...e of all fire hazards Please read the literature and warranties supplied by the manufacturers of the various accessory equipment This equipment is warranted by the respective manufacturers not by Quin...

Page 6: ...fused with those of influenza and the highest incidence of poisoning occurs at the onset of cold weather or during flu season A victim may not experience any symptoms only one symptom or a few symptom...

Page 7: ...AND UL AGA LISTED GAS BURNER COMPONENTS SUPPLIED WITH THE BIASI SG BOILER 1 General Information Boiler Model Heating Capacity Net Output Efficiency Water Content Length L Weight MBH GPH MBH NET MBH GA...

Page 8: ...Install the four draw rods and draw the sections together evenly measure with yardstick Draw the sections together until sections make iron to iron contact at a point around the top and bottom ports o...

Page 9: ...ble materials 1 9 from the top sides and rear of the boiler 2 18 from the flue pipe in any direction 3 24 inches from the front of the boiler DANGER The boiler must be located on a non combustible flo...

Page 10: ...mper w Manual Reset Spill Switch BIASI SG T handle Gas Cock Alternative Location Drip Leg Gas Train Positive Pressure Gas Fired 4 1 Installation of Boiler Trim Components Union Trim Kit Components 1 H...

Page 11: ...lower rear tapping 4 Install remote pressure sensor from the control panel in lower front tapping of the boiler 5 Install remote temperature probe and operating aquastat sensor from control panel into...

Page 12: ...ext place the door catch under the top post of the side opposite that on which the hinges are mounted This is mounted in a similar manner to the hinges Tighten with a washer and a nut 4 Place the bolt...

Page 13: ...l manual and or automatic air venting devices at the high points in the system to eliminate trapped air The weight of all piping should be supported by suitable hangars and floor stands not by the boi...

Page 14: ...top or bottom of the enclosure and shall connect directly or by ducts with the outdoors The area of each opening shall be equal to one square inch per 4000 BTU HR of total input rating If ducts are u...

Page 15: ...ceiling joints between wall panels at penetrations for plumbing electrical and gas lines and in other openings If the building is of tight construction air openings must be provided from the outside...

Page 16: ...ipped with a postpurge control such as a delay off timing control to prevent problems with fogging and nozzle post drip The determining connection from the boiler to the chimney should be as short as...

Page 17: ...exhaust fans fireplace dampers and any other gas burning appliance to their previous condition of use 7 Any improper operation of the common venting system should be corrected so the in stallation co...

Page 18: ...maintained instruments A good target is 11 to 12 5 of CO2 or 6 5 to 3 8 of O2 To ensure proper burner setup gauges should be used to check things such as the pump pres sure CO2 levels etc 8 Burner Se...

Page 19: ...KA P 2 KA P 2 K P 2 K Firing Rate 0 65 1 1 3 1 6 1 9 2 25 Insertion Depth 3 5 3 5 3 5 3 5 3 5 3 5 Nozzle 0 5 x 80 0 75 x 80 1 00 x 80 1 25 x 80 1 75 x 80 1 75 x 70 Spray Pattern solid solid semi solid...

Page 20: ...Setup Heat Wise Natural Gas Propane Boiler Model Burner Model Input MBH Man Pres W C Head Setting Air Gate Orifice Man Pres W C Head Setting Air Gate Orifice SG 2 SU 2A 91 3 5 20 closed 7 32 N A N A...

Page 21: ...as valve When installing the boiler make sure a pipe compound resistant to the action of liquefied petroleum is used Check piping for leaks Always check leaks with a water and soap solution DO NOT USE...

Page 22: ...o the upper tie rods using the outer nuts 5 already mounted on tie rods 4 Attach the two lower mounting brackets 3 to the lower tie rods using the outer nuts 5 already mounted on the tie rods 5 Mount...

Page 23: ...e 7248 probe into the front immersion well 3 Remove spring clip from well and reinstall the clip over the capillary lines for the probe 4 Install pressure adapter Part 1 into lower tapping on front of...

Page 24: ...T wire 63F 35C or other specified wire as applicable when installed in accordance to manufacturer s instructions and wiring diagrams If an external electrical source is utilized the boiler when instal...

Page 25: ...r casing Connect the female connector from harness A to the male connector of harness B Harness C connects to the burner Run the harness behind the front panel of the boiler and connect it to the male...

Page 26: ...Page 26 Biasi SG Series 12 1 Oil Burner Wiring...

Page 27: ...Biasi SG Series Page 27 12 1 Oil Burner Wiring...

Page 28: ...Page 28 Biasi SG Series 12 2 Gas Burner Wiring TO EARTH GROUND LINE HONEYWELL 7248U...

Page 29: ...Biasi SG Series Page 29 12 2 Gas Burner Wiring...

Page 30: ...een seconds from the time that the Operating control calls for the burner to start and the burner actually starts that this time delay value be entered into the controller as a Pre Purge time e g actu...

Page 31: ...rol reads in HLOLIM xxx F 120 90 160 Sets the low limit water temperature for the heating water DLOLIM xxx F 115 90 150 Sets the low limit water temperature for the domestic water MAX ECON xxx MIN 45...

Page 32: ...should be installed on the boiler supply pipe of the boiler It should be positioned as shown in the illustration below and fixed in place with tyraps Once the sensor is in place it is advisable to in...

Page 33: ...Biasi SG Series Page 33 13 4 Efficiency Control Wiring Wiring SG Control Panel with Efficiency Control...

Page 34: ...rmally and not leaking 3 If a Low Water Cut Off is installed follow the manufactures suggested maintenance and test procedures 4 Adjust room thermostat so there is a call for heat and test boiler high...

Page 35: ...__________________ ______________________ _________________________ ______________________ Burner Manufacturer Type of Oil Burner Burner Model No Burner Serial No Nozzle Manufacturer Nozzle Spray Angl...

Page 36: ...t step 7 Return the manual valve on the combination gas valve to the on position by reversing step 5 8 Turn on all electric power to the appliance 9 Set thermostat to the desired setting 10 If the bur...

Page 37: ...Biasi SG Series Page 37 Notes...

Page 38: ...Page 38 Biasi SG Series Notes...

Page 39: ...Biasi SG Series Page 39 Notes...

Page 40: ...nstallation conforms to all codes and ordinances 4 This warranty does not apply to boilers which are subject to misuse abuse neglect alteration accident excessive temperature excessive pressure or cor...

Reviews: