Set up
Move the camera unit over any text or
images and they will be magnified onto the
screen.
2. Use as a photo frame
Press the play button on the remote control once
to go to the photo frame.
Some default images will be displayed until you
plug in a USB drive with your own photos.
To display your own photo’s, plug in a USB drive
containing the photo’s and the MPD-12 will be
display them one by one.
Note: The MPD-12 can display images of any size,
but the ideal size is 1280 x 800.
Note: The MPD-12 will turn on automatically when
first connected to a power source.
3. Use as a digital clock
Set Date / Time
Press the Menu button ( see below ) to go to
Date / Time set up.
Press the Increase button to increase the date /
time, or press the Decrease button to decrease the
date / time, press the Menu button again to confirm
the changes.
Press the play button until the digital clock
appears.
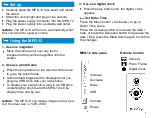
MPD-12 side penal
Decrease
Increase
Menu
USB
Camera
Power
Remote Control
Camera
Photo Frame
Digital Clock
1. Use as a magnifier
Carefully place the MPD-12 face down and install
the stand
Stand the unit upright and plug in the camera
Plug the power supply connector into the MPD-12
Plug the power supply into a suitable wall outlet
Using the MPD-12


