ALGAS-QA
Instruction and Operation Manual
© Copyright by BIFFI Italia. All right reserved
page 33
Contents may change without notice
3) Check that the air supply pressure value is within the required
range.
4) If there is an air filter on the actuator, bleed the condense water
accumulated in the cup by opening the drain cock. Disassemble
the cup periodically and wash it with soap and water; disassemble
the filter: if this is made up of a sintered cartridge, wash it with
nitrate solvent and blow through with air. If the filter is made of
cellulose, it must be replaced when clogged.
5) Check that the external components of the actuator are in good
conditions.
6) Check all the paint-coat of the actuator. If some areas are
damaged, repair the paint-coat according to the applicable
specification.
7) Check that there are no leaks in the pneumatic connections. If
necessary tighten the nuts of the pipe fittings.
5.2
Extraordinary maintenance
If there are leaks in the hydraulic cylinder, pneumatic cylinder or a
malfunction in the mechanical components, or in case of scheduled
preventive maintenance, the actuator must be disassembled and
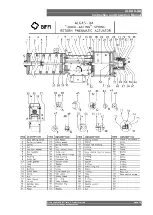
seals must be replaced with reference to the follow general sectional
drawing and adopting the following procedures:
If the actuator can be operated, it is essential to take it to
fail safe position, with the spring totally extended,
otherwise the actuator should be disassembled from the
valve and follow these steps:
❑
Remove the plug (26) from the cover of the adjustment screw
(26).
❑
Record the length between end flange and stop-setting screw, as
in figure A below.


