04
1.b. Features:
• Cable: 3m
• Two game modes: Cyberbike™ or Gamecube™
• Button programming system
• Handlebar calibration system
• Full Gamecube™ controls for compatibility with Gamecube™ and Wii ™
games.
• Two Z buttons
• Adjustable magnetic resistance for pedaling
• Forward and reverse pedalling
• Handlebar can be adjusted to three different heights
• Seat can be adjusted to seven different heights
• Front and rear stabilisers
• Maximum weight limit: 130kg/286lbs.
1.c. Cyberbike™ overview:
(Picture A)
2. ASSEMBLING THE CYBERBIKE™
The Cyberbike™ should only be assembled by an adult. When assembling the bike,
no force should be applied when inserting parts. In case of difficulty, you should refer
to the assembly diagrams or contact the helpline (see paragraph 7).
2.a. Assembling the parts
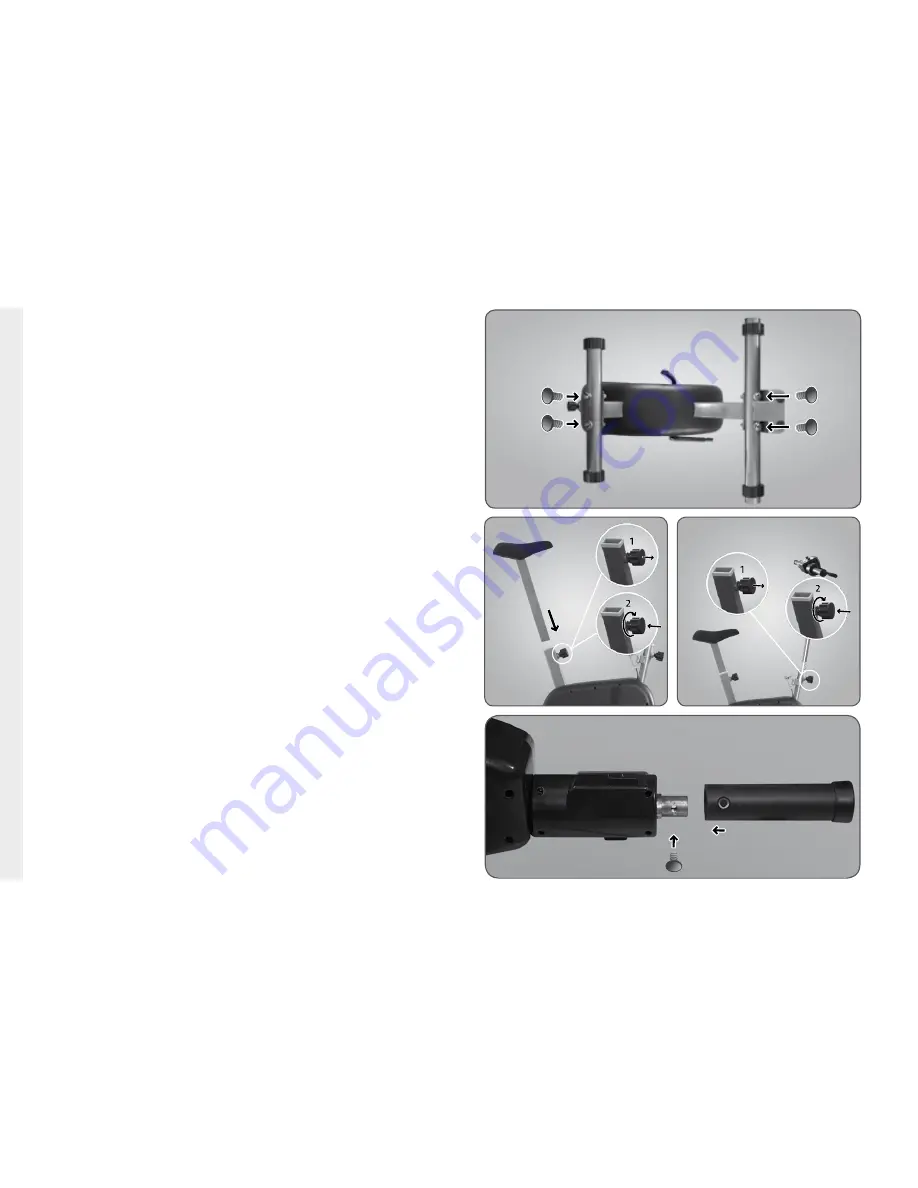
Front and rear supports:
Turn the Cyberbike™ upside down and attach the feet
as described below. Position the screws and tighten using the assembly key
provided (See Fig 1).
Seat:
Insert the tube supporting the seat into the Cyberbike™ main frame (See
Fig 2).
Handlebar:
Connect the cable inside the tubes before inserting the tube into
the Cyberbike™ base. Insert the handlebar tube into the Cyberbike™ main
frame (See Fig 3).
Insert the left handle into your handle bars making sure that the screw hole is
correctly positioned underneath. (See Fig 4).
Insert the screw supplied and screw in with a Phillips screwdriver.
Make sure the screw is fully screwed in before use.
Pedals:
Each pedal is marked as left and right. It is essential that you insert the
correct pedal to each side. Tighten the pedals with the tool provided.
The Left pedal needs to be tightened anticlockwise and the Right pedal
clockwise (See Fig 5).
Cable with Gamecube™ connector:
Connect the cable to the connector
located on the front of the Cyberbike™ (see diagram below). Ensure that the
connector is fitted the right way round (See Fig 6).
EN
G
LIS
H
ES
PA
Ñ
O
L
FR
A
N
C
A
IS
Fig 1
Fig 2
Fig 3
Fig 4
Summary of Contents for CYBERBIKE
Page 3: ...E n g l i s h p 0 1 0 9 E s p a o l p 1 0 1 6 F r a n a i s p 1 7 2 3...
Page 4: ......
Page 5: ...Picture B Picture A I II III IV V VI VII VIII IX X XI XII...
Page 6: ......
Page 7: ......
Page 31: ...Connect your cyberbike and play 24 Annexe Anexo 1...


