SPRING ASSISTED BAND
INSTRUCTION MANUAL
PARTS LIST
LARGE, MEDIUM & SMALL EGG
(2) Bands (1) Handle assembly (1) Hinge mechanism assembly
(1) Hardware bag:
(2) ¼” x ½” clinch studs (8) ¼” x 5/8” clinch studs (8) ¼” Keps nuts (2) 5/16” x 2” carriage bolts
(2) ¼” Acorn nuts (2) 5/16” flat washers (2) 5/16” hex nuts
WARNING: THE HINGE MECHANISM IS UNDER SPRING PRESSURE, DO NOT REMOVE THE (
WHITE
PLASTIC
) SHIPPING RETAINER BAR/S UNTIL INSTRUCTED, OR PERSONAL INJURY COULD OCCUR.
STEP 1A
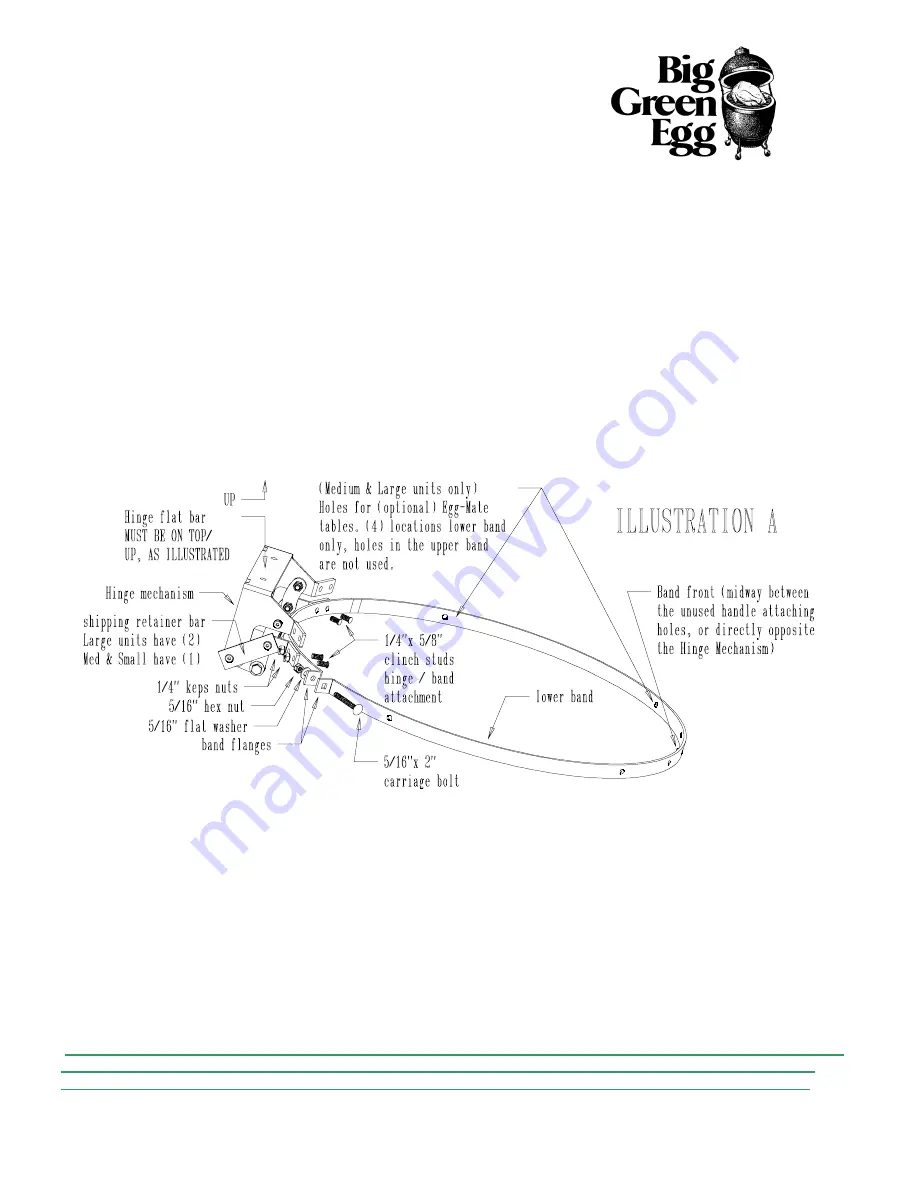
Position a band (
both bands are the same
) and the hinge mechanism in relation to each other as in (
illustration A
), insert the
(4) ¼” x 5/8” clinch studs through the inside of the lower band then through the hinge assembly. Install (1) ¼” Keps nut onto each stud and hand
tighten only.
STEP 1B
If you are installing the optional Egg-Mate tables at this time, you will want to insert the (4) ¼” x ¾” clinch studs (
provided with the
tables
) into the lower band only (see
step 1 of the Egg-Mate manual
). Tip: install & hand tighten nuts to hold the studs in place during the
remainder of the assembly
.
STEP 2
With the Egg bottom positioned in its nest or table, place the hinge / band assy. onto the egg bottom making sure the hinge flat bar is
on top; align the band front (
illustration A
) with the front of the egg bottom (
the ceramic bottom has a small hole in the band attaching surface
that indicates the front)
. Insert (1) 5/16” x 2” carriage bolt through the square hole in the band flange (
illustration A
) then through the round hole
in the opposite band flange. Install (1) 5/16” flat washer and (1) 5/16” hex nut and hand tighten only
.
STEP 3
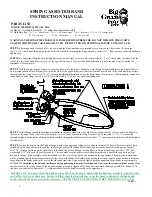
Install the upper band to the hinge mechanism in the same manner that you did the lower band in step 1A. Now install the handle to
the front of the upper band (
the 2 holes you need to use are directly opposite the Hinge Mechanism
) by inserting (1) ¼” x ½” clinch stud
through each hole on the inside of the upper band and then through the handle assembly install (1) ¼” Acorn nut onto each stud and hand tighten
(
illustration B
).
STEP 4
Position the dome onto the Egg bottom and inside the upper band taking care to align the front of the dome (
the ceramic dome has a
small hole in the band attaching surface that indicates the front
) with the band front (
midway between the handle attaching bolts
) Insert (1)
5/16” x 2” carriage bolt through the square hole in the band flange then through the round hole in the opposite flange. Install (1) 5/16” flat
washer and (1) 5/16” hex nut (
hand tighten only
). Check to make sure the dome is centered and seated evenly against the egg bottom. Next,
position the hinge / band assembly so the lower band is as low as it will go all the way around on the egg bottom. The upper and lower bands
will be properly spaced by the hinge assembly at the rear, but the bands are flexible and you should move the upper band as needed to make the
space between the bands equal to the rear on the sides and front also. Next, securely tighten both the upper and lower bands to approximately
125 inch lbs
.
(
bending of the bolt and the flanges during tightening is normal / recommended, Don’t fear, the ceramic will not break
).
Make
sure the dome is still evenly seated on the Egg bottom and proceed to tighten all (8) Keps nuts that attach the hinge assembly to the bands. At
this time, you should also tighten the ¼” Acorn nuts that attach the handle assembly to the upper band.
IMPORTANT: You must check the band carriage bolts and the hinge / band studs for tightness regularly, especially after
each of the first two or three uses. Failure to follow these instructions may cause the dome to slip out of the bands and
break; this will not be covered under warranty. (NEVER TIGHTEN THE BANDS WHEN THE GRILL IS IN USE)
OVER
→
1


