background image

 MV PUSH EU Owner’s Manual

Part No 

840506


     11         


840506_

A

_HI


DEBRIS


BAG 

Debris bags are normal replaceable wear items.


Bag liners are available for use in various conditions where debris will be vacuumed. (See Bag Liner Accessories on page 

1). 

DO NOT 

place bag on or near hot surface, such as engine.


Be sure engine has come to a complete stop before removing or emptying bag!


MAINTENANCE


PERIODIC


MAINTENANCE 

Periodic maintenance should be performed at the following intervals:


Maintenance Operation 

Every Use 

Daily or Every 

5 Hours 

Every 25 Hours 

Inspect for worn or damaged parts 


Check for excessive vibration 


Inspect for loose parts 


Clean debris bag 


Lubricate throttle control cable and linkage. 

NOTE:

 Use white lithium grease or equivalent 


COMMON REPLACEMENT PARTS 

Bag; P/N 840189 Original Equipment Replacement Bag.

Skid; P/N 840041 Nozzle Wear Guard Skid.

*****TIPS*****

.

Frequently empty debris to prevent bag overloading with more weight than you can lift.


Many vacuums are used where dust is mixed with trash.  Your unit can intermittently vacuum in dusty areas. However, following 

these rules will help maintain your machine's ability to vacuum in dusty conditions: 

• Run machine at idle to quarter throttle.
• Machine or pressure-wash debris bag if normal cleaning does not fully clean bag.  Bag should be thoroughly dry before use.

Having one or more spare bags


(P/N 840189) is a good way to reduce down time while dirty bags are being cleaned. 

Felt Bag (P/N 840194) accessory is great when used in dusty conditions

.


NOT 

FOR 

REPRODUCTION

Summary of Contents for MV VACUUM PUSH EU MV601EU

Page 1: ... AND KEEP FOR FUTURE REFERENCE CASTER KIT Use on hard surface for maneuverability P N 840129 HOSE KIT For vacuuming hard to reach areas P N 840116 BAG LINER KIT To collect leaves thatch and grass P N 840134 FELT BAG KIT Use on all dusty conditions P N 840194 LINER KIT Interior housing liner to decrease housing wear P N 840201 N O T F O R R E P R O D U C T I O N ...

Page 2: ...ual Part No 840506 2 840506_A_HI CONTENTS SPECIFICATIONS 3 INSTRUCTION LABELS 4 ASSEMBLY INSTRUCTIONS 5 8 OPERATION 9 11 MAINTENANCE AND TROUBLESHOOTING 11 13 ILLUSTRATED PARTS LIST 14 20 N O T F O R R E P R O D U C T I O N ...

Page 3: ...g Shipping Weight 180 lbs 81 7 kg Overall Dimensions 28 Wide x 62 5 Long x 45 5 High Maximum Operating Slope 20 SAFETY WARNING This product can expose you to chemicals including gasoline engine exhaust which is known to the State of California to cause cancer and carbon monoxide which is known to the State of California to cause birth defects or other reproductive harm For more information go to w...

Page 4: ...abels part numbers are included in the Illustrated Parts List The correct position for each label may be determined by referring to the Figure and Item numbers shown LABEL FUEL WARNING LABEL EAR EYE BREATHE READ LABEL HEIGHT ADJUST ITEM 55 P N 400268 ITEM 162 P N 100346 ITEM 34 P N 840054 LABEL DANGER LABEL DANGER LABEL DOOR OPENING ITEM 11 P N 400424 ITEM 174 P N 810736 ITEM 175 P N 840080 ENGINE...

Page 5: ...g using corresponding hardware NOTE You will have to insert the bolt washer from the inside by reaching through the hood See Fig 2 4 Attach upper handle brace to lower handle using corresponding hardware Then repeat this step on the other side See Fig 3 next page 5 Attach rod end item 164 to the nozzle door rod then secure in place by tightening jam nut See Fig 4 next page 6 Attach nozzle door rod...

Page 6: ...MV PUSH EU Owner s Manual Part No 840506 6 840506_A_HI HERE HERE Fig 3 Fig 4 Fig 5 Fig 6 Fig 7 N O T F O R R E P R O D U C T I O N ...

Page 7: ...No 840506 7 840506_A_HI MV Vacuum Assembly Drawing 166 152 159 170 153 161 158 161 166 160 164 160 160 173 152 164 139 159 165 171 167 LOWER HANDLE UPPER HANDLE BRACE NOZZLE DOOR LEVER NOZZLE DOOR N O T F O R R E P R O D U C T I O N ...

Page 8: ...8 8041006 SCREWCAP 1 4 20 X 1 ZP 2 159 8041031 SCREWCAP 5 16 X 1 3 4 ZP 2 160 8171004 WASHER 3 8 FLAT 4 161 8172007 WASHER 1 4 SAE ZP 5 164 400886 ROD END BALL JOINT 3 8 NF 2 165 8041052 SCREWCAP 3 8 16 X 1 1 2 ZP 1 166 8160003 NUT LOCK 3 8 16 2 167 8041056 SCREWCAP 3 8 16 X 2 1 2 ZP 1 170 8041004 SCREWCAP 1 4 20 X 3 4 HCS ZP 1 171 8172019 WASHER FENDER 1 4 ZP 2 173 840071 NUT ACORN 1 4 20 2 N O T...

Page 9: ...e SHUT DOWN 1 Pull the throttle control all the way back to the STOP position 2 3 4 1 Secure unit at the handle with left hand during start Pull rope starter with right hand DO NOT START the equipment without the debris bag in place 1 Place equipment on a level firm surface that is free of rocks or other debris 2 Place throttle in CHOKE position 3 Secure the unit with left hand at the handle then ...

Page 10: ...In dusty conditions it maybe necessary to purchase Felt Bag Kit P N 840022 Do not operate if excessive vibration occurs If excessive vibration occurs shut engine off immediately and check for damaged or worn impeller loose impeller bolt loose impeller key loose engine or lodged foreign objects Note See parts list for proper impeller bolt torque specifications See Trouble Shooting section on page 2...

Page 11: ...le control cable and linkage NOTE Use white lithium grease or equivalent COMMON REPLACEMENT PARTS Bag P N 840189 Original Equipment Replacement Bag Skid P N 840041 Nozzle Wear Guard Skid TIPS Frequently empty debris to prevent bag overloading with more weight than you can lift Many vacuums are used where dust is mixed with trash Your unit can intermittently vacuum in dusty areas However following ...

Page 12: ...6 If the impeller cannot be loosened obtain a 3 8 24 x 2 3 4 longer bolt of the same diameter and thread type as the impeller bolt Invert engine and impeller and support engine above ground to prevent recoil damage Thread longer bolt by hand into the crankshaft until bolt bottoms Using a suitable gear or wheel puller against the bolt head and the impeller back plate near the blades remove impeller...

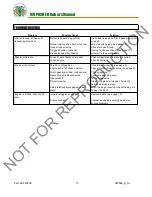
Page 13: ... impeller and replace if required Loose engine Check engine Engine will not start Throttle in off position Check throttle control see page 9 Engine not in full choke position Check throttle choke position see page 9 Out of gasoline or bad old gasoline Check gasoline Spark Plug wire disconnected Connect spark plug wire Gas valve off Turn on gas valve Dirty air cleaner Clean or replace air cleaner C...

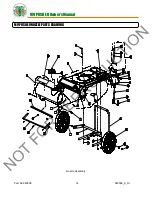
Page 14: ...MV PUSH EU Owner s Manual Part No 840506 14 840506_A_HI MV PUSH EU NOZZLE PARTS DRAWING Nozzle Assembly N O T F O R R E P R O D U C T I O N ...

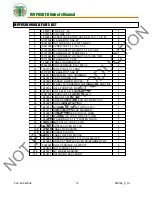
Page 15: ...WHEEL 14 ASSEMBLY WITH BEARING AND TIRE 2 19 840104 AXLE FRONT WA MV VAC 1 20 840155 HGT ADJ WA W LABEL MV VAC 1 21 8041004 SCREWCAP 1 4 20 x 0 75 HWH 1 22 840034 LINK HGT ADJ MV VAC 1 23 840041 BRACKET NOZZLE WEAR GUARD MV VAC 2 24 840029 ROD CONNECT HGT ADJ 1 25 840073 BUSHING 0 5 ID 0 625 OD X X 0 250 1 26 840119 ROD HANDLE CRANK ASSEMBLY 1 27 840057 HANDLE CRANK 0 5 ID X 3 72 LONG 1 28 840078 ...

Page 16: ...MV PUSH EU Owner s Manual Part No 840506 16 840506_A_HI MV PUSH EU ENGINE PARTS DRAWING Engine Assembly N O T F O R R E P R O D U C T I O N ...

Page 17: ... KEY 2 125 X 87 1 57 840220 BRACKET COVER TOP PLATE VAC 1 58 890359 SCREW 1 4 20 X 5 8 HWH 2 59 8172007 WASHER 1 4 SAE ZP 6 60 8172019 WASHER FENDER 1 4 ZP 6 61 8041004 SCREWCAP 1 4 20 x 0 75 HWH 6 62 790167 SCREWCAP 3 8 24X2 3 4 W PATCH LOCK 1 63 900564 SCREWCAP 3 8 16X2 1 2 TAPTITE 3 64 8177010 WASHER SPLIT LOCK 1 4 6 65 8177012 WASHER LOCK 3 8 ST MED 1 67 840083 SPACER 1 50OD X 875ID X 5 THK 1 ...

Page 18: ...MV PUSH EU Owner s Manual Part No 840506 18 840506_A_HI MV PUSH EU HOOD PARTS DRAWING Hood Assembly N O T F O R R E P R O D U C T I O N ...

Page 19: ...C 3 154 610429 SPRING LEVER GZ 1 155 610348 FIBRE WASHER 1 156 8041032 SCREWCAP 5 16 18 X 2 ZP 1 158 8041006 SCREWCAP 1 4 20X1 ZP 2 159 8041031 SCREWCAP 5 16 18 X 1 75 ZP 2 160 8171004 WASHER 3 8 FC 4 161 8172007 WASHER 1 4 SAE ZP 6 162 100346 LABEL SAFETY PROTECT READ MANUAL 1 164 400886 ROD END BALL JOINT 3 8 NF 2 165 8041052 SCREW CAP 3 8 16X1 1 2 ZP 1 166 8160003 NYLON INSERT LOCKNUT 3 8 16 UN...

Page 20: ...HER FLAT 1 2 SAE 2 201 8024046 BOLT CARRIAGE 5 16 18X2 1 2 4 202 8171002 WASHER 1 4 FC ZP 4 203 8160002 NYLON INSERT LOCKNUT 5 16 18 UNC 4 204 8161044 NYLON INSERT LOCKNUT 1 2 13 UNC THIN 2 205 840091 SHAFT REAR AXLE PUSH VAC 1 206 840090 BRACKET REAR AXLE MOUNT PUSH MV VAC 2 207 840101 WHEEL 14 ASSEMBLY WITH BEARING AND TIRE 2 208 840017 MV WHEEL BEARING 2 N O T F O R R E P R O D U C T I O N ...

Reviews: