background image


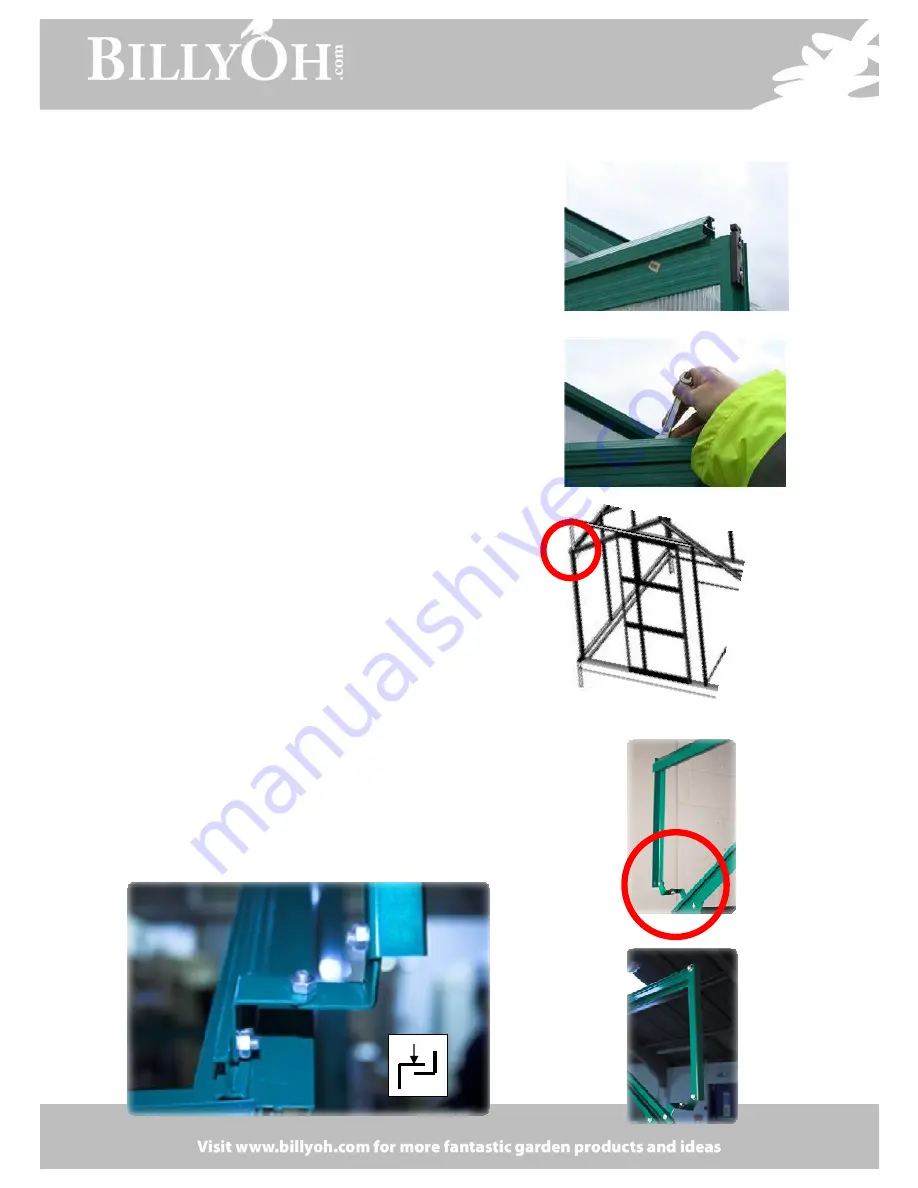
Place  the  remaining  top  door  runner  into  the  groove  to 

complete the door attachment process. Make sure you attach 

the bottom grooves to the greenhouse base. 


Once you have the runner in place with the doors, the last job 

to do is to tighten the two top bolts. 


Door Runner Corner Assembly 

At first glance it appears from the instructions 

that the fitting of the door rail assembly is complicated  

because the door rail sits further forward than the  

frame. To overcome this two L shaped clips are used in 

conjunction with each other which allows the door  

frame runner to be connected to the main greenhouse  frame. 

This is achieved as follows, place one L shape piece 

onto the frame and use the nut and bolts to secure 

then place the second L shaped piece on top of the 

first one and bolt the two together, the second one can  

then be bolted to the door frame runner. 


Front View 

Rear View 

Summary of Contents for Rosette

Page 1: ...lows Part A for the 12 x 8 greenhouse Part B for the 10 x 8 greenhouse Part C for the 7 4 x 7 4 greenhouse Part D for the 8 x 6 greenhouse 3 To ensure the base is level and square the use of a spirit...

Page 2: ...tight 11 If the greenhouse is sited in an exposed location and or is exposed to high winds improvisation for extra protection may be considered If so the following is recommended Drill 3 holes in the...

Page 3: ...ure loosely then lay the next sections on top of the base as per Fig 1 Corner Uprights Offer the upright corner section to the base and slot the nut heads into the groove on the upright do this carefu...

Page 4: ...e which need to be used as shown to add additional stability to the uprights Note how the corner is completed The photo is taken Inside the greenhouse and we are looking at the Right hand corner Inser...

Page 5: ...o These are the bolts that the runner part 22 slides onto at a later stage When you are ready to place the already assembled doors onto the frame please take note of the following which is for the rig...

Page 6: ...the fitting of the door rail assembly is complicated because the door rail sits further forward than the frame To overcome this two L shaped clips are used in conjunction with each other which allows...

Page 7: ...e Collector The plastic down pipe connector slides between the gutter and the upright Tip you may need to loosen the nut and bolts to assist in this then push the plastic connector in and re tighten t...

Page 8: ...bottom section this is for the opening vent handle Once the frame is assembled this needs to be slid into the ridge frame of the greenhouse There is a rounded top on the top edge of the opening vent...

Page 9: ...Please note that there will be gap at the top of the opening vent This is normal and as it was designed to aid the opening of the window View from outside View from Inside...

Page 10: ...t catches the centre cross member to prevent the opening vent from falling through into the greenhouse Cross Member which can be moved into position once the opening vent has been installed Please mak...

Page 11: ...correct place This will move up and down as required Note how the cross members are slotted into the frame edge figure 3 Please make sure that the plastic runners are placed the correct way around fo...

Page 12: ...Figure 3 Rear of Door Figure 4 Door Front Figure 5 Bottom of Door Figure 6 Please see figure 6 which shows how door is placed into the upper door frame...

Page 13: ...further safeguard the roof panels Give similar attention to the side and rear panels This time attach 2 cords horizontally and equally spaced It is important to drill the holes in the uprights as clo...

Reviews: