background image

6

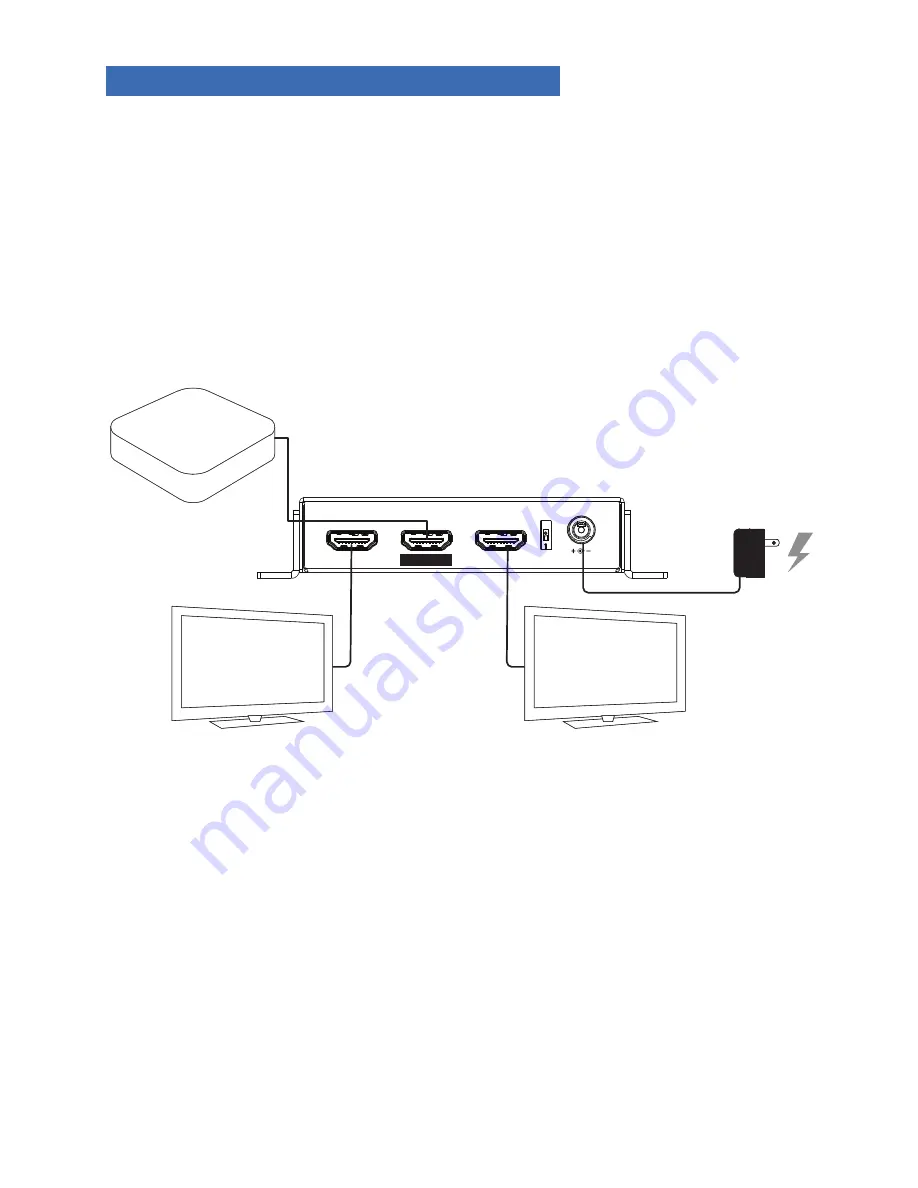
5.  INSTALLATION AND CONNECTIONS

1.  Connect an HDMI cable from the source to the B-240-HDSPLTR-1x2 HDMI 

input.

2.  Connect an HDMI cable from each HDMI output to a display.

3.  Connect the power to the B-240-HDSPLTR-1x2.

4.  Turn on the source and the devices.

5.  Set DIP switch to AUTO/First Output based on requirement of installation.

HDMI OUT 1

HDMI OUT 2 AUTO EDID

1

ST

 OUTPUT

+12 VDC

HDMI IN

HDMI Source

B-240-HDSPLTR-1x2

TV

TV

AC 

Power

Summary of Contents for B-240-HDSPLTR-1x2

Page 1: ...Source Mute 2ch HDMI Out Audio INSTALLATION MANUAL HDMI 1x2 Splitter B 240 HDSPLTR 1x2 HDMI IN HDMI IN HDMI IN 1 ON B 2 4 0 H D S P L T R 1 X 2 HDMI OUT 1 HDMI OUT 2 HDMI IN I N P U T ...

Page 2: ...2 ...

Page 3: ...tlet 7 Protect the power cord from being walked on or pinched particularly at the plug end and where the power cord is attached to the apparatus 8 Only use attachments and accessories specified by the manufacturer 9 Refer all servicing to qualified service personnel Servicing is required when the apparatus has been damaged in any way such as when the power supply cord or plug is damaged liquid has...

Page 4: ...and is compatible with HDMI 2 0 and HDCP 2 2 products Additionally the design includes DDC termination and inlcudes a dip switch for basic EDID function 2 FEATURES Distributes a single HDMI signal to 2 identical HDMI outputs DIP switch for AUTO EDID First Output EDID selection Supports 7 1 channel surround sound DTS HD Master Audio and TrueHD high bit rate audio 4K Ultra HD with 36 bit Deep Color ...

Page 5: ...isplay D Dip Switch AUTO EDID selects the lowest common EDID between the two output ports to send to the source Output EDID reports the EDID from output 1 to the source E Power Supply 12V DC Connect the included 12V power supply to this port F Power LED Indicates that device is receiving power G Input LED Indicates signal transfer over the input port H LEDs for Outputs 1 and 2 Indicates signal tra...

Page 6: ...nnect an HDMI cable from each HDMI output to a display 3 Connect the power to the B 240 HDSPLTR 1x2 4 Turn on the source and the devices 5 Set DIP switch to AUTO First Output based on requirement of installation HDMI OUT 1 HDMI OUT 2 AUTO EDID 1ST OUTPUT 12 VDC HDMI IN HDMI Source B 240 HDSPLTR 1x2 TV TV AC Power ...

Page 7: ...rge 2 Core chipset 8kV Connections HDMI 2x HDMI Type A 19 pin female Power Thread Locking Controls DIP switch 1 AUTO EDID EDID Output 1 EDID Mechanical Housing Metal enclosure Dimensions 3 960 L x 3 228 W x 0 905 H Weight 0 55 lbs 0 25kg Power Supply 12V DC 2A Power Consumption 12W max Operation Temperature 32 104 F Storage Temperature 4 140 F Relative Humidity 20 90 RH no condensation Certificati...

Page 8: ...f use This warranty shall not apply to products that have been abused modified or disassembled Products to be repaired under this warranty must be returned to SnapAV or a designated service center with prior notification and an assigned return authorization number RA 8 SUPPORT 866 838 5052 For SnapAV customers snapav com For Aisle 8 customers onaisle8 com Rev 160927 0315 A6 Booklet fold 2016 Binar...

Reviews: