


BINKS 1999 –SB-E- A1-2
5
CLEANING GUN USED WITH SYPHON CUP OR MATERIAL SUPPLY HOSE
CUP -
Unscrew the cup empty and rinse out carefully with thinners, place clean thinners in the cup and spray this through the
gun until it is clean, then blow air through the gun to dry it.
MODE -
Disconnect supply hose at Fluid Inlet, reconnect a supply of clean solvent. Spray through the gun until clean, then
disconnect solvent and replace with an air supply and blow through until dry.
EVERY DAY AFTER CLEANING PLACE A DROP OF OIL IN THE FOLLOWING:
1) Trigger stud.
2) Material needle valve at material packing screw.
3) Air valve stem at gun body.
4) Material needle valve guide at gun body.
NEVER IMMERSE GUN IN SOLVENTS. DO NOT USE SILICONE OILS OR GREASES.
FAULTY SPRAY
This can be caused by improper cleaning, dried material around the material nozzle tip or in the air nozzle. Soak these parts in
thinners that will soften the dried material and remove with a brush or cloth.
NEVER USE METAL INSTRUMENTS TO CLEAN THE AIR OR MATERIAL NOZZLES. THESE PARTS ARE CAREFULLY
MACHINED AND ANY DAMAGE TO THEM WILL CAUSE A FAULTY SPRAY.
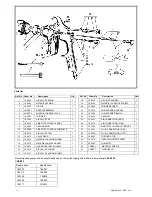
If either the Air Nozzle (33) or Material Nozzle (32) are damaged, these parts must be replaced before a perfect spray can be
obtained.
INTERMITTENT SPRAY.
If the spray flutters, it is caused by one of the following faults: -
1)
Insufficient material available. Check supply and replenish if necessary.
2)
Loose Material Nozzle (32 ). Tighten but without using undue force. Replace Material Nozzle Gasket (14) if necessary.
bb
3)
Leakage at Material Needle Valve Packing (23). Tighten or replace Material Needle Valve Packing.
4)
Cup connection insufficiently tight, or dirt on cone faces. Correct as necessary.
5)
Air vent in cup lid blocked . Remove lid and clear obstruction. Replace lid.
AIR LEAK AT AIR VALVE STEM.
This could be caused by a slack or worn Air Valve Packing (16) or a worn Air Valve Stem (11) . Remove Air Valve Cap (7) , Air
Valve Spring (1) and Valve Head (12) leaving Air Valve Stem (11) in position. With Key (18) engage Air Packing Screw (17) and
tighten until the Valve Stem is lightly gripped by the Air Valve Packing (16) but free to move easily. This will be easier to check if
the trigger is removed. If this fails to cure the leak replace packing (16) and stem (11), adjust after replacement.
AIR LEAKING THROUGH THE GUN
This can be caused by dirt on the air valve seat or worn air valve. To correct, remove Air Valve Cap (7) take out Air Valve Spring
(1) and the Valve Head (12). Clean these parts and the seat in the body of the gun, replacing air valve (12) if worn.
PAINT LEAKING AT NEEDLE GLAND SEAL
Tighten Material Packing Screw (13), do not overtighten as this may cause the needle to stick. To replace Seal unscerw
Material Valve Control Screw (19) , remove Material Spring (2) and Material Needle Valve (5). Unscrew Material Packing Screw
(13) and take out old packing. Repack with Packing Washer (23) then replace material packing screw then adjust to seal
correctly.
MAINTENANCE & FAULT FINDING


